Netgear WG111v3 WG111v3 User Manual - Page 28
Joining a Network, Selecting a Network - setup
 |
View all Netgear WG111v3 manuals
Add to My Manuals
Save this manual to your list of manuals |
Page 28 highlights
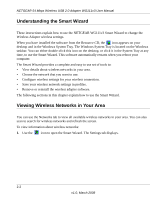
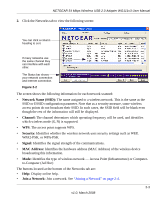
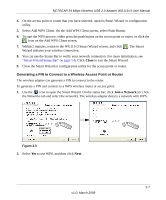
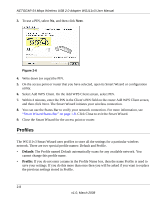
NETGEAR 54 Mbps Wireless USB 2.0 Adapter WG111v3 User Manual • Connect: Connect to the network that you selected. • Scan: Check for wireless networks. Clicking Scan refreshes the screen. • Close: Close the window of the Wizard. Joining a Network During installation, the wireless adapter either connects to a wireless access point or router, or lists the available networks to let you select a network. After installation you can use the Join a Network button or the Networks tab at any time to connect to another access point or router or to view the available networks and select one: • If none of the wireless access points or routers in the network support WPS, or if you prefer to manually select a network, see "Selecting a Network." • If a wireless access point or router in the network supports Wi-Fi Protected Setup (WPS), see "Using WPS to Connect to a Wireless Network. Selecting a Network During installation, the wireless adapter connects to a wireless access point or router, or lists the available networks to let you select a network. After installation you can use the Join a Network button or the Networks tab at any time to either connect to another access point or router or to view the available networks and select one: Note: Unless you are using WPS, make sure that you know the security settings for the network that you want to use. For example, if WEP is used then you need to know the WEP key. If you use secure networks frequently, set up profiles for each network with the wireless network and security settings. Depending on whether or not a wireless access point or router in the network supports Wi-Fi Protected Setup (WPS), the Smart Wizard presents different screens. To join a network: 1. Use the icon to open the Smart Wizard. On the status bar, click Join a Network. 2. If the Smart Wizard detects an access point or router with WPS, it displays the WPS screen. To connect manually (not using WPS), select No, and click Next. 2-4 v1.0, March 2008
-
 1
1 -
2
-
3
-
4
-
5
-
6
-
7
-
8
-
9
-
10
-
11
-
12
-
13
-
14
-
15
-
16
-
17
-
18
-
19
-
20
-
21
-
22
-
 23
23 -
 24
24 -
 25
25 -
 26
26 -
 27
27 -
 28
28 -
 29
29 -
 30
30 -
 31
31 -
 32
32 -
 33
33 -
34
-
35
-
36
-
37
-
38
-
39
-
40
-
41
-
42
-
43
-
44
-
45
-
46
-
47
-
48
-
49
-
50
-
51
-
52
-
53
-
54
 |
 |