Netgear WG111v3 WG111v3 User Manual - Page 48
Ad Hoc Mode is Not Working Correctly, Initiate Ad Hoc, Apply, Network Name SSID - software version 2 0 0
 |
View all Netgear WG111v3 manuals
Add to My Manuals
Save this manual to your list of manuals |
Page 48 highlights
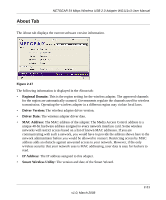
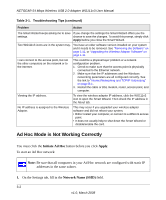
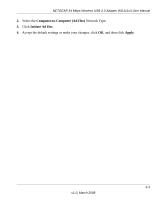
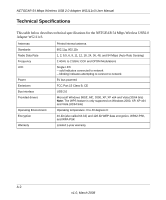
NETGEAR 54 Mbps Wireless USB 2.0 Adapter WG111v3 User Manual Table 3-1. Troubleshooting Tips (continued) Problem Action The Smart Wizard keeps asking me to save If you change the settings the Smart Wizard offers you the settings. chance to save the changes. To avoid this prompt, simply click Apply before you close the Smart Wizard. Two WG111v3 icons are in the system tray. You have an older software version installed on your system and it needs to be removed. See "Removing the Software" on page 1-11, or "Upgrading the Wireless Adapter Software" on page 1-11. I can connect to the access point, but not the other computers on the network or to the Internet. This could be a physical layer problem or a network configuration problem. 1. Check to make sure that the access point is physically connected to the Ethernet network. 2. Make sure that the IP addresses and the Windows networking parameters are all configured correctly. See the link to "Internet Networking and TCP/IP Addressing" on page B-1. 3. Restart the cable or DSL modem, router, access point, and computer. Viewing the IP address. To view the wireless adapter IP address, click the WG111v3 icon to open the Smart Wizard. Then check the IP address in the About tab. No IP address is assigned to the Wireless Adapter. This may occur if you upgraded your wireless adapter software and did not reboot your system. • Either restart your computer, or connect to a different access point. • It does not usually help to shut down the Smart Wizard or disable/enable the card. Ad Hoc Mode is Not Working Correctly You must click the Initiate Ad Hoc button before you click Apply. To start an Ad Hoc network: Note: Be sure that all computers in your Ad Hoc network are configured with static IP addresses in the same subnet. 1. On the Settings tab, fill in the Network Name (SSID) field. 3-2 v1.0, March 2008
-
 1
1 -
2
-
3
-
4
-
5
-
6
-
7
-
8
-
9
-
10
-
11
-
12
-
13
-
14
-
15
-
16
-
17
-
18
-
19
-
20
-
21
-
22
-
23
-
24
-
25
-
26
-
27
-
28
-
29
-
30
-
31
-
32
-
33
-
34
-
35
-
36
-
37
-
38
-
39
-
40
-
41
-
42
-
 43
43 -
 44
44 -
 45
45 -
 46
46 -
 47
47 -
 48
48 -
 49
49 -
 50
50 -
 51
51 -
 52
52 -
 53
53 -
54
 |
 |