Netgear WG111v3 WG111v3 User Manual - Page 41
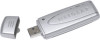
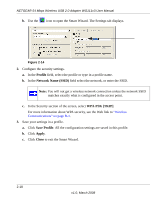
Setting up WPA-PSK Security, Profile, Network Name SSID, WPA2-PSK [AES], Save Profile, Apply, Close
 |
View all Netgear WG111v3 manuals
Add to My Manuals
Save this manual to your list of manuals |
Page 41 highlights
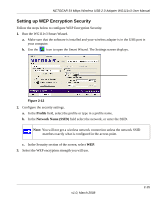
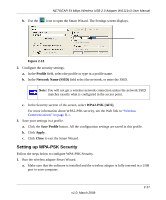
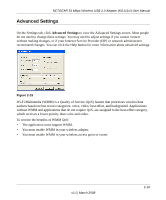
NETGEAR 54 Mbps Wireless USB 2.0 Adapter WG111v3 User Manual b. Use the icon to open the Smart Wizard. The Settings screen displays. Figure 2-13 2. Configure the security settings. a. In the Profile field, select the profile or type in a profile name. b. In the Network Name (SSID) field select the network, or enter the SSID. Note: You will not get a wireless network connection unless the network SSID matches exactly what is configured in the access point. c. In the Security section of the screen, select WPA2-PSK [AES]. For more information about WPA2-PSK security, see the Web link to "Wireless Communications" on page B-1. 3. Save your settings in a profile. a. Click the Save Profile button. All the configuration settings are saved in this profile. b. Click Apply. c. Click Close to exit the Smart Wizard. Setting up WPA-PSK Security Follow the steps below to configure WPA-PSK Security. 1. Run the wireless adapter Smart Wizard. a. Make sure that the software is installed and the wireless adapter is fully inserted in a USB port in your computer. v1.0, March 2008 2-17
-
 1
1 -
2
-
3
-
4
-
5
-
6
-
7
-
8
-
9
-
10
-
11
-
12
-
13
-
14
-
15
-
16
-
17
-
18
-
19
-
20
-
21
-
22
-
23
-
24
-
25
-
26
-
27
-
28
-
29
-
30
-
31
-
32
-
33
-
34
-
35
-
 36
36 -
 37
37 -
 38
38 -
 39
39 -
 40
40 -
 41
41 -
 42
42 -
 43
43 -
 44
44 -
 45
45 -
 46
46 -
47
-
48
-
49
-
50
-
51
-
52
-
53
-
54
 |
 |