Netgear WNDR4700 User Manual
Netgear WNDR4700 Manual
 |
View all Netgear WNDR4700 manuals
Add to My Manuals
Save this manual to your list of manuals |
Netgear WNDR4700 manual content summary:
- Netgear WNDR4700 | User Manual - Page 1
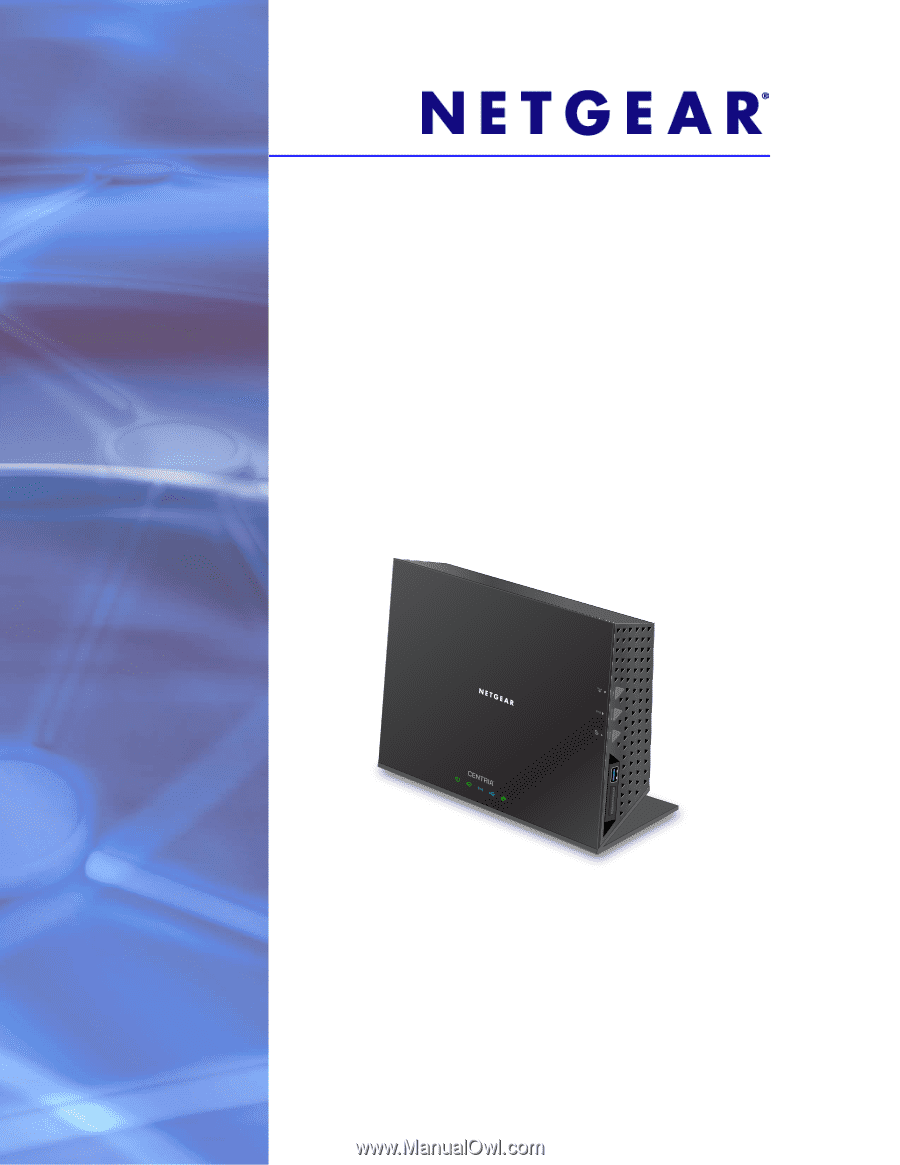
CENTRIA User Manual Models: WNDR4700 WNDR4720 350 East Plumeria Drive San Jose, CA 95134 USA September 2014 202-11016-03 v1.0 - Netgear WNDR4700 | User Manual - Page 2
. For product updates and web support, visit http://support.netgear.com. Phone (US & Canada only): 1-888-NETGEAR. Phone (Other Countries): Check the list of phone numbers at http://support.netgear.com/general/contact/default.aspx. Trademarks NETGEAR, the NETGEAR logo, and Connect with Innovation are - Netgear WNDR4700 | User Manual - Page 3
17 Remove a Hard Disk Drive 17 Requirements for Optional USB Devices 19 Chapter 2 Getting Started with NETGEAR genie Router Setup Preparation 21 Use Standard TCP/IP Properties for DHCP 21 Gather ISP Information 21 Wireless Devices and Security Settings 21 Types of Logins and Access 21 Use - Netgear WNDR4700 | User Manual - Page 4
Service (QoS) Setup 48 Chapter 5 Storage ReadySHARE Access 53 User Setup 53 File-Sharing Scenarios 54 Storage Basic Settings 56 Add or Edit a Network Folder 57 Storage Advanced Settings 58 Safely Remove a USB or Internal Hard Drive 59 Media Server 60 Specify Approved USB Devices 60 Connect - Netgear WNDR4700 | User Manual - Page 5
CENTRIA WNDR4700/WNDR4720 Security Event Email Notifications 87 Chapter 8 Administration Upgrade the Firmware 89 View Router Status 90 Router Information 90 Internet Port (WAN) Setup 91 Wireless Settings (2.4 GHz and 5 GHz 93 View Logs of Web Access or Attempted Web Access 94 Manage the - Netgear WNDR4700 | User Manual - Page 6
130 Cannot Log In to CENTRIA 131 Cannot Access the Internet 131 Troubleshoot PPPoE 133 Troubleshooting Internet Browsing 133 Changes Not Saved 134 Wireless Connectivity 134 Wireless Signal Strength 134 Restore the Factory Settings and Password 135 Troubleshoot Your Network Using the Ping - Netgear WNDR4700 | User Manual - Page 7
. Enjoy high-performance connectivity throughout your home with your 900 Mbps, dual-band WiFi router. CENTRIA comes in two models: WNDR4720, which comes with a 2 TB hard drive, and WNDR4700, for which you provide your own hard drive. You can upgrade the hard disk drive at any time. Both models have - Netgear WNDR4700 | User Manual - Page 8
CENTRIA WNDR4700/WNDR4720 Unpack CENTRIA Open the box and remove the router, cables, and installation guide. CENTRIA Hard disk drive (HDD) included only with model WNDR4720 Tray for 0.75-inch HDD only Note: If you purchased model WNDR4720, your hard disk drive was shipped external to CENTRIA - Netgear WNDR4700 | User Manual - Page 9
CENTRIA WNDR4700/WNDR4720 • Near the center of the area where your computers and other devices operate and preferably within line of sight to your wireless devices. • So it is accessible to an AC power outlet and near Ethernet cables for wired computers. • In an elevated location such as a high - Netgear WNDR4700 | User Manual - Page 10
. The firmware is corrupted. Visit www.netgear.com/support. • Off. Power is not supplied to CENTRIA. Internet • Solid green. The Internet connection is ready. • Solid amber. The Ethernet cable connection to the modem has been detected. • Off. No Ethernet cable is connected to CENTRIA. Wireless - Netgear WNDR4700 | User Manual - Page 11
(Internet) port Figure 3. CENTRIA, rear view Reset Power On/Off See Factory Settings on page 138 for information about restoring factory settings. Label The label on the bottom of the router shows the login information, MAC address, and serial number. Default access information Figure 4. The - Netgear WNDR4700 | User Manual - Page 12
CENTRIA WNDR4700/WNDR4720 Install CENTRIA To view the CENTRIA Installation video, visit http://kb.netgear.com/app/answers/detail/a_id/21753/~/centria-hard-drive-installation-video, or use the following QR code. To install CENTRIA: Make sure that your Internet service is working before you install - Netgear WNDR4700 | User Manual - Page 13
CENTRIA WNDR4700/WNDR4720 a. Plug in and turn on your modem. (Replace the batteries if you removed them previously.) 2 Router b a Modem b. With the yellow Ethernet cable that came with the router, connect your modem to the Internet port of your router. 3. Install a hard disk drive (optional). 3 For - Netgear WNDR4700 | User Manual - Page 14
CENTRIA WNDR4700/WNDR4720 5. Connect a computer. Router Modem 5 You can use an Ethernet cable (not included) or connect wirelessly. • Use an Ethernet cable to connect your computer to an Ethernet port on your Router. • Or, connect wirelessly by using the preset SSID and preset WiFi password on - Netgear WNDR4700 | User Manual - Page 15
correct configuration information. 3. Read Chapter 10, Troubleshooting. If problems persist, register your NETGEAR product and contact NETGEAR technical support. Install an Optional Internal Hard Disk Drive (HDD) CENTRIA supports an optional HDD. The router supports 3.5-inch SATA HDDs (both 0.75 and - Netgear WNDR4700 | User Manual - Page 16
CENTRIA WNDR4700/WNDR4720 3. If you are installing a 0.75-inch-thick HDD (this is uncommon), insert the tray into the router. Follow the THIS SIDE UP and the BACK OF PRODUCT signs on the tray to place it in the correct orientation. 4. Insert the HDD. The - Netgear WNDR4700 | User Manual - Page 17
CAUTION: To protect your equipment, always turn off the router before removing or inserting a hard disk drive (HDD). To remove the hard disk drive (HDD): 1. Power off the router with the Power On/Off button. 2. Open the router side door and release the internal latch as shown. Hardware Setup 17 - Netgear WNDR4700 | User Manual - Page 18
CENTRIA WNDR4700/WNDR4720 3. Grab the top and bottom of the HDD with your fingers and pull to remove it. 4. If you removed a 0.75-inch HDD, remove the tray from the router. 5. Place the latch back to the left (a) so that the router side door can be closed (b). a b Hardware Setup 18 - Netgear WNDR4700 | User Manual - Page 19
Speed/Sec 5,000 Mbits 480 Mbits 12 Mbits The router works with most USB-compliant external flash and hard drives. For the most up-to-date list of USB drives that the router supports, go to: http://kbserver.netgear.com/readyshare The router supports both read and write for FAT16, FAT32, NTFS, Linux - Netgear WNDR4700 | User Manual - Page 20
with NETGEAR genie 2 Connecting to CENTRIA This chapter explains how to use NETGEAR genie to set up your router after you complete cabling as described in the installation guide and in the previous chapter. This chapter contains the following sections: • Router Setup Preparation • Types of Logins - Netgear WNDR4700 | User Manual - Page 21
is the wireless security supported by the router. Types of Logins and Access Different types of logins have different purposes: It is important that you understand the difference so that you know which login to use when. • Router login logs you in to the router interface from NETGEAR genie. See - Netgear WNDR4700 | User Manual - Page 22
the router user name and password for the router password, both in lowercase letters. Note: The router user name and password are different from the user name and password for logging in to your Internet connection. See Types of Logins and Access on page 21 for more information. Upgrade the Firmware - Netgear WNDR4700 | User Manual - Page 23
to your network. • Parental Controls. Download and set up parental controls to prevent objectionable content from reaching your computers. • ReadySHARE. Manage storage on the internal hard disk drive (HDD) and USB devices that you connect to the router USB drive. • Guest Network. Set up a guest - Netgear WNDR4700 | User Manual - Page 24
typing its password. Instead, press a button or enter a PIN. NETGEAR calls WPS Push 'N' Connect. Some older WiFi equipment is not compatible with WPS. WPS works only with WPA2 or WPA wireless security. To use WPS to join the wireless network: 1. Press the WPS button on the router side panel - Netgear WNDR4700 | User Manual - Page 25
NETGEAR genie App User Manual for details about the genie apps. Retrieve wireless password About genie Menu Language Dashboard (Click to view details) Support The genie app can help you with the following: • Automatically repair common wireless network problems. • Have easy access to router - Netgear WNDR4700 | User Manual - Page 26
3. NETGEAR genie Basic Settings Your Internet connection and net work This chapter contains the following sections: • Basic Home Screen • Internet Setup • Attached Devices • Parental Controls • ReadySHARE Storage • Basic Wireless Settings • Guest Networks 3 26 - Netgear WNDR4700 | User Manual - Page 27
CENTRIA WNDR4700/WNDR4720 Basic Home Screen The genie Basic Home screen is shown in the following figure: Internet Setup The Internet Setup screen is where you view or change basic ISP information. You can use the Setup Wizard to detect the Internet connection and automatically set up the router. - Netgear WNDR4700 | User Manual - Page 28
. If you want to change the login time-out, enter a new value in minutes. • No. Enter the account and domain names, only if needed. 2. Enter the settings for the IP address and DNS server. The default settings usually work fine. If you have problems with your connection, check to make sure that the - Netgear WNDR4700 | User Manual - Page 29
screen: From the Basic Home screen, select Attached Devices to display the following screen: Wired devices are connected to the router with Ethernet cables. Wireless devices have joined the wireless network. • # (number). The order in which the device joined the network. • IP Address. The IP address - Netgear WNDR4700 | User Manual - Page 30
CENTRIA WNDR4700/WNDR4720 Parental Controls The first time you select Parental Controls from the Basic Home screen, your browser goes to the Parental Controls website. You can learn more about Live Parental Controls or download the application. To set up Live Parental Controls: 1. Select Parental - Netgear WNDR4700 | User Manual - Page 31
CENTRIA WNDR4700/WNDR4720 After installation, Live Parental Controls automatically starts. 5. Click Next, read the note, and click Next again to proceed. account, select the No radio button. After you log on or create your account, the filtering level screen displays: NETGEAR genie Basic Settings 31 - Netgear WNDR4700 | User Manual - Page 32
button. Parental controls are now set up for the router. The dashboard shows Parental Controls as enabled. ReadySHARE Storage You can view information about an internal hard disk drive (HDD) or a USB storage device that is connected to the router's USB port here. From the Basic Home screen, select - Netgear WNDR4700 | User Manual - Page 33
folder. The user name (account name) for All - no password is guest. The password for admin is the same one that you use to log in to the router. By default, it is password. Folder Name. Full path of the network folder. Volume Name. Volume name from the storage device (either USB drive or HDD - Netgear WNDR4700 | User Manual - Page 34
Devices screen? If it does, then it is connected to the network. • If you are not sure what the network name (SSID) or password is, look on the label on the bottom of your router. Wireless Settings Screen Fields Region Selection The location where the router is used. Select from the countries in the - Netgear WNDR4700 | User Manual - Page 35
CENTRIA WNDR4700/WNDR4720 Enable SSID Broadcast. This setting allows the router to broadcast its SSID so wireless stations can see this wireless name (SSID) in their scanned network lists. This check box is selected by default. To turn off the SSID broadcast, clear the Enable SSID Broadcast check - Netgear WNDR4700 | User Manual - Page 36
. Enable SSID Broadcast. If this check box is selected, the wireless access point broadcasts its name (SSID) to all wireless stations. Stations with no SSID can adopt the correct SSID for connections to this access point. Allow guest to access My Local Network. If this check box is selected, anyone - Netgear WNDR4700 | User Manual - Page 37
data encryption keys. Then it dynamically varies the encryption key. WPA-PSK uses Temporal Key Integrity Protocol (TKIP) data encryption, implements most of the IEEE 802.11i standard, and works with all wireless network interface cards, but not all wireless access points. WPA2-PSK is stronger than - Netgear WNDR4700 | User Manual - Page 38
Specifying custom settings This chapter contains the following sections: • NETGEAR genie Advanced Home Screen • Setup Wizard • WPS Wizard • Setup Menu • WAN Setup • LAN Setup • Quality of Service (QoS) Setup Some selections on the Advanced Home screen are described in separate chapters: • Storage - Netgear WNDR4700 | User Manual - Page 39
CENTRIA WNDR4700/WNDR4720 NETGEAR genie Advanced Home Screen The genie Advanced Home dashboard presents status information. The content is the same as what is on the Router up your router. The Setup Wizard is not the same as the genie screens that display the first time you connect to your router to - Netgear WNDR4700 | User Manual - Page 40
CENTRIA WNDR4700/WNDR4720 3. Select Yes and click Next. The Setup Wizard searches your Internet connection for servers and protocols to determine your ISP configuration. The following screen displays: WPS Wizard The WPS Wizard helps you add a WPS-capable client device (a wireless device or computer) - Netgear WNDR4700 | User Manual - Page 41
CENTRIA WNDR4700/WNDR4720 Within 2 minutes, go to the client device and use its WPS software to join the network without entering a password. The router attempts to add the WPS-capable device. The WPS LED on the front of the router blinks green. When the router establishes a WPS connection, the LED - Netgear WNDR4700 | User Manual - Page 42
CENTRIA WNDR4700/WNDR4720 WAN Setup The WAN Setup screen lets you configure a DMZ (demilitarized zone) server, change the maximum transmit unit (MTU) size, and enable the router to respond to a ping on the WAN (Internet) port. To view or change the WAN settings: Select Advanced > Setup > WAN Setup - Netgear WNDR4700 | User Manual - Page 43
, you can have the router forward the traffic to one computer on your network. This computer is called the default DMZ server. To set up a default DMZ server: 1. On the WAN Setup screen, select the Default DMZ Server check box. 2. Type the IP address. 3. Click Apply. NETGEAR genie Advanced Home 43 - Netgear WNDR4700 | User Manual - Page 44
just the default value. In some situations, changing the value fixes one problem but causes another. Leave the MTU unchanged unless one of these situations occurs: • You have problems connecting to your ISP or other Internet service, and the technical support of either the ISP or NETGEAR recommends - Netgear WNDR4700 | User Manual - Page 45
CENTRIA WNDR4700/WNDR4720 Table 3. Common MTU sizes (Continued) MTU Application 1460 Usable by AOL if you do not have large email attachments.. 1436 Used in PPTP environments or with VPN. 1400 Maximum size for AOL DSL. 576 Typical value to connect to dial-up ISPs. To change the MTU - Netgear WNDR4700 | User Manual - Page 46
CENTRIA WNDR4700/WNDR4720 1. Select Advanced > Setup > LAN Setup to display the following screen: 2. Enter the settings that you want to customize. that the router sends. It recognizes both formats when receiving. By default, the RIP function is disabled. RIP-1 is universally supported. It is - Netgear WNDR4700 | User Manual - Page 47
address each time it accesses the router's DHCP server. Assign reserved IP addresses to servers that require permanent IP settings. See Address Reservation on page 48. Use the Router as a DHCP Server By default, the router acts as a DHCP server. The router assigns IP, DNS server, and default gateway - Netgear WNDR4700 | User Manual - Page 48
CENTRIA WNDR4700/WNDR4720 Address Reservation When you specify a reserved IP address for a computer on the LAN, that computer always receives the same IP address each time it accesses the router's DHCP server. Reserved IP addresses should be assigned to computers or servers that require permanent IP - Netgear WNDR4700 | User Manual - Page 49
CENTRIA WNDR4700/WNDR4720 Enable WMM QoS for Wireless Multimedia Applications The CENTRIA supports Wi-Fi Multimedia Quality of Service (WMM QoS) to prioritize wireless voice and video traffic over the wireless link. WMM QoS provides prioritization of wireless data packets from different applications - Netgear WNDR4700 | User Manual - Page 50
CENTRIA WNDR4700 the Connection Type access Router LAN Port To create a QoS policy for a device connected to one of the router 's LAN ports: 1. Select Advanced > Setup > QoS Setup to display the QoS Setup screen. 2. Select the Turn Internet Access Internet access for - Netgear WNDR4700 | User Manual - Page 51
CENTRIA WNDR4700/WNDR4720 QoS for , then fill in these fields manually. 5. From the Priority list, select the priority for Internet access for this device's traffic reelative to edit the QoS policy. Follow the instructions in the preceding sections to change the policy settings. 3. Click Apply - Netgear WNDR4700 | User Manual - Page 52
not connect computers, USB modems, CD drives, or DVD drives to the router USB port. This chapter contains the following sections: • ReadySHARE Access • User Setup • File-Sharing Scenarios • Storage Basic Settings • Storage Advanced Settings • Safely Remove a USB or Internal Hard Drive • Media Server - Netgear WNDR4700 | User Manual - Page 53
CENTRIA WNDR4700/WNDR4720 ReadySHARE Access ReadySHARE lets you access and share the HDD inside the router or a USB drive connected the router USB port. (If your USB device has special drivers, it is not compatible.) When you connect the USB device, it might take up to 2 minutes before it is ready - Netgear WNDR4700 | User Manual - Page 54
2. Click Add. CENTRIA WNDR4700/WNDR4720 3. In the User Name field, type a name. 4. Type the password in the Password field and in the Re-enter Password field to confirm it. 5. Click the Add button when finished. File-Sharing Scenarios You can share files on the USB drive for a wide variety of - Netgear WNDR4700 | User Manual - Page 55
receiving the files uses the guest user account and enters the password. (FTP requires that you type something in the password field.) • Be sure to select the FTP (via Internet) check box in the USB Storage (Advanced Settings) screen. This option supports both downloading and uploading of files. You - Netgear WNDR4700 | User Manual - Page 56
CENTRIA WNDR4700/WNDR4720 Storage Basic Settings You can view or edit basic settings for an internal hard disk drive (HDD) in the router and a USB storage device attached to your router. To go to Storage Basic Settings: Select Basic > ReadySHARE. By default, the HDD and USB storage device are - Netgear WNDR4700 | User Manual - Page 57
or change the read access or write access from All - no password to admin. The user name (account name) for All - no password is guest. The password for admin is the same one that is used to log in to the router. By default, it is password. 4. Click Apply for your changes to take effect. Storage 57 - Netgear WNDR4700 | User Manual - Page 58
over the Internet. This setting supports file uploading only. FTP. Disabled by default. FTP (via Internet). Disabled by default. If you enable this setting, remote users can access the USB drive through FTP over the Internet. This setting supports both downloading and uploading of files. Storage 58 - Netgear WNDR4700 | User Manual - Page 59
folder: All - no password (the default) allows all users to access the network folder. The password for admin is the same one that you use to log in to the router. • Folder Name. Full path of the network folder. • Volume Name. Volume name from the storage device (either USB drive or HDD). • Total - Netgear WNDR4700 | User Manual - Page 60
Storage > Media Server to display the following screen: By default the Enable Media Server check box and the Automatic (when new files are added) radio button are selected. When these options are selected, the router scans for media files whenever new files are added to the ReadySHARE USB hard drive - Netgear WNDR4700 | User Manual - Page 61
Navigator. For example: ftp://10.1.65.4 If you are using Dynamic DNS, you can type the DNS name rather than the IP address. 2. Type the account name and password that has access rights to the USB drive. The user name (account name) for All - no password is guest. 3. The directories of the USB - Netgear WNDR4700 | User Manual - Page 62
CENTRIA WNDR4700/WNDR4720 Back Up Your Computers You can back up your computers onto the CENTRIA internal SATA hard disk drive or to a connected external USB storage drive. You can use a formatted HDD or you can format an HDD from the router menu (see Format the HDD on page 72). Note: For - Netgear WNDR4700 | User Manual - Page 63
CENTRIA WNDR4700/WNDR4720 To back up a Windows PC on to an HDD in the router: The first time you back up your PC, the backup could take a while to complete. During the backup you can continue to use your computer. 1. Install the genie app on each PC by downloading the software from www.netgear.com - Netgear WNDR4700 | User Manual - Page 64
enter admin as the user name and password as the password. 5. Click Connect. After connecting, you can list connected devices. One extra device, called admin, displays whenever you log in as admin. 6. From the Apple menu, select System Preferences, and then open Time Machine. 7. Click Select Disk - Netgear WNDR4700 | User Manual - Page 65
CENTRIA WNDR4700/WNDR4720 9. Enter the password (password), and the backup begins. Time Machine USB Drive Backup If you are already using Time Machine software with your USB hard drive, you can skip this section. To set up a USB drive for Time Machine: 1. Physically connect the USB hard drive to - Netgear WNDR4700 | User Manual - Page 66
CENTRIA WNDR4700/WNDR4720 3. Open the Disk Utility and format your drive, as shown here. The router supports GUID and MBR partitions only. To see how to change the partition scheme, see Change the Partition Scheme on page 69. You can now use Time Machine wirelessly by connecting the USB hard drive - Netgear WNDR4700 | User Manual - Page 67
CENTRIA WNDR4700/WNDR4720 4. Click Connect. After connecting, you can list connected devices. One extra device, called admin, displays whenever you log in as admin. 5. From the Apple menu, select System Preferences, and then open Time Machine. 6. Click Select Disk and select the backup disk. 7. - Netgear WNDR4700 | User Manual - Page 68
CENTRIA WNDR4700/WNDR4720 c. On the Energy Saver screen, select Wake for Ethernet network access. d. Click the Back arrow to exit this screen. Your changes are saved. 5. Modify your Security Security screen, leave the Log out after minutes of inactivity check box cleared (not selected). Storage 68 - Netgear WNDR4700 | User Manual - Page 69
CENTRIA WNDR4700/WNDR4720 Change the Partition Scheme To run with the router, the partition scheme on your Mac has to be set to either GUID or MBR. To make sure the partition scheme is set to one of these supported schemes: 1. Open the Disk Utility and select your USB drive. 2. Select the - Netgear WNDR4700 | User Manual - Page 70
an HDD: 1. Obtain a compatible HDD. It can be preformatted or unformatted. For a list of HDDs that are compatible with the router, visit www.netgear.com/CENTRIA_HD. 2. Select Advanced > USB Storage > Advanced Settings. 3. Click the Safely Remove USB or Internal Hard Drive button. Storage 70 - Netgear WNDR4700 | User Manual - Page 71
CENTRIA WNDR4700/WNDR4720 4. Use the Power On/Off button to turn off the router. 5. Open the router side door and release the internal latch as shown. insert the tray into the router. Follow the THIS SIDE UP and the BACK OF PRODUCT signs on the tray to place it in the correct orientation. Storage 71 - Netgear WNDR4700 | User Manual - Page 72
, the router detects it and prompts you to format the HDD. You can follow the prompts to do so, or wait until later and log in to the router to format the HDD from the router menu. CAUTION: Formatting the internal disk drive erases all files and folders that are stored on it. Storage 72 - Netgear WNDR4700 | User Manual - Page 73
CENTRIA WNDR4700/WNDR4720 To format the HDD: 1. Select Advanced > Storage > Advanced Settings. 2. Click the Format Internal Disk button. Storage 73 - Netgear WNDR4700 | User Manual - Page 74
Printer is compatible with Macs and Windows PCs. It lets you connect a USB printer to the router's USB port, and access it wirelessly. This chapter contains the following sections: • ReadySHARE Printer • USB Control Center Utility For more information about ReadySHARE features, visit www.netgear.com - Netgear WNDR4700 | User Manual - Page 75
CENTRIA WNDR4700/WNDR4720 ReadySHARE Printer You can connect a USB printer to the router's USB port, and share it among Windows and Mac computers on the network. To set up ReadySHARE Printer: 1. Connect the USB printer to the router's USB port with a USB printer cable. 2. Install the USB printer - Netgear WNDR4700 | User Manual - Page 76
CENTRIA WNDR4700/WNDR4720 4. Follow the instructions to install the NETGEAR USB Control Center utility. 5. After you have installed the utility, select the language. ReadySHARE Printer 76 - Netgear WNDR4700 | User Manual - Page 77
CENTRIA WNDR4700/WNDR4720 6. The first time you access the utility, you are asked to select the printer and click the Connect button. Once the connection is established, the status changes to Manually connected by xxx. You can click the Disconnect button at any time to release the connection. The - Netgear WNDR4700 | User Manual - Page 78
CENTRIA WNDR4700/WNDR4720 • You can set the value for the default time-out time from Tools > Configuration. • The USB Control Center utility must be running for the computer to be able to print to the USB printer attached to the router work. 7. If your printer supports scanning, make sure that the - Netgear WNDR4700 | User Manual - Page 79
computer that is connected to the USB port on your router. The utility allows you to control a printer and a scanner. You have to install the utility on each computer on the network from which you want to control the device. You can download this utility for PC and Mac at www.netgear.com/landing - Netgear WNDR4700 | User Manual - Page 80
CENTRIA WNDR4700/WNDR4720 Control Center Configuration Select Tools > Configuration to display the following screen: Automatically execute when logging on Windows. Enable this utility to start automatically when you are logged in to Windows. Timeout. Specify the time-out value for holding the USB - Netgear WNDR4700 | User Manual - Page 81
CENTRIA WNDR4700/WNDR4720 Once the printer shows Available status, it is no longer grayed out in a Paused state in the Windows Printers window. This USB printer is ready. The utility does not need to hold the connection of this USB printer. Once there is any print job for this printer, the USB - Netgear WNDR4700 | User Manual - Page 82
7. Security 7 Keeping unwanted content out of your network This chapter explains how to use the basic firewall features of the router to prevent objectionable content from reaching the computers and devices on your network. This chapter includes the following sections: • Keyword Blocking of HTTP - Netgear WNDR4700 | User Manual - Page 83
CENTRIA WNDR4700/WNDR4720 Keyword Blocking of HTTP Traffic Use keyword blocking to prevent certain types of HTTP traffic from accessing Turn on keyword blocking all the time, independent of the Schedule screen. Keyword, and click Apply. The keyword list supports up to 32 entries. Here are some - Netgear WNDR4700 | User Manual - Page 84
CENTRIA WNDR4700/WNDR4720 Block Services (Port Filtering) Services are functions that server computers perform at the request of client computers. For example, web servers serve web pages, time servers serve time and date . Although the router already holds a list of many service port numbers, - Netgear WNDR4700 | User Manual - Page 85
CENTRIA WNDR4700/WNDR4720 3. Click Add to add a service. The Block Services Setup screen displays: 4. From the Service Type list, select the application or service to allow or block. The list already displays several common services, but you are not limited to these choices. To add any additional - Netgear WNDR4700 | User Manual - Page 86
CENTRIA WNDR4700/WNDR4720 Schedule Blocking You can specify the days and time that you want to block Internet access. To schedule blocking: 1. Select Advanced > Security > Schedule to display the following screen: 2. Set up the schedule for blocking keywords and services. • Days to Block. Select - Netgear WNDR4700 | User Manual - Page 87
CENTRIA WNDR4700 display the following screen: 2. To receive email logs and alerts from the router, select the Turn Email Notification On check box. 3. In the Your mail server requires authentication check box. Fill in the User Name and Password fields for the outgoing email server. 6. You can - Netgear WNDR4700 | User Manual - Page 88
your router over the Internet. For information about monitoring Internet traffic, see Traffic Meter on page 125. This chapter includes the following sections: • Upgrade the Firmware • View Router Status • View Logs of Web Access or Attempted Web Access • Manage the Configuration File • Set Password - Netgear WNDR4700 | User Manual - Page 89
CENTRIA WNDR4700/WNDR4720 Upgrade the Firmware The router firmware (routing software) is stored in flash memory. You can update the firmware from the Administration menu on the Advanced tab. You might see a message at the top of the genie screens when new firmware is available for your product. You - Netgear WNDR4700 | User Manual - Page 90
following screen: Router Information Hardware Version. The router model. Firmware Version. The version of the router firmware. It changes if you upgrade the router firmware. GUI Language Version. The localized language of the user interface. LAN Port. • MAC Address. The Media Access Control address - Netgear WNDR4700 | User Manual - Page 91
System Up Time. The time elapsed since the router was last restarted. Port. The statistics for the WAN (Internet) and LAN (Ethernet) ports. For each port, the screen displays: • Status. The link status of the port. • TxPkts. The number of packets transmitted on this port since reset or manual clear - Netgear WNDR4700 | User Manual - Page 92
Dynamic Host Configuration Protocol server that provides the TCP/IP configuration for all the computers that are connected to the router. DNS Server. The IP address of the Domain Name Service server that provides translation of network names to IP addresses. Lease Obtained. The date and time when - Netgear WNDR4700 | User Manual - Page 93
CENTRIA WNDR4700/WNDR4720 Wireless Settings (2.4 GHz and 5 GHz) The following settings are displayed: Name (SSID). The wireless network name (SSID) that the router uses. The default name for 5 GHz ends in -5G to distinguish it from the 2.4 GHz network. Region. The geographic region where the router - Netgear WNDR4700 | User Manual - Page 94
to access. Up to 256 entries are stored in the log. Log entries appear only when keyword blocking is enabled and no log entries are made for the trusted user. Select Advanced > Administration > Logs. The Logs screen displays. The log screen shows the following information: • Date and time. The date - Netgear WNDR4700 | User Manual - Page 95
settings of the CENTRIA are stored within the router in a configuration file. You can back up (save) this file to your computer, restore it, or reset it to the factory default settings. Note: For information about backing up your computer onto the router's internal hard disk drive (HDD) or onto - Netgear WNDR4700 | User Manual - Page 96
CENTRIA WNDR4700/WNDR4720 Erase Under some circumstances, you might want to erase the configuration and restore the factory default settings. Some examples are if you move the router to a different network or if you have forgotten the password. You can use the Reset button on the back of the router - Netgear WNDR4700 | User Manual - Page 97
CENTRIA WNDR4700/WNDR4720 3. Click Apply to save your changes. When you use your browser to access the router, the login window displays. If password recovery is enabled, when you click Cancel, the password recovery process starts. You can then enter the saved answers to the security questions to - Netgear WNDR4700 | User Manual - Page 98
access from the Internet by IP or domain name is needed. This chapter includes the following sections: • Advanced Wireless Settings • Wireless AP • Wireless Repeating Function (WDS) • Port Forwarding and Triggering • Set Up Port Forwarding to Local Servers • Set Up Port Triggering • Dynamic DNS - Netgear WNDR4700 | User Manual - Page 99
CENTRIA WNDR4700/WNDR4720 Advanced Wireless Settings Select Advanced > Advanced Setup > Wireless Settings to display the following screen: The following settings are available in this screen: Enable Wireless Router Radio. You can completely turn off the wireless portion of the wireless router by - Netgear WNDR4700 | User Manual - Page 100
CENTRIA WNDR4700/WNDR4720 Turn off wireless signal by schedule. You can use this feature to turn off the wireless signal from your router at times when you do not need a wireless connection. For example, you could turn it off for the weekend if you leave town. WPS Settings.You can add WPS devices to - Netgear WNDR4700 | User Manual - Page 101
802.11ac WiFi connection to the first router. To set up a router as a wireless access point: 1. Make sure that your router has an Internet connection and that wireless devices can connect to it. 2. Select Advanced > Advanced Setup > Wireless AP. 3. Select the Enable Access Point Mode radio button - Netgear WNDR4700 | User Manual - Page 102
CENTRIA WNDR4700/WNDR4720 Wireless Repeating Function (WDS) You can set the CENTRIA up to be used as a wireless access point (AP). Doing this enables the router to act as a wireless repeater. A wireless repeater connects to another wireless router as a client where the network to which it connects - Netgear WNDR4700 | User Manual - Page 103
CENTRIA WNDR4700/WNDR4720 The router is always in dual-band concurrent mode, unless you turn off one radio. If you enable the wireless repeater in either radio band, the wireless base station or wireless repeater cannot be enabled in the other radio band. However, if you enable the wireless base - Netgear WNDR4700 | User Manual - Page 104
CENTRIA WNDR4700/WNDR4720 Repeater IP Address. If your router is the repeater, enter the IP address of the other access point. Disable Wireless Client Association. If your router is the repeater, selecting this check box means that wireless clients cannot associate with it. Only LAN client - Netgear WNDR4700 | User Manual - Page 105
to save your changes. Set Up a Repeater Unit Use a wired Ethernet connection to set up the repeater unit to avoid conflicts with the wireless connection to the base station. Note: If you are using the WNDR4700/WNDR4720 base station with a non-NETGEAR router as the repeater, you might need to change - Netgear WNDR4700 | User Manual - Page 106
to the Internet or share files and printers with any other wireless or wired computer or server connected to the other access point. Port Forwarding and Triggering By default, the router blocks inbound traffic from the Internet to your computers except replies to your outbound traffic. You might - Netgear WNDR4700 | User Manual - Page 107
CENTRIA WNDR4700/WNDR4720 the web page request message to www.example.com, your router stores the original information and then modifies the source information in the request message, performing Network Address Translation (NAT): • The source address is replaced with your router's public IP address. - Netgear WNDR4700 | User Manual - Page 108
CENTRIA WNDR4700/WNDR4720 An example is Internet Relay Chat (IRC). Your computer connects having observed the destination port number of 6667, your router creates an additional session entry to send any incoming the relevant user groups or news groups. Note: Only one computer at a time can use the - Netgear WNDR4700 | User Manual - Page 109
CENTRIA WNDR4700/WNDR4720 Internet to initiate a connection to a server computer on your network. Normally, your router ignores any inbound traffic that is not a response to your own outbound traffic. You can configure exceptions to this default rule by using the port forwarding feature. A typical - Netgear WNDR4700 | User Manual - Page 110
CENTRIA WNDR4700 the Port Forwarding screen to configure the router to forward specific incoming protocols to computers on service type. 2. From the Service Name list, select the service or game that you will host on your network. If the service does not appear in the list, see Add a Custom Service - Netgear WNDR4700 | User Manual - Page 111
CENTRIA WNDR4700/WNDR4720 Add a Custom Service To define a service, game, or application that does not appear in the Service Internal port. This check box is selected by default. If you want to use different ports, the router's local area network (LAN). These are private ports. The router calculates - Netgear WNDR4700 | User Manual - Page 112
name with a Dynamic DNS service, and configure your router to use the name as described in Dynamic DNS on page 114. To access your web server from the Internet, a remote user has to know the IP address that your ISP assigned. However, if you use a Dynamic DNS service, the remote user can reach your - Netgear WNDR4700 | User Manual - Page 113
CENTRIA WNDR4700 of the application or the relevant user groups or news groups. To time expires. This is required because the router cannot be sure when the application has terminated. 5. Click Add Service to display the following screen: 6. In the Service Name field, type a descriptive service - Netgear WNDR4700 | User Manual - Page 114
a private WAN IP address (such as 192.168.x.x or 10.x.x.x), the Dynamic DNS service does not work because private addresses are not routed on the Internet. Your router contains a client that can connect to the Dynamic DNS service provided by DynDNS.org. First visit their website at http://www.dyndns - Netgear WNDR4700 | User Manual - Page 115
CENTRIA WNDR4700/WNDR4720 For example, for DynDNS.org, select www.dyndns.org. 4. Type the host name (or domain name) that your Dynamic DNS service provider gave you. 5. Type the user name for your Dynamic DNS account. This is the name that you use to log in to your account, not your host name. 6. - Netgear WNDR4700 | User Manual - Page 116
CENTRIA WNDR4700/WNDR4720 To set up a static route: 1. Select Advanced > router. 8. Type a number from 1 through 15 as the metric value. This value represents the number of routers between your network and the destination. Usually, a setting of 2 or 3 works, but if this is a direct connection - Netgear WNDR4700 | User Manual - Page 117
CENTRIA WNDR4700/WNDR4720 Remote Management The remote management feature lets you upgrade or check the status of your CENTRIA over the Internet. To set up remote management: 1. Select Advanced > Advanced Setup > Remote Management. Note: Be sure to change the router's default login password to a - Netgear WNDR4700 | User Manual - Page 118
and computers, access the network and connect to other devices as needed. UPnP devices can automatically discover the services from other registered UPnP devices on the network. If you use applications such as multiplayer gaming, peer-to-peer connections, or real-time communications such as - Netgear WNDR4700 | User Manual - Page 119
the following screen: 2. Select the IPv6 connection type from the list. Your Internet service provider (ISP) can provide this information. • If your ISP did not provide details, you can select IPv6 Tunnel. • If you are not sure, select Auto Detect so that the router detects the IPv6 type that is in - Netgear WNDR4700 | User Manual - Page 120
CENTRIA WNDR4700/WNDR4720 Auto Detect Fields In the IPv6 screen, when you select Auto Detect from the drop-down list, the following screen displays. The Connection Type field indicates the connection type detected. The following fields are also included in this screen: IPv6 LAN Setup Router's IPv6 - Netgear WNDR4700 | User Manual - Page 121
CENTRIA WNDR4700/WNDR4720 router blocks this packet. This function has two modes. The default is Secured mode, which checks both TCP and UDP packets. For Open mode, the checking is applied only to the UDP connection. Auto Config In the IPv6 screen, when you select Auto Config from the drop-down list - Netgear WNDR4700 | User Manual - Page 122
CENTRIA WNDR4700/WNDR4720 6to4 Tunnel In the IPv6 screen, when you select 6to4 Tunnel from the drop-down list, the following screen displays. The following fields are included in this screen: Remote 6to4 Relay Router. The remote relay router to which your router creates the 6to4 tunnel. If your ISP - Netgear WNDR4700 | User Manual - Page 123
of the default IPv6 gateway, which is supposed to be on the router's WAN interface. Primary/Secondary DNS Server. The DNS servers that resolve IPv6 domain name records for you. If these fields are not specified, the router uses the DNS server configured for the IPv4 Internet connection on the - Netgear WNDR4700 | User Manual - Page 124
CENTRIA WNDR4700/WNDR4720 DHCP In the IPv6 screen, when you select DHCP from the drop-down list, the following screen displays. The following fields are included in this screen: User domain name for the IPv6 connection. Do not enter the domain name for the IPv4 connection here. The other settings are - Netgear WNDR4700 | User Manual - Page 125
field. Password. Type the password that you use to log in to your ISP. Service Name. If your ISP provided a service name, enter it here. Otherwise, you can leave this field blank. Connection Mode. This specifies when the router should establish the PPPoE connection. Currently the connection mode is - Netgear WNDR4700 | User Manual - Page 126
CENTRIA WNDR4700 is reached. Download only. to begin at a specific time and date. 6. Set up Traffic connection is disconnected and disabled. 7. Set up Internet Traffic Statistics to monitor the data traffic. 8. Click the Traffic Status button for an update on Internet traffic status on your router - Netgear WNDR4700 | User Manual - Page 127
http://support.netgear.com for product and contact information. This chapter contains the following sections: • Quick Tips • Troubleshooting with the LEDs • Cannot Log In to CENTRIA • Cannot Access the Internet • Changes Not Saved • Wireless Connectivity • Restore the Factory Settings and Password - Netgear WNDR4700 | User Manual - Page 128
For each powered-on computer connected to the router by an Ethernet cable, the corresponding numbered router LAN port LED is on. Hard Disk Drive (HDD) If you turn off the router when an HDD is installed, wait 2 seconds before turning it back on to give the HDD enough time to reset. If the HDD LED is - Netgear WNDR4700 | User Manual - Page 129
is interrupted, or if the router detects a problem with the firmware. If the error persists, you have a hardware problem. For recovery instructions, or help with a hardware problem, contact technical support at www.netgear.com/support. Power LED Stays Amber When the router is turned on, the Power - Netgear WNDR4700 | User Manual - Page 130
. • Press and hold the Reset button to return the router to its factory settings as explained in Restore the Factory Settings and Password on page 135. If the error persists, you might have a hardware problem and should contact technical support at www.netgear.com/support. Internet LED Is Off If - Netgear WNDR4700 | User Manual - Page 131
. The factory default login name is admin and the password is password. Make sure that Caps Lock is off when you enter this information. • If you are attempting to set up your NETGEAR router as a replacement for an ADSL gateway in your network, the router cannot perform many gateway services. For - Netgear WNDR4700 | User Manual - Page 132
from the ISP, the problem might be one of the following: • Your Internet service provider (ISP) might require a login program. Ask your ISP whether it requires PPP over Ethernet (PPPoE) or some other type of login. • If your ISP requires a login, the login name and password might be set incorrectly - Netgear WNDR4700 | User Manual - Page 133
be using an incorrect service name, user name, or password. There might be a provisioning problem with your ISP. Note: Unless you connect manually, the router does not authenticate using PPPoE until data is transmitted to the network. Troubleshooting Internet Browsing If your router can obtain an IP - Netgear WNDR4700 | User Manual - Page 134
the web browser's cache. Wireless Connectivity If you are having trouble connecting wirelessly to the router, try to isolate the problem. • Does the wireless device or computer that you are using find your wireless network? If not, check the Wireless LEDs on the front of the router. It should be lit - Netgear WNDR4700 | User Manual - Page 135
you restore the factory settings and the router fails to restart, or the green Power LED continues to blink, the unit might be defective. If the error persists, you might have a hardware problem and should contact technical support at http://www.netgear.com/support. Troubleshoot Your Network Using - Netgear WNDR4700 | User Manual - Page 136
CENTRIA WNDR4700/WNDR4720 Check that the appropriate LEDs are on for your network devices. If your router and computer are connected to a separate Ethernet switch, make sure that the link LEDs are on for the switch ports that are connected to your computer and router router is listed as the default - Netgear WNDR4700 | User Manual - Page 137
A. Supplemental Information A This appendix provides factory default settings and technical specifications for the CENTRIA WNDR4700/WNDR4720. This appendix includes the following sections: • Factory Settings • Technical Specifications 137 - Netgear WNDR4700 | User Manual - Page 138
shown in the following table. Table 4. Factory default settings Feature Default behavior Router login User login URL www.routerlogin.com or www.routerlogin.net User name (case-sensitive) admin Login password (case-sensitive) password Internet connection WAN MAC address WAN MTU size Use - Netgear WNDR4700 | User Manual - Page 139
CENTRIA WNDR4700/WNDR4720 Table 4. Factory default settings (Continued) Feature Default behavior Wireless Wireless communication Enabled SSID name See router label Security WPA2-PSK (AES) Broadcast SSID Enabled Transmission speed Auto* Country/region United States in the US, - Netgear WNDR4700 | User Manual - Page 140
CENTRIA WNDR4700/WNDR4720 Table 5. WNDR4700/WNDR4720 Router specifications (Continued) Feature LAN WAN Wireless Radio data rates Data encoding standards Maximum computers per wireless network Operating frequency range 802.11 security Description 10BASE-T or 100BASE-Tx or 1000BASE-T, RJ-45 10BASE
-
 1
1 -
 2
2 -
 3
3 -
 4
4 -
 5
5 -
 6
6 -
 7
7 -
8
-
9
-
10
-
11
-
12
-
13
-
14
-
15
-
16
-
17
-
18
-
19
-
20
-
21
-
22
-
23
-
24
-
25
-
26
-
27
-
28
-
29
-
30
-
31
-
32
-
33
-
34
-
35
-
36
-
37
-
38
-
39
-
40
-
41
-
42
-
43
-
44
-
45
-
46
-
47
-
48
-
49
-
50
-
51
-
52
-
53
-
54
-
55
-
56
-
57
-
58
-
59
-
60
-
61
-
62
-
63
-
64
-
65
-
66
-
67
-
68
-
69
-
70
-
71
-
72
-
73
-
74
-
75
-
76
-
77
-
78
-
79
-
80
-
81
-
82
-
83
-
84
-
85
-
86
-
87
-
88
-
89
-
90
-
91
-
92
-
93
-
94
-
95
-
96
-
97
-
98
-
99
-
100
-
101
-
102
-
103
-
104
-
105
-
106
-
107
-
108
-
109
-
110
-
111
-
112
-
113
-
114
-
115
-
116
-
117
-
118
-
119
-
120
-
121
-
122
-
123
-
124
-
125
-
126
-
127
-
128
-
129
-
130
-
131
-
132
-
133
-
134
-
135
-
136
-
137
-
138
-
139
-
140
 |
 |
350 East Plumeria Drive
San Jose, CA 95134
USA
September 2014
202-11016-03
v1.0
CENTRIA
User Manual
Models:
WNDR4700
WNDR4720