Netgear WNDR4700 User Manual - Page 61
Connect to the USB Drive from a Remote Computer, Access the Router’s USB Drive Remotely Using FTP
 |
View all Netgear WNDR4700 manuals
Add to My Manuals
Save this manual to your list of manuals |
Page 61 highlights
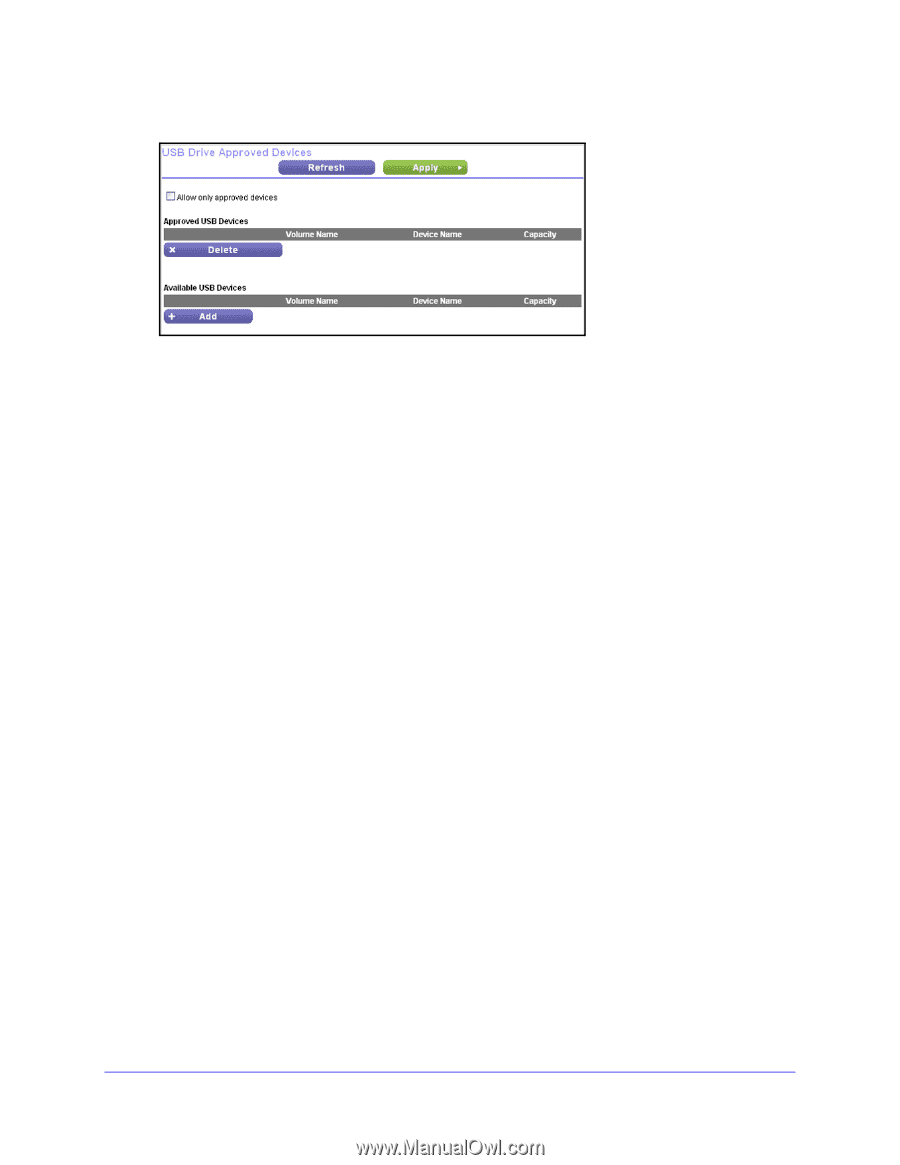
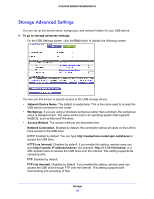
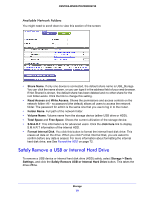
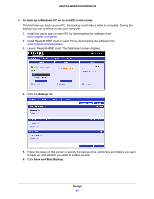
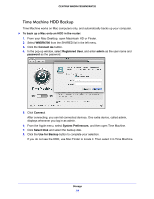
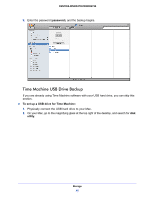
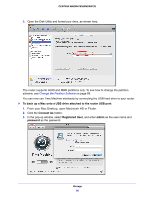
CENTRIA WNDR4700/WNDR4720 2. Click the Approved Devices button. The USB Drive Approved Devices screen displays: This screen shows the approved USB devices and the available USB devices. You can remove or add approved USB devices. 3. To add an approved USB device, select it from the Available USB Devices list, and then click Add. 4. Select the Allow only approved devices check box. 5. Click Apply so that your change takes effect. If you want to work with another USB device, first click the Safely Remove USB Device button for the currently connected USB device. Connect the other USB device and repeat this process. Connect to the USB Drive from a Remote Computer To connect to the USB drive from remote computers with a web browser, use the router's Internet port IP address. If you are using Dynamic DNS, you can type the DNS name rather than the IP address. You can view the router's Internet IP address from the dashboard on the Basic Home screen or the Advanced Home screen. Access the Router's USB Drive Remotely Using FTP To connect to the router's USB drive using a web browser: 1. Connect to the router by typing ftp:// and the Internet port IP address in the address field of Internet Explorer or Netscape Navigator. For example: ftp://10.1.65.4 If you are using Dynamic DNS, you can type the DNS name rather than the IP address. 2. Type the account name and password that has access rights to the USB drive. The user name (account name) for All - no password is guest. 3. The directories of the USB drive that your account has access to display. For example, you could see: share/partition1/directory1. You can now read and copy files from the USB directory. Storage 61
-
 1
1 -
2
-
3
-
4
-
5
-
6
-
7
-
8
-
9
-
10
-
11
-
12
-
13
-
14
-
15
-
16
-
17
-
18
-
19
-
20
-
21
-
22
-
23
-
24
-
25
-
26
-
27
-
28
-
29
-
30
-
31
-
32
-
33
-
34
-
35
-
36
-
37
-
38
-
39
-
40
-
41
-
42
-
43
-
44
-
45
-
46
-
47
-
48
-
49
-
50
-
51
-
52
-
53
-
54
-
55
-
 56
56 -
 57
57 -
 58
58 -
 59
59 -
 60
60 -
 61
61 -
 62
62 -
 63
63 -
 64
64 -
 65
65 -
 66
66 -
67
-
68
-
69
-
70
-
71
-
72
-
73
-
74
-
75
-
76
-
77
-
78
-
79
-
80
-
81
-
82
-
83
-
84
-
85
-
86
-
87
-
88
-
89
-
90
-
91
-
92
-
93
-
94
-
95
-
96
-
97
-
98
-
99
-
100
-
101
-
102
-
103
-
104
-
105
-
106
-
107
-
108
-
109
-
110
-
111
-
112
-
113
-
114
-
115
-
116
-
117
-
118
-
119
-
120
-
121
-
122
-
123
-
124
-
125
-
126
-
127
-
128
-
129
-
130
-
131
-
132
-
133
-
134
-
135
-
136
-
137
-
138
-
139
-
140
 |
 |