Oki MPS2731mc MC362w/MC562w/MPS2731mc Advanced User Guide (English) - Page 48
Starting a Scan Job, Using Windows FAX and Scan
 |
View all Oki MPS2731mc manuals
Add to My Manuals
Save this manual to your list of manuals |
Page 48 highlights
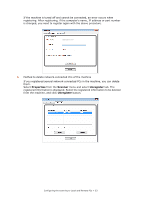
Starting a Scan Job MEMO The explanations in this section use PaperPort as an example, and may differ from the description depending on your application. 1. Place your document with text face up in the ADF or face down on the document glass. 2. Press the SCAN key. 3. Press the to select Remote PC and then press OK. 4. Start PaperPort on your computer. 5. Click Select and then click WIA: MC5(3)x2/ES5(3)4x2 (MC332dn, MC342dn, MC342dw, MC352dn, MC362dn, MC362w, MC562dn, MC562w, MC562dw, ES3452 MFP, ES5462 MFP, ES5462dw MFP) or WIA: MPS2731mc (for MPS2731mc). 6. Click Scan. 7. Select a paper feeding method. 8. Select a document type. 9. Specify the area to be scanned. 10. Click Scan. 11. Click Cancel when scanning is finished. 12. When there is no continued page or the back side is not scanned, click Finish. The scanned image is displayed in PaperPort. Using Windows FAX and Scan "Windows FAX and Scan" is a function used in Windows Vista/ 7/ 8. 1. Place your document with text face up in the ADF or face down on the document glass. 2. Press the SCAN key. 3. Press the to select Remote PC and then press OK. 4. Click Start on your computer, and select All Programs > Windows FAX and Scan. 5. Click New Scan. 6. Select MC5(3)x2/ES5(3)4x2 (for MC332dn, MC342dn, MC342dw, MC352dn, MC362dn, MC362w, MC562dn, MC562w, MC562dw, ES3452 MFP, ES5462 MFP, ES5462dw MFP) or MPS2731mc (for MPS2731mc) and click OK. Configuring the scanning to Local and Remote PCs > 48
-
 1
1 -
2
-
3
-
4
-
5
-
6
-
7
-
8
-
9
-
10
-
11
-
12
-
13
-
14
-
15
-
16
-
17
-
18
-
19
-
20
-
21
-
22
-
23
-
24
-
25
-
26
-
27
-
28
-
29
-
30
-
31
-
32
-
33
-
34
-
35
-
36
-
37
-
38
-
39
-
40
-
41
-
42
-
 43
43 -
 44
44 -
 45
45 -
 46
46 -
 47
47 -
 48
48 -
 49
49 -
 50
50 -
 51
51 -
 52
52 -
 53
53 -
54
-
55
-
56
-
57
-
58
-
59
-
60
-
61
-
62
-
63
-
64
-
65
-
66
-
67
-
68
-
69
-
70
-
71
-
72
-
73
-
74
-
75
-
76
-
77
-
78
-
79
-
80
-
81
-
82
-
83
-
84
-
85
-
86
-
87
-
88
-
89
-
90
-
91
-
92
-
93
-
94
-
95
-
96
-
97
-
98
-
99
-
100
-
101
-
102
-
103
-
104
-
105
-
106
-
107
-
108
-
109
-
110
-
111
-
112
-
113
-
114
-
115
-
116
-
117
-
118
-
119
-
120
-
121
-
122
-
123
-
124
-
125
-
126
-
127
-
128
-
129
-
130
-
131
-
132
-
133
-
134
-
135
-
136
-
137
-
138
-
139
-
140
-
141
-
142
-
143
-
144
-
145
-
146
-
147
-
148
-
149
-
150
-
151
-
152
-
153
-
154
-
155
-
156
-
157
 |
 |
