Oki MPS2731mc MC362w/MC562w/MPS2731mc Advanced User Guide (English) - Page 57
Onfiguring, Settings
 |
View all Oki MPS2731mc manuals
Add to My Manuals
Save this manual to your list of manuals |
Page 57 highlights
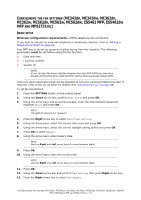
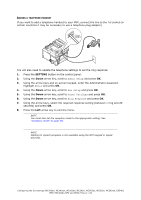
CONFIGURING THE FAX SETTINGS (MC342dn, MC342dw, MC362dn, MC362w, MC562dn, MC562w, MC562dw, ES5462 MFP, ES5462dw MFP AND MPS2731mc) BASIC SETUP Minimum configuration requirements; a PSTN telephone line connection. If you wish to connect an external telephone or answering machine, refer to "Adding a telephone handset" on page 60. Your MFP has to be set up properly to allow faxing from the machine. The following parameters must be set before using the fax function: > Date and time > Local fax number > Sender ID NOTE If you ran the Oki driver installer program from the DVD-ROM you may have already set the time zone, date and time via the Panel Language Setup utility. There are other parameters that can be adjusted to suit your personal preferences later if required, refer to fax set up table for details (See "Advanced set up" on page 58). To set fax parameters: 1. Press the SETTING button on the control panel. 2. Using the Down arrow key, scroll to Easy Setup and press OK. 3. Using the arrow keys and on-screen keypad, enter the Administrator password. Highlight Enter and press OK. NOTE The default password is "aaaaaa". 4. Press the Right arrow key to select Date/Time Setting. 5. Using the arrow keys, select the correct time zone and press OK. 6. Using the arrow keys, select the correct daylight saving option and press OK. 7. Press OK to select Manual. 8. Using the arrow keys, enter today's date. NOTE Use the Right and Left arrow keys to move between digits. 9. Press OK. 10. Using the arrow keys, enter the correct time. NOTE Use the Right and Left arrow keys to move between digits. 11. Press OK. 12. Using the Down arrow key and scroll to Fax Setting then press Right arrow key. 13. Press the Right arrow key to select Fax Number. Configuring the fax settings (MC342dn, MC342dw, MC362dn, MC362w, MC562dn, MC562w, MC562dw, ES5462 MFP, ES5462dw MFP and MPS2731mc) > 57
-
 1
1 -
2
-
3
-
4
-
5
-
6
-
7
-
8
-
9
-
10
-
11
-
12
-
13
-
14
-
15
-
16
-
17
-
18
-
19
-
20
-
21
-
22
-
23
-
24
-
25
-
26
-
27
-
28
-
29
-
30
-
31
-
32
-
33
-
34
-
35
-
36
-
37
-
38
-
39
-
40
-
41
-
42
-
43
-
44
-
45
-
46
-
47
-
48
-
49
-
50
-
51
-
 52
52 -
 53
53 -
 54
54 -
 55
55 -
 56
56 -
 57
57 -
 58
58 -
 59
59 -
 60
60 -
 61
61 -
 62
62 -
63
-
64
-
65
-
66
-
67
-
68
-
69
-
70
-
71
-
72
-
73
-
74
-
75
-
76
-
77
-
78
-
79
-
80
-
81
-
82
-
83
-
84
-
85
-
86
-
87
-
88
-
89
-
90
-
91
-
92
-
93
-
94
-
95
-
96
-
97
-
98
-
99
-
100
-
101
-
102
-
103
-
104
-
105
-
106
-
107
-
108
-
109
-
110
-
111
-
112
-
113
-
114
-
115
-
116
-
117
-
118
-
119
-
120
-
121
-
122
-
123
-
124
-
125
-
126
-
127
-
128
-
129
-
130
-
131
-
132
-
133
-
134
-
135
-
136
-
137
-
138
-
139
-
140
-
141
-
142
-
143
-
144
-
145
-
146
-
147
-
148
-
149
-
150
-
151
-
152
-
153
-
154
-
155
-
156
-
157
 |
 |
