Oki MPS2731mc MC362w/MC562w/MPS2731mc Advanced User Guide (English) - Page 58
Dvanced
 |
View all Oki MPS2731mc manuals
Add to My Manuals
Save this manual to your list of manuals |
Page 58 highlights
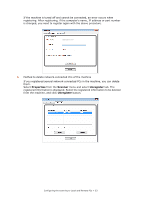
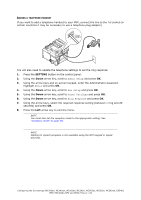
14. Using the keypad and on screen options enter the fax number for this MFP. 15. Highlight Enter and press OK. 16. Press the Right arrow key to select Sender ID. 17. Using the keypad or arrow keys and on screen keyboard, enter the sender ID. NOTE Maximum 22 characters. 18. Highlight Enter and press OK. 19. Press OK to complete. 20. Press the Left arrow key to exit the menu. NOTE By default the country code is set to International. If you need to change this, refer to "Country Code" on page 135. If required, set the dialling method for your region (Pulse or Tone). Refer to "MF(Tone)/DP(Pulse)" on page 154. If connecting the machine through a private branch exchange (PBX) line, you must also specify a dial prefix to allow the machine to obtain an external line before dialling. Refer to "Connecting to a PBX" on page 58. ADVANCED SET UP Your machine offers a multitude of features which reduce the time required for manual operation and make fax communications more efficient. CONNECTING TO A PBX Private branch exchanges (PBXs) are private telephone systems used to route calls internally, for example, in a company. When dialling a telephone number, if a prefix is required to open an outside line, the line is connected to a PBX. If this MFP is going to be connected to a PBX, please make the following changes to enable it to recognise the prefix digits in the telephone numbers used to obtain access to the outside line. After dialling the prefix digits, the MFP will wait until the outside line is available (secondary dial tone detected) before dialling the rest of the number. 1. Press the SETTING button on the control panel. 2. Using the Down arrow key, scroll to Admin Setup and press OK. 3. Using the arrow keys and on-screen keypad, enter the Administrator password. Highlight Enter and press OK. 4. Using the Down arrow key, scroll to Fax Setup and press OK. 5. Using the Down arrow key, scroll to Other Settings and press OK. 6. Using the Down arrow key, scroll to Prefix and press OK. 7. Using the keypad, arrow keys and on screen options, enter the required prefix and press OK. 8. Press the Left arrow key to exit the menu. Configuring the fax settings (MC342dn, MC342dw, MC362dn, MC362w, MC562dn, MC562w, MC562dw, ES5462 MFP, ES5462dw MFP and MPS2731mc) > 58
-
 1
1 -
2
-
3
-
4
-
5
-
6
-
7
-
8
-
9
-
10
-
11
-
12
-
13
-
14
-
15
-
16
-
17
-
18
-
19
-
20
-
21
-
22
-
23
-
24
-
25
-
26
-
27
-
28
-
29
-
30
-
31
-
32
-
33
-
34
-
35
-
36
-
37
-
38
-
39
-
40
-
41
-
42
-
43
-
44
-
45
-
46
-
47
-
48
-
49
-
50
-
51
-
52
-
 53
53 -
 54
54 -
 55
55 -
 56
56 -
 57
57 -
 58
58 -
 59
59 -
 60
60 -
 61
61 -
 62
62 -
 63
63 -
64
-
65
-
66
-
67
-
68
-
69
-
70
-
71
-
72
-
73
-
74
-
75
-
76
-
77
-
78
-
79
-
80
-
81
-
82
-
83
-
84
-
85
-
86
-
87
-
88
-
89
-
90
-
91
-
92
-
93
-
94
-
95
-
96
-
97
-
98
-
99
-
100
-
101
-
102
-
103
-
104
-
105
-
106
-
107
-
108
-
109
-
110
-
111
-
112
-
113
-
114
-
115
-
116
-
117
-
118
-
119
-
120
-
121
-
122
-
123
-
124
-
125
-
126
-
127
-
128
-
129
-
130
-
131
-
132
-
133
-
134
-
135
-
136
-
137
-
138
-
139
-
140
-
141
-
142
-
143
-
144
-
145
-
146
-
147
-
148
-
149
-
150
-
151
-
152
-
153
-
154
-
155
-
156
-
157
 |
 |
