Oki MPS2731mc MC362w/MC562w/MPS2731mc Advanced User Guide (English) - Page 52
Add Scanner, Scanner, Edit Driver Name, Edit Scanner, Properties, Register
 |
View all Oki MPS2731mc manuals
Add to My Manuals
Save this manual to your list of manuals |
Page 52 highlights
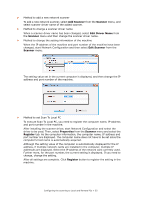
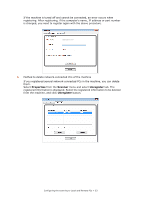
> Method to add a new network scanner To add a new network scanner, select Add Scanner from the Scanner menu, and select scanner driver name of the added scanner. > Method to change a scanner driver name When a scanner driver name has been changed, select Edit Driver Name from the Scanner menu and then change the scanner driver name. > Method to change the setting information of the machine When the IP address of the machine and port number of the machine have been changed, start Network Configuration and then select Edit Scanner from the Scanner menu. The setting value set in the current computer is displayed, and then change the IP address and port number of the machine. > Method to set Scan To Local PC To execute Scan To Local PC, you need to register the computer name, IP address and port number in the machine. After installing the scanner driver, start Network Configuration and select the driver to be used. Then, select Properties from the Scanner menu and select the Register tab. As the computer information, the computer name, IP address and port number are displayed. The computer name does not have to be set since the computer's host name is automatically acquired. Although the setting value of the computer is automatically displayed for the IP address, if multiple network cards are installed in the computer, multiple IP addresses are displayed. Select the IP address of the network card currently used. Further more, for the port number, the current setting is displayed. If you need to change, change the setting. After all settings are complete. Click Register button to register the setting in the machine. Configuring the scanning to Local and Remote PCs > 52
-
 1
1 -
2
-
3
-
4
-
5
-
6
-
7
-
8
-
9
-
10
-
11
-
12
-
13
-
14
-
15
-
16
-
17
-
18
-
19
-
20
-
21
-
22
-
23
-
24
-
25
-
26
-
27
-
28
-
29
-
30
-
31
-
32
-
33
-
34
-
35
-
36
-
37
-
38
-
39
-
40
-
41
-
42
-
43
-
44
-
45
-
46
-
 47
47 -
 48
48 -
 49
49 -
 50
50 -
 51
51 -
 52
52 -
 53
53 -
 54
54 -
 55
55 -
 56
56 -
 57
57 -
58
-
59
-
60
-
61
-
62
-
63
-
64
-
65
-
66
-
67
-
68
-
69
-
70
-
71
-
72
-
73
-
74
-
75
-
76
-
77
-
78
-
79
-
80
-
81
-
82
-
83
-
84
-
85
-
86
-
87
-
88
-
89
-
90
-
91
-
92
-
93
-
94
-
95
-
96
-
97
-
98
-
99
-
100
-
101
-
102
-
103
-
104
-
105
-
106
-
107
-
108
-
109
-
110
-
111
-
112
-
113
-
114
-
115
-
116
-
117
-
118
-
119
-
120
-
121
-
122
-
123
-
124
-
125
-
126
-
127
-
128
-
129
-
130
-
131
-
132
-
133
-
134
-
135
-
136
-
137
-
138
-
139
-
140
-
141
-
142
-
143
-
144
-
145
-
146
-
147
-
148
-
149
-
150
-
151
-
152
-
153
-
154
-
155
-
156
-
157
 |
 |
