Panasonic HDC HS9 Sd/hdd Video Camcorder - Multi Language - Page 34
Adjusting LCD monitor
 |
UPC - 037988256679
View all Panasonic HDC HS9 manuals
Add to My Manuals
Save this manual to your list of manuals |
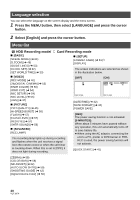
Page 34 highlights
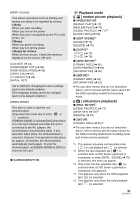
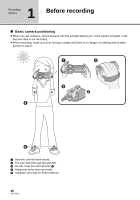
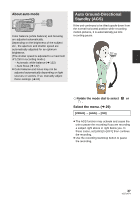
Setup 6 Adjusting LCD monitor ≥ These settings will not affect the images actually recorded. Increasing the brightness of the LCD monitor Adjusting the brightness and the color level of the LCD monitor 1 Select the menu. (l 29) [SETUP] # [LCD SET] # [YES] 2 Select the item with the cursor button. [BRIGHTNESS]: Brightness of the LCD monitor [COLOR]: Color level of the LCD monitor 3 Press the cursor button to make the adjustment. POWER LCD EXTRA button Each time the POWER LCD EXTRA button is pressed, the indication changes by one setting in the following order: [ +1 ] > [ +2 ] > setting canceled (standard) ≥ If you use the AC adaptor, the [ +1 ] indication appears and the screen becomes brighter automatically when the power is turned on. ≥ After adjustments are made if no operations are performed for about 2 seconds, the bar will disappear. ≥ Press the MENU button to exit the menu screen. Recording Yourself ¬ Rotate the mode dial to select or . Rotate the LCD monitor towards the lens side. ≥ The image is horizontally flipped as if you see a mirror image. (However the image recorded is the same as a normal recording.) ≥ Only some indications will appear on the screen. When [°] appears, return the direction of the LCD monitor to normal position and check the warning/alarm indication. (l 115) 34 VQT1N74
-
 1
1 -
2
-
3
-
4
-
5
-
6
-
7
-
8
-
9
-
10
-
11
-
12
-
13
-
14
-
15
-
16
-
17
-
18
-
19
-
20
-
21
-
22
-
23
-
24
-
25
-
26
-
27
-
28
-
 29
29 -
 30
30 -
 31
31 -
 32
32 -
 33
33 -
 34
34 -
 35
35 -
 36
36 -
 37
37 -
 38
38 -
 39
39 -
40
-
41
-
42
-
43
-
44
-
45
-
46
-
47
-
48
-
49
-
50
-
51
-
52
-
53
-
54
-
55
-
56
-
57
-
58
-
59
-
60
-
61
-
62
-
63
-
64
-
65
-
66
-
67
-
68
-
69
-
70
-
71
-
72
-
73
-
74
-
75
-
76
-
77
-
78
-
79
-
80
-
81
-
82
-
83
-
84
-
85
-
86
-
87
-
88
-
89
-
90
-
91
-
92
-
93
-
94
-
95
-
96
-
97
-
98
-
99
-
100
-
101
-
102
-
103
-
104
-
105
-
106
-
107
-
108
-
109
-
110
-
111
-
112
-
113
-
114
-
115
-
116
-
117
-
118
-
119
-
120
-
121
-
122
-
123
-
124
-
125
-
126
-
127
-
128
-
129
-
130
-
131
-
132
-
133
-
134
-
135
-
136
-
137
-
138
-
139
-
140
-
141
-
142
-
143
-
144
-
145
-
146
-
147
-
148
 |
 |