Pentax PZ-1 PZ-1 Manual - Page 23
perforations
 |
View all Pentax PZ-1 manuals
Add to My Manuals
Save this manual to your list of manuals |
Page 23 highlights
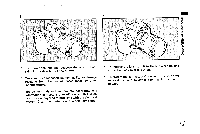
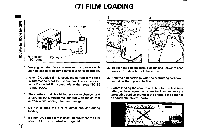
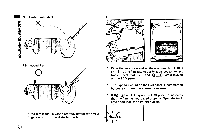
4 5 0 0000000 0 OOOO CO 0 ym O Cop 00.00000©0 €Oses 0 4. Hold the film cartridge with a finger and draw out the film leader as shown in the illustration. Ensure that your finger or the film end does not touch the shutter curtain. If you have pulled out too much film, push it back into the cartridge to reduce the slack. * The DX information pins in the film chamber read the film speed information from the cartridge. Keep them clean and free of scratches. If necessary, clean the pins with a soft, dry cloth. 5. Align the film leader and the red leader end mark 0 as shown in the illustration. * Ensure that the film perforations are properly engaged with the sprocket teeth 131 and that the film lies between the guide rails el (shown as red lines in the illustration). 17
-
 1
1 -
2
-
3
-
4
-
5
-
6
-
7
-
8
-
9
-
10
-
11
-
12
-
13
-
14
-
15
-
16
-
17
-
 18
18 -
 19
19 -
 20
20 -
 21
21 -
 22
22 -
 23
23 -
 24
24 -
 25
25 -
 26
26 -
 27
27 -
 28
28 -
29
-
30
-
31
-
32
-
33
-
34
-
35
-
36
-
37
-
38
-
39
-
40
-
41
-
42
-
43
-
44
-
45
-
46
-
47
-
48
-
49
-
50
-
51
-
52
-
53
-
54
-
55
-
56
-
57
-
58
-
59
-
60
-
61
-
62
-
63
-
64
-
65
-
66
-
67
-
68
-
69
-
70
-
71
-
72
-
73
-
74
-
75
-
76
-
77
-
78
-
79
-
80
-
81
-
82
-
83
-
84
-
85
-
86
-
87
-
88
-
89
-
90
-
91
-
92
-
93
-
94
-
95
-
96
-
97
-
98
-
99
-
100
-
101
-
102
-
103
-
104
-
105
-
106
-
107
-
108
-
109
-
110
-
111
-
112
-
113
-
114
-
115
-
116
-
117
-
118
-
119
-
120
-
121
-
122
-
123
-
124
 |
 |
