Philips DVDR600VR User manual - Page 26
Front Panel - remote control
 |
UPC - 037849948699
View all Philips DVDR600VR manuals
Add to My Manuals
Save this manual to your list of manuals |
Page 26 highlights
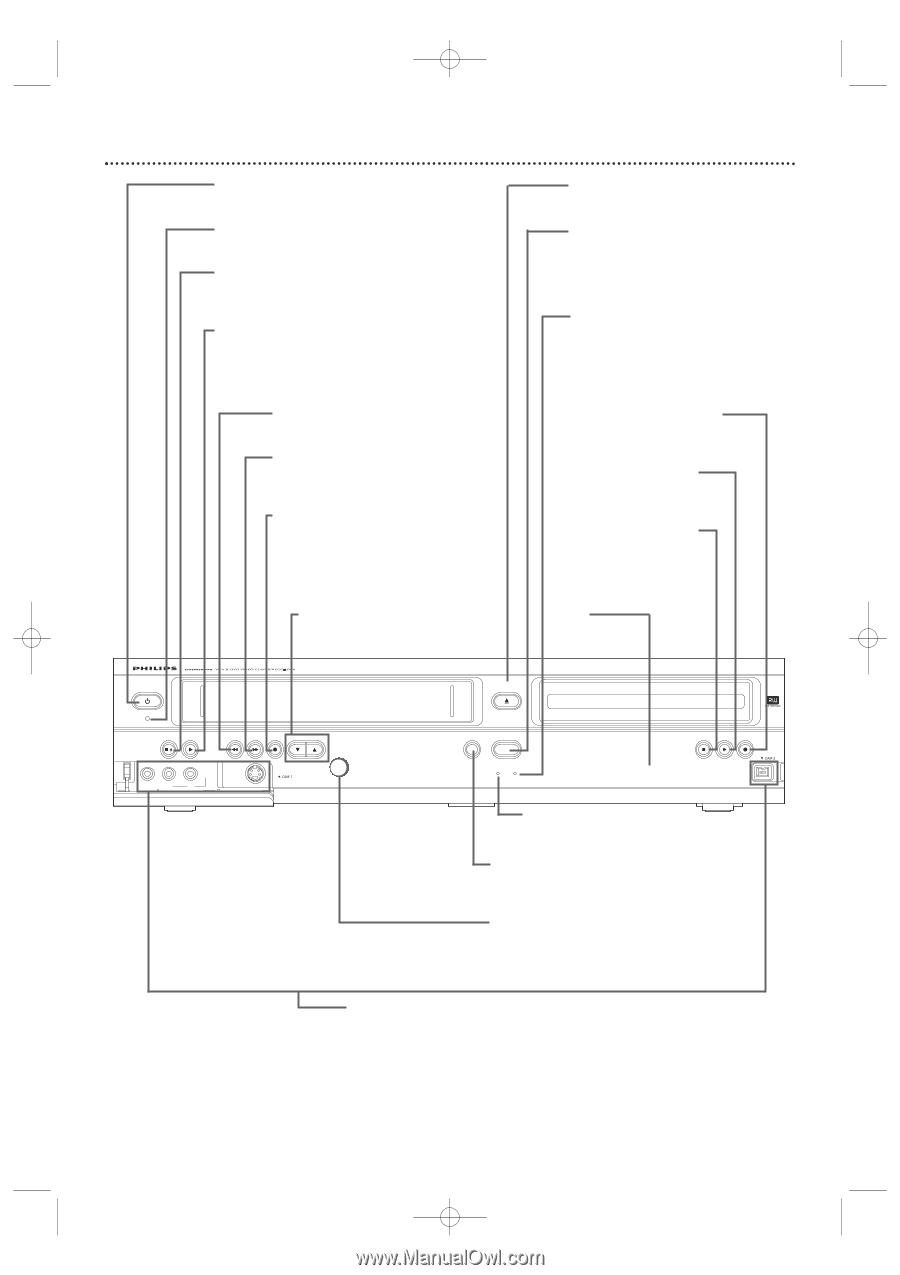
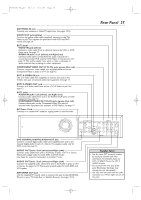
E9480UD_EN.qx3 05.1.8 4:16 PM Page 26 26 Front Panel STANDBY-ON y Button Press to turn the power on or off. POWER ON Light Appears when the power is on STOP C / EJECT A Button (VCR) Press once to stop videotape playback.When play is stopped, press to eject the videotape. PLAY B Button (VCR) Press to play a videotape. Press to release Slow, Search, or Still mode and return to playback. See page 77. REW E Button (VCR) Press to rewind a videotape. See page 77. F.FWD D Button (VCR) Press to fast forward a videotape. See page 77. RECORD I Button (VCR) Press to start a videotape recording. See page 69. Press repeatedly to start a One-Touch Recording. See page 71. CHANNEL K/ L Buttons Press to select TV channels. DVD OPEN/CLOSE A Button Press to open or close the Disc Tray. SOURCE Button Press to select DVD mode or VCR mode.The DVD light appears in DVD mode. The VCR light appears in VCR mode. DVD Light This light appears when the Recorder is in DVD mode. RECORD I Button (DVD) Press to start a Disc recording. See page 22. PLAY B Button (DVD) Press to start Disc playback. See page 21. STOP C Button (DVD) Press to stop Disc playback. See page 21. DVD Display Panel Shows Disc status in DVD mode. STANDBY-ON POWER ON STOP/EJECT PLAY 4 HEAD HI-FI STEREO ONE TOUCH RECORDING · LONG PLAY REW F.FWD RECORD CHANNEL DVD OPEN/CLOSE D.DUBBING SOURCE DVD RECORDER DVD+RW/+R RECORDING STOP PLAY RECORD AUDIO SV VIDEO L R IR VCR DVD PROGRESSIVE SCAN VCR Light This light appears when the Recorder is in VCR mode. D.DUBBING Button Press to start DVD to VCR or VCR to DVD duplication. See pages 44 and 73. IR (infrared) Remote Sensor Receives a signal from the Recorder's remote control so you can work your Recorder from a distance. Point the remote here, not at your TV. CAM1 jacks SV (S-Video),VIDEO and AUDIO IN CAM2 jack DV (digital video) IN To access these jacks, flip down the door or rubber flap that covers the jacks. Use these jacks when connecting a Camcorder or other equipment to the Recorder. See page 17. When recording material that is playing on the other equipment, choose the CAM channel that corresponds to the jack to which the equipment is connected. If your Personal Computer has an IEEE 1394 Firewire connector, you may connect it to the Recorder's DV IN jack. Limited applications are available.
-
 1
1 -
2
-
3
-
4
-
5
-
6
-
7
-
8
-
9
-
10
-
11
-
12
-
13
-
14
-
15
-
16
-
17
-
18
-
19
-
20
-
 21
21 -
 22
22 -
 23
23 -
 24
24 -
 25
25 -
 26
26 -
 27
27 -
 28
28 -
 29
29 -
 30
30 -
 31
31 -
32
-
33
-
34
-
35
-
36
-
37
-
38
-
39
-
40
-
41
-
42
-
43
-
44
-
45
-
46
-
47
-
48
-
49
-
50
-
51
-
52
-
53
-
54
-
55
-
56
-
57
-
58
-
59
-
60
-
61
-
62
-
63
-
64
-
65
-
66
-
67
-
68
-
69
-
70
-
71
-
72
-
73
-
74
-
75
-
76
-
77
-
78
-
79
-
80
-
81
-
82
-
83
-
84
-
85
-
86
-
87
-
88
 |
 |