Philips DVDR600VR User manual - Page 43
One-Touch Recording
 |
UPC - 037849948699
View all Philips DVDR600VR manuals
Add to My Manuals
Save this manual to your list of manuals |
Page 43 highlights
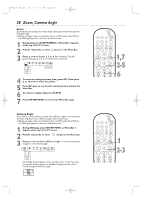
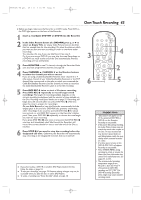
E9480UD_EN.qx3 05.1.8 4:16 PM Page 43 One-Touch Recording 43 ● Before you begin, make sure the Recorder is in DVD mode. Press DVD so the DVD light appears on the front of the Recorder. 1 Insert a recordable DVD+RW or DVD+R into the Recorder. 2 In the Index Picture Screen of a DVD+RW, press K or L to select an Empty Title (or empty Index Picture box) on the Disc that has enough time for the recording. Or, select the place at which you want to start the new recording in order to overwrite other recordings. You may skip this step if you use Safe Record. See step 5. Or, if you are using a DVD+R, you may skip this step. Recordings on a DVD+R are made at the end of the Disc automatically. Previous recordings are not overwritten. 3 Press MONITOR to see TV channels through the Recorder. Make sure you have programmed channels. See page 28. 4 Press CHANNEL K, CHANNEL L or the Number buttons to select the channel you wish to record. If you are using a Cable Box/Satellite Receiver, enter channel 3 or 4 (the output channel of your Cable Box/Satellite Receiver) or the EXT channel (that corresponds to the jacks to which you connected the Cable Box/Satellite Receiver). Set the channel you want to record at the Cable Box/Satellite Receiver. Leave it on for the recording. 5 Press DVD REC I twice to start a 30-minute recording. Press DVD REC I repeatedly to record longer timed recordings. The length of recording available depends on the current recording mode/speed and the amount of time available on the Disc. Recording mode/speed details are on page 52. Recording will begin about 30 seconds after you press DVD REC I. (The Disc takes this time to prepare for recording.) Or, use Safe Record to have the Recorder automatically find the empty space at the end of a DVD+RW; this prevents overwriting other recordings.To do so, press and hold DVD REC I for about two seconds, or until SAFE REC appears on the Recorder's display panel.Then, press DVD REC I repeatedly to choose the time length you want for your recording. If you press DVD REC I only once, or press and hold DVD REC I one time and immediately start Safe Record, the Recorder will record the current channel or source until the end of the Disc is reached. 6 Press STOP C if you need to stop the recording before the designated end time. Otherwise, the Recorder will automatically stop recording at the designated end time, then turn itself off. ● If you plan to play a DVD+R on another DVD Player, finalize the Disc. Follow the steps on page 55. ● To edit your recordings, see page 54. However, editing changes may not be accessible when you play the Disc on other DVD Players. ● To erase a recording, see "Erase this title" details on page 50. STANDBY-ON OPEN/CLOSE 1 2 3 EJECT TV/VIDEO 4 5 6 3 7 8 VCR Plus +/TIMER 0 9 MONITOR CHANNEL VCR DISC MENU CLEAR DVD SYSTEM MENU 4 OK SELECT RETURN PLAY 2 6 VCR REC STOP DVD REC 5 Helpful Hints • "Disc locked" will appear on the TV if a protected DVD+RW or DVD+R is in the Recorder. Recording is not possible. • If the power fails during recording, the Index Picture Screen may not match the actual video content on the Disc.The last recorded Title may be lost.A power failure or unit failure/system crash also may destroy all the material recorded on a Disc. • If no free space remains on the DVD+R, DISC FULL will appear. Recording is not possible. • Press SYSTEM MENU during recording to access or remove the Status box,Tuner Information box, and/or Timer Information box. See pages 33 and 35. • The recommended operating temperature range for the Recorder is from 32°F-122°F (Fahrenheit) for DVD+RW recording and 32°F-104°F for DVD+R recording. Exceeding these ranges may cause unstable recording results.
-
 1
1 -
2
-
3
-
4
-
5
-
6
-
7
-
8
-
9
-
10
-
11
-
12
-
13
-
14
-
15
-
16
-
17
-
18
-
19
-
20
-
21
-
22
-
23
-
24
-
25
-
26
-
27
-
28
-
29
-
30
-
31
-
32
-
33
-
34
-
35
-
36
-
37
-
 38
38 -
 39
39 -
 40
40 -
 41
41 -
 42
42 -
 43
43 -
 44
44 -
 45
45 -
 46
46 -
 47
47 -
 48
48 -
49
-
50
-
51
-
52
-
53
-
54
-
55
-
56
-
57
-
58
-
59
-
60
-
61
-
62
-
63
-
64
-
65
-
66
-
67
-
68
-
69
-
70
-
71
-
72
-
73
-
74
-
75
-
76
-
77
-
78
-
79
-
80
-
81
-
82
-
83
-
84
-
85
-
86
-
87
-
88
 |
 |
