Pioneer AVIC-F90BT Owner's Manual - Page 143
Settings
 |
UPC - 012562897271
View all Pioneer AVIC-F90BT manuals
Add to My Manuals
Save this manual to your list of manuals |
Page 143 highlights
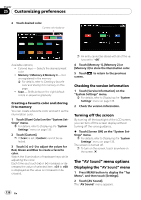
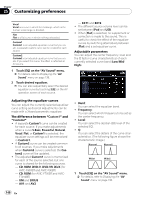
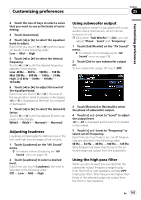
Customizing preferences Chapter 25 Customizing preferences The options on the "AV Settings" menu Displaying the "AV Settings" menu 1 Press MENU button to display the "Top Menu", and then touch [Settings]. 2 Touch [AV Settings]. The "AV Settings" menu appears. % Touch [AV1 Input] on the "AV Settings" menu. = For details, refer to Displaying the "AV Settings" menu on this page. Each touch of [AV1 Input] changes the settings as follows: ! Off - No video component is connected ! iPod - iPod connected with the USB Inter- face cable for iPod (CD-IU230V) ! Video - External video component ! EXT - Pioneer external unit connected with the RCA video cable p Only when selecting the AV source with video, you can adjust [Wide Mode]. p Only when the AV source is "OFF", the following items can be adjusted; [MUTE Input/GUIDE] and [Rear SP] Setting video input 1 (AV1) You can switch this setting according to the connected component. p This setting is effective for RCA inputs (AUDIO INPUT and VIDEO INPUT) on backside. Setting video input 2 (AV2) You can switch this setting according to the connected component. p This setting is effective for mini-jack input on front panel. % Touch [AV2 Input] on the "AV Settings" menu. = For details, refer to Displaying the "AV Settings" menu on this page. Each touch of [AV2 Input] changes the settings as follows: ! Off - No video component is connected ! Video - External video component p Use AV2 Input when connecting CD-RM10 (sold separately) through the external video component. Switching the auto antenna setting If the blue lead of the navigation system is connected to the antenna control terminal of the vehicle, select either of the following settings. ! Radio - The antenna extends or turns on only when the audio source is FM or AM. The antenna is stored or turned off when the AV source is switched to another source. ! Power - The antenna extends or turns on when the ignition switch is turned on. The antenna is stored or turned off when the ignition switch is turned off. En 143
-
 1
1 -
2
-
3
-
4
-
5
-
6
-
7
-
8
-
9
-
10
-
11
-
12
-
13
-
14
-
15
-
16
-
17
-
18
-
19
-
20
-
21
-
22
-
23
-
24
-
25
-
26
-
27
-
28
-
29
-
30
-
31
-
32
-
33
-
34
-
35
-
36
-
37
-
38
-
39
-
40
-
41
-
42
-
43
-
44
-
45
-
46
-
47
-
48
-
49
-
50
-
51
-
52
-
53
-
54
-
55
-
56
-
57
-
58
-
59
-
60
-
61
-
62
-
63
-
64
-
65
-
66
-
67
-
68
-
69
-
70
-
71
-
72
-
73
-
74
-
75
-
76
-
77
-
78
-
79
-
80
-
81
-
82
-
83
-
84
-
85
-
86
-
87
-
88
-
89
-
90
-
91
-
92
-
93
-
94
-
95
-
96
-
97
-
98
-
99
-
100
-
101
-
102
-
103
-
104
-
105
-
106
-
107
-
108
-
109
-
110
-
111
-
112
-
113
-
114
-
115
-
116
-
117
-
118
-
119
-
120
-
121
-
122
-
123
-
124
-
125
-
126
-
127
-
128
-
129
-
130
-
131
-
132
-
133
-
134
-
135
-
136
-
137
-
 138
138 -
 139
139 -
 140
140 -
 141
141 -
 142
142 -
 143
143 -
 144
144 -
 145
145 -
 146
146 -
 147
147 -
 148
148 -
149
-
150
-
151
-
152
-
153
-
154
-
155
-
156
-
157
-
158
-
159
-
160
-
161
-
162
-
163
-
164
-
165
-
166
-
167
-
168
-
169
-
170
-
171
-
172
-
173
-
174
-
175
-
176
-
177
-
178
-
179
-
180
-
181
-
182
-
183
-
184
-
185
-
186
-
187
-
188
-
189
-
190
-
191
-
192
 |
 |