Pioneer AVIC-F90BT Owner's Manual - Page 60
Clearing memory, Using hands-free phoning
 |
UPC - 012562897271
View all Pioneer AVIC-F90BT manuals
Add to My Manuals
Save this manual to your list of manuals |
Page 60 highlights
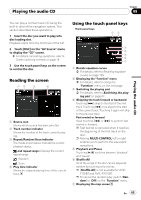
Chapter 08 Using hands-free phoning p Depending on the cellular phone that is connected to this navigation system via Bluetooth technology, this navigation system may not be able to display the phone book correctly. (Some characters may be garbled.) p If the phone book in the cellular phone contains image data, the phone book may not be correctly transferred. 1 Connect the cellular phone that has the phone book to transfer. = For details, refer to Connecting a registered cellular phone on page 55. 2 Touch [Phone Book Transfer] on the "Phone Menu". The confirmation messages appear. 3 Check the messages and touch [OK]. p If there is a phone book already transferred, a message asking whether you can accept the data replacement appears. 4 Check that the following screen is displayed, and operate your cellular phone to transfer the phone book entries. p The transferred data can not be edited on the navigation system. 5 When the completion message appears, check the message and touch [OK]. Transfer ends. Clearing memory You can clear the memory of each item that corresponds to the connected cellular phone: phone book, dialled/received/missed call history list and preset dials. 1 Touch [Phone Settings] on the "Phone Menu". = For details, refer to Displaying the Phone Menu on page 52. 2 Touch [Clear Memory]. Transfer starts. It may take time depending on how many entries will be transferred. p You can send the phone book entries repeatedly before touching [OK]. If your cellular phone supports one-by-one transfer only, send all the entries that you want to transfer before touching [OK]. p If your phone has a capability for automatic transfer of phone book, this screen is skipped and transfer will start. On this screen, you can select the following items: Contacts: You can clear the registered phone book. Received Calls List: You can clear the received call history list. Dialed Calls List: You can clear the dialed call history list. Missed Calls List: You can clear the missed call history list. p Touching [Clear] displays the confirmation message for clearing the memory. p Touching [Clear All] clears all the data that correspond to the connected cellular phone. 60 En
-
 1
1 -
2
-
3
-
4
-
5
-
6
-
7
-
8
-
9
-
10
-
11
-
12
-
13
-
14
-
15
-
16
-
17
-
18
-
19
-
20
-
21
-
22
-
23
-
24
-
25
-
26
-
27
-
28
-
29
-
30
-
31
-
32
-
33
-
34
-
35
-
36
-
37
-
38
-
39
-
40
-
41
-
42
-
43
-
44
-
45
-
46
-
47
-
48
-
49
-
50
-
51
-
52
-
53
-
54
-
 55
55 -
 56
56 -
 57
57 -
 58
58 -
 59
59 -
 60
60 -
 61
61 -
 62
62 -
 63
63 -
 64
64 -
 65
65 -
66
-
67
-
68
-
69
-
70
-
71
-
72
-
73
-
74
-
75
-
76
-
77
-
78
-
79
-
80
-
81
-
82
-
83
-
84
-
85
-
86
-
87
-
88
-
89
-
90
-
91
-
92
-
93
-
94
-
95
-
96
-
97
-
98
-
99
-
100
-
101
-
102
-
103
-
104
-
105
-
106
-
107
-
108
-
109
-
110
-
111
-
112
-
113
-
114
-
115
-
116
-
117
-
118
-
119
-
120
-
121
-
122
-
123
-
124
-
125
-
126
-
127
-
128
-
129
-
130
-
131
-
132
-
133
-
134
-
135
-
136
-
137
-
138
-
139
-
140
-
141
-
142
-
143
-
144
-
145
-
146
-
147
-
148
-
149
-
150
-
151
-
152
-
153
-
154
-
155
-
156
-
157
-
158
-
159
-
160
-
161
-
162
-
163
-
164
-
165
-
166
-
167
-
168
-
169
-
170
-
171
-
172
-
173
-
174
-
175
-
176
-
177
-
178
-
179
-
180
-
181
-
182
-
183
-
184
-
185
-
186
-
187
-
188
-
189
-
190
-
191
-
192
 |
 |
