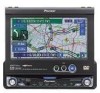
Pioneer AVIC N2 Owner's Manual - Page 31
How to Use the Map, Switching the current position, screen display mode, How to view the map of - won t turn on
 |
UPC - 012562735191
View all Pioneer AVIC N2 manuals
Add to My Manuals
Save this manual to your list of manuals |
Page 31 highlights
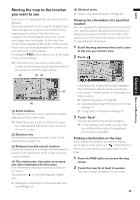
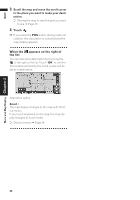
NAVI Chapter 2 Menu and Map Display How to Use the Map Most of the information provided by your Navigation System can be seen on the map. You need to get to know how the information appears on the map. Switching the current position screen display mode This section describes how to display the current position screen and change the map display mode. There are four types of map display and two additional view modes. • Map View • Driver's View • Guide View (during route guidance only) • Route View (during route guidance only) • Vehicle Dynamics • Rear View (Only possible when the "CAMERA" is set to "ON".) 1 Press the POS button to display a map of the area around your current position. 2 Press the POS button again. 3 Touch the mode name or press the POS button to select the mode you want to display. How to view the map of the current location • In Driver's View, a small gauge with no scale is depicted, but is not intended to be used as a speedometer. Use the actual speedometer of your vehicle to confirm speed. Map View Displays standard map. (1) (11) (8) (2) (7) (17) (18) (4) (12) (9) (5) (13)(3)(10)(19)(6) Driver's View The map from the driver's viewpoint is shown. (1) (11) (8) (2) (7) (16) (4) (12) (3) (13) (9) (5) (17) (10)(19)(6) ❒ If the mode is selected by pressing the POS button, the screen automatically switches to the selected map display mode after 4 seconds. Guide View The standard map of your surroundings is overlaid with the name of the street you will turn onto next, and 2 arrows: the larger one to the left indicating the direction of your next maneuver and how far you are from approaching it, and the smaller one to the right indicating the direction of your second to next maneuver and how far you are from approaching it. 29
-
 1
1 -
2
-
3
-
4
-
5
-
6
-
7
-
8
-
9
-
10
-
11
-
12
-
13
-
14
-
15
-
16
-
17
-
18
-
19
-
20
-
21
-
22
-
23
-
24
-
25
-
 26
26 -
 27
27 -
 28
28 -
 29
29 -
 30
30 -
 31
31 -
 32
32 -
 33
33 -
 34
34 -
 35
35 -
 36
36 -
37
-
38
-
39
-
40
-
41
-
42
-
43
-
44
-
45
-
46
-
47
-
48
-
49
-
50
-
51
-
52
-
53
-
54
-
55
-
56
-
57
-
58
-
59
-
60
-
61
-
62
-
63
-
64
-
65
-
66
-
67
-
68
-
69
-
70
-
71
-
72
-
73
-
74
-
75
-
76
-
77
-
78
-
79
-
80
-
81
-
82
-
83
-
84
-
85
-
86
-
87
-
88
-
89
-
90
-
91
-
92
-
93
-
94
-
95
-
96
-
97
-
98
-
99
-
100
-
101
-
102
-
103
-
104
-
105
-
106
-
107
-
108
-
109
-
110
-
111
-
112
-
113
-
114
-
115
-
116
-
117
-
118
-
119
-
120
-
121
-
122
-
123
-
124
-
125
-
126
-
127
-
128
-
129
-
130
-
131
-
132
-
133
-
134
-
135
-
136
-
137
-
138
-
139
 |
 |
