Pioneer AVIC N2 Owner's Manual - Page 99
Selecting the video of rear dis, Setting the slide back function
 |
UPC - 012562735191
View all Pioneer AVIC N2 manuals
Add to My Manuals
Save this manual to your list of manuals |
Page 99 highlights
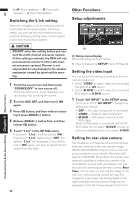
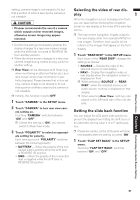
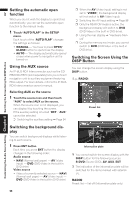
AV setting, camera image is not resized to fit, but that a portion of what is seen by the camera is not viewable. • Pioneer recommends the use of a camera which outputs mirror reversed images, otherwise screen image may appear reversed. • Confirm the setting immediately whether the display changes to a rear view camera image when the shift lever is moved to REVERSE (R) from another position. • When the whole screen changes to a rear view camera image during normal driving, switch to another setting. ❒ Rear View can be displayed at all times (e.g. when monitoring an attached trailer, etc.) as a split screen where map information is partially displayed. Please beware that in this setting, camera image is not resized to fit, but that a portion of what is seen by the camera is not viewable. ❒ Initially, this function is set to OFF. 1 Touch "CAMERA" in the SETUP menu. 2 Touch "CAMERA" to turn rear view cam- era setting on. Touching "CAMERA" switches between "ON" and "OFF". ❒ Unless this setting is "ON", you cannot switch to Rear View mode. 3 Touch "POLARITY" to select an appropri- ate setting for polarity. Each time you touch "POLARITY" switches between the following polarity: • BATTERY - When the polarity of the con- nected lead is positive while the shift lever is REVERSE (R) position • GND - When the polarity of the connected lead is negative while the shift lever is REVERSE (R) position Selecting the video of rear display When the navigation screen is displayed on front, you can select either showing the navigation screen on rear display or the video of the selected source. ❒ The map screen navigation images output to the rear display differ from standard NTSC format images. Therefore, their quality will be inferior to the images that appear on the front display. 1 Touch "REAR DISP" in the SETUP menu. Each touch of the "REAR DISP" changes the settings as follows: • SOURCE - Display the video of the selected source on rear display • NAVI- Display the navigation video on rear display when the navigation screen is displayed on front ❒ When selecting "SOURCE" in "REAR DISP", when the selected source is an audio source, nothing is displayed on rear display. ❒ When selecting Rear View, nothing is displayed on the left-hand side of the rear display. Setting the slide back function You can adjust the LCD panel slide position to prevent the display from hitting the shift lever of an automatic vehicle when it is in P (park) position. ❒ Please be careful, as the LCD panel will slide immediately after the setting is turned "ON". 1 Touch "FLAP SET BACK" in the SETUP menu. Touching "FLAP SET BACK" switches between "ON" and "OFF". Other Functions Chapter 8 Customizing the Audio Source Setting 97
-
 1
1 -
2
-
3
-
4
-
5
-
6
-
7
-
8
-
9
-
10
-
11
-
12
-
13
-
14
-
15
-
16
-
17
-
18
-
19
-
20
-
21
-
22
-
23
-
24
-
25
-
26
-
27
-
28
-
29
-
30
-
31
-
32
-
33
-
34
-
35
-
36
-
37
-
38
-
39
-
40
-
41
-
42
-
43
-
44
-
45
-
46
-
47
-
48
-
49
-
50
-
51
-
52
-
53
-
54
-
55
-
56
-
57
-
58
-
59
-
60
-
61
-
62
-
63
-
64
-
65
-
66
-
67
-
68
-
69
-
70
-
71
-
72
-
73
-
74
-
75
-
76
-
77
-
78
-
79
-
80
-
81
-
82
-
83
-
84
-
85
-
86
-
87
-
88
-
89
-
90
-
91
-
92
-
93
-
 94
94 -
 95
95 -
 96
96 -
 97
97 -
 98
98 -
 99
99 -
 100
100 -
 101
101 -
 102
102 -
 103
103 -
 104
104 -
105
-
106
-
107
-
108
-
109
-
110
-
111
-
112
-
113
-
114
-
115
-
116
-
117
-
118
-
119
-
120
-
121
-
122
-
123
-
124
-
125
-
126
-
127
-
128
-
129
-
130
-
131
-
132
-
133
-
134
-
135
-
136
-
137
-
138
-
139
 |
 |