Pioneer SC-05 Owner's Manual - Page 10
Simple Home Theater Guide, Automatically setting up for surround, sound MCACC & Full Band Phase - receiver remote
 |
UPC - 012562891521
View all Pioneer SC-05 manuals
Add to My Manuals
Save this manual to your list of manuals |
Page 10 highlights
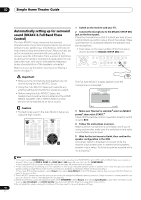
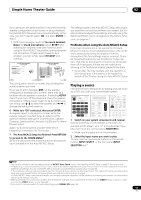
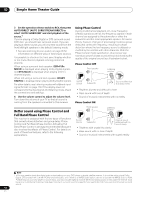
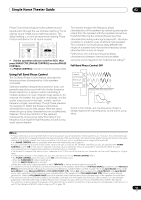
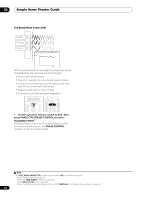
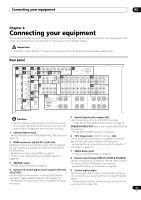
02 Simple Home Theater Guide Automatically setting up for surround sound (MCACC & Full Band Phase Control) The Auto MCACC Setup measures the acoustic characteristics of your listening area, taking into account ambient noise, speaker size and distance, and tests for both channel delay and channel level. After you have set up the microphone provided with your system, the receiver uses the information from a series of test tones to optimize the speaker settings and equalization for your particular room, and also to calibrate the frequencyphase characteristics of the speakers connected. Make sure you do this before moving on to Playing a source on page 11. 1 Switch on the receiver and your TV. 2 Connect the microphone to the MCACC SETUP MIC jack on the front panel. Place the microphone so that it's about ear level at your normal listening position (use a tripod if possible). Make sure there are no obstacles between the speakers and the microphone. • Push down on the lower portion of the front panel door to access the MCACC SETUP MIC jack: AUDIO PARAMETER (TUNE) VIDEO (ST) ENTER (ST) (TUNE) HOME MENU RETURN AUTO SURR/ HOME STANDARD ADVANCED STEREO/ TUNER EDIT BAND STREAM DIRECT THX SURROUND SURROUND A.L.C. CONTROL ON/OFF SPEAKERS iPod DIRECT USB VIDEO3 INPUT MULTI-ZONE & SOURCE DIGITAL IN S-VIDEO VIDEO L AUDIO R MCACC SETUP MIC PHONES Important • Make sure the microphone and speakers are not moved during the Auto MCACC Setup. • Using the Auto MCACC Setup will overwrite any existing settings for the MCACC preset you select. • Before using the Auto MCACC Setup, the headphones should be disconnected and the HOME MEDIA GALLERY, XM or SIRIUS Radio function should not be selected as an input source. Caution • The test tones used in the Auto MCACC Setup are output at high volume. RECEIVER MAIN ZONE2 DVD BD SOURCE 3 MULTI OPERATION DVR1 DVR2 VIDEO1 VIDEO2 VIDEO3 TV HOME MEDIA GALLERY CD CD-R PHONO HDMI TUNER XM SIRIUS INPUT SELECT SOURCE TV RCV CH VOL VOL TV CONTROL INPUT MUTE AUDIO PARAMETER EXIT TUNE MUTE VIDEO PARAMETER TOOLS TOP MENU BAND ST ENTER MENU T.EDIT ST CATEGORY HOME MENU iPod CTRL TUNE RETURN The Full Auto MCACC display appears once the microphone is connected.1 1a.Full Auto MCACC A/V RECEIVER Surr Back System : Normal Save SYMMETRY to : M1.MEMORY 1 START Exit Return 3 Make sure 'Normal' is selected,2 select an MCACC preset3, then select START.4 Check that the remote control's operation selector switch is set to RCV. 4 Follow the instructions on-screen. Make sure the microphone is connected, and if you're using a subwoofer, make sure it is switched on and set to a comfortable volume level. 5 Wait for the test tones to finish, then confirm the speaker configuration in the OSD. A progress report is displayed on-screen while the receiver outputs test tones to determine the speakers present in your setup. Try to be as quiet as possible while it's doing this.5 Note 1 • You can't use the HOME MENU in either the main or sub zone when the HOME MEDIA GALLAERY, XM or SIRIUS Radio input source is selected. When you set ZONE 2, ZONE 3 or ZONE 2&3 to ON (page 68), you can't use the HOME MENU. • If you leave the OSD (on screen display) for over five minutes, the screen saver will appear. 2 • If you are planning on bi-amping your front speakers, or setting up a separate speaker system in another room, read through Surround back speaker setting on page 56 and make sure to connect your speakers as necessary before continuing to step 4. • If you have THX-certified speakers, select Return, then select Auto MCACC for the THX Speaker setting. See Automatic MCACC (Expert) on page 44 for more on this. 3 The six MCACC presets are used for storing surround sound settings for different listening positions. Simply choose an unused preset for now (you can rename it later in Data Management on page 53). 4 Note that correction curves are saved only when set to SYMMETRY. Select Return, then select Auto MCACC to save other correction curves (such as ALL CH ADJUST and FRONT ALIGN). See Automatic MCACC (Expert) on page 44 for more on this. 5 Do not adjust the volume during the test tones. This may result in incorrect speaker settings. 10 En
-
 1
1 -
2
-
3
-
4
-
 5
5 -
 6
6 -
 7
7 -
 8
8 -
 9
9 -
 10
10 -
 11
11 -
 12
12 -
 13
13 -
 14
14 -
 15
15 -
16
-
17
-
18
-
19
-
20
-
21
-
22
-
23
-
24
-
25
-
26
-
27
-
28
-
29
-
30
-
31
-
32
-
33
-
34
-
35
-
36
-
37
-
38
-
39
-
40
-
41
-
42
-
43
-
44
-
45
-
46
-
47
-
48
-
49
-
50
-
51
-
52
-
53
-
54
-
55
-
56
-
57
-
58
-
59
-
60
-
61
-
62
-
63
-
64
-
65
-
66
-
67
-
68
-
69
-
70
-
71
-
72
-
73
-
74
-
75
-
76
-
77
-
78
-
79
-
80
-
81
-
82
-
83
-
84
-
85
-
86
-
87
-
88
-
89
-
90
-
91
-
92
-
93
-
94
-
95
-
96
-
97
-
98
-
99
-
100
-
101
-
102
-
103
-
104
-
105
-
106
-
107
-
108
-
109
-
110
-
111
-
112
-
113
-
114
-
115
-
116
-
117
-
118
-
119
-
120
-
121
-
122
-
123
-
124
-
125
-
126
-
127
-
128
-
129
-
130
-
131
-
132
-
133
-
134
-
135
-
136
-
137
-
138
 |
 |
