Pioneer SC-05 Owner's Manual - Page 86
DNS Server - firmware
 |
UPC - 012562891521
View all Pioneer SC-05 manuals
Add to My Manuals
Save this manual to your list of manuals |
Page 86 highlights
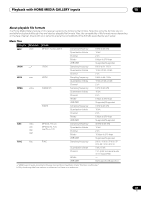
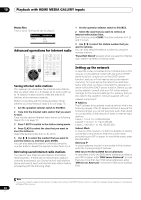
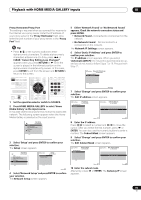
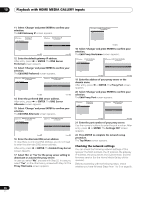
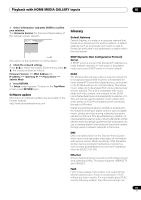
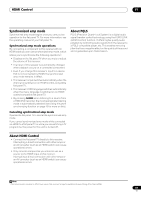
10 Playback with HOME MEDIA GALLERY inputs 11 Select 'Change' and press ENTER to confirm your selection. The Edit Gateway IP screen appears. Top Menu Gateway IP A/V RECEIVER 192.168.000.001 Change Top Menu Edit Gateway IP A/V RECEIVER 192.168.000.001 3/ 5 Return Return 12 Enter the default gateway IP address. After entry, press or ENTER. The DNS Server Preferred screen appears. 13 Select 'Change' and press ENTER to confirm your selection. The Edit DNS Preferred screen appears. Top Menu DNS Server Preferred A/V RECEIVER 192.168.000.001 Change Top Menu Edit DNS Preferred A/V RECEIVER 192.168.000.001 4/ 5 Return Return 14 Enter the preferred DNS server address. After entry, press or ENTER. The DNS Server Alternate screen appears. 15 Select 'Change' and press ENTER to confirm your selection. The Edit DNS Alternate screen appears. Top Menu DNS Server Alternate A/V RECEIVER 192.168.000.001 Change Top Menu Edit DNS Alternate A/V RECEIVER 192.168.000.001 5/ 5 Return Return 16 Enter the alternate DNS server address. In case there is only one DNS address, you do not need to enter the alternate DNS server address. After entry, press or ENTER. The Enable Proxy Server screen appears. 17 Select 'No' or 'Yes' for the proxy server setting to deactivate or activate the proxy server. In case you select 'No', proceed with Step 22. In case you select 'Yes', on the other hand, proceed with Step 18. The Proxy Hostname screen appears. Top Menu Enable Proxy Server A/V RECEIVER No Yes 1/ 2 Return 18 Select 'Change' and press ENTER to confirm your selection. The Edit Proxy Hostname screen appears. Top Menu Proxy Hostname A/V RECEIVER XXXXXXXXXXXXXX Change Top Menu Edit Proxy Hostname A/V RECEIVER abcdefghijklmnopqrstuv 2/ 2 Return Return 19 Enter the address of your proxy server or the domain name. After entry, press or ENTER. The Proxy Port screen appears. 20 Select 'Change' and press ENTER to confirm your selection. The Edit Proxy Port screen appears. Top Menu 11111 Change Proxy Port A/V RECEIVER Top Menu Edit Proxy Port A/V RECEIVER 11111 2/ 2 Return Return 21 Enter the port number of your proxy server. Use the numeric buttons to enter the port number. After entry, press or ENTER. The Settings OK? screen appears. 22 Press ENTER to complete the network setup procedure. The Top Menu screen appears. Checking the network settings You can check the following network settings of this receiver: the MAC address, the IP address, the gateway IP address, the proxy server, the Subnet mask, and the firmware version (for the Home Media Gallery of this receiver). Before proceeding with the following steps, check whether you have followed Steps from 1 to 3 on page 85. 86 En
-
 1
1 -
2
-
3
-
4
-
5
-
6
-
7
-
8
-
9
-
10
-
11
-
12
-
13
-
14
-
15
-
16
-
17
-
18
-
19
-
20
-
21
-
22
-
23
-
24
-
25
-
26
-
27
-
28
-
29
-
30
-
31
-
32
-
33
-
34
-
35
-
36
-
37
-
38
-
39
-
40
-
41
-
42
-
43
-
44
-
45
-
46
-
47
-
48
-
49
-
50
-
51
-
52
-
53
-
54
-
55
-
56
-
57
-
58
-
59
-
60
-
61
-
62
-
63
-
64
-
65
-
66
-
67
-
68
-
69
-
70
-
71
-
72
-
73
-
74
-
75
-
76
-
77
-
78
-
79
-
80
-
 81
81 -
 82
82 -
 83
83 -
 84
84 -
 85
85 -
 86
86 -
 87
87 -
 88
88 -
 89
89 -
 90
90 -
 91
91 -
92
-
93
-
94
-
95
-
96
-
97
-
98
-
99
-
100
-
101
-
102
-
103
-
104
-
105
-
106
-
107
-
108
-
109
-
110
-
111
-
112
-
113
-
114
-
115
-
116
-
117
-
118
-
119
-
120
-
121
-
122
-
123
-
124
-
125
-
126
-
127
-
128
-
129
-
130
-
131
-
132
-
133
-
134
-
135
-
136
-
137
-
138
 |
 |
