Pioneer SC-05 Owner's Manual - Page 94
Other Settings, The Other Setup menu
 |
UPC - 012562891521
View all Pioneer SC-05 manuals
Add to My Manuals
Save this manual to your list of manuals |
Page 94 highlights
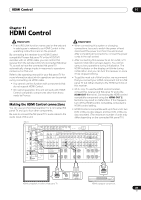
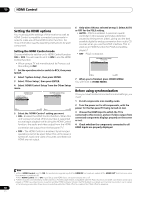
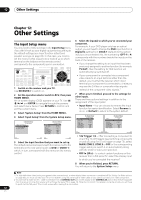
12 Other Settings The Other Setup menu The Other Setup menu is where you can make customized settings to reflect how you are using the receiver. 1 Set the operation selector switch to RCV, then press HOME MENU. An on-screen display (OSD) appears on your TV. Use and ENTER to navigate through the screens and select menu items. Press RETURN to confirm and exit the current menu. 2 Select 'System Setup' from the HOME MENU. 3 Select 'Other Setup', then press ENTER. 4.SystemSetup A/V RECEIVER a.Manual SP Setup b. Input Setup c. OSD Language d. Other Setup 4d.Other Setup A/V RECEIVER 1. Multi Ch In Setup 2. ZONE Audio Setup 3. SR+ Setup 4. HDMI Control Setup 5. Flicker Reduction Setup Exit Return Exit Return 4 Select the setting you want to adjust. If you are doing this for the first time, you may want to adjust these settings in order: • Multi Ch In Setup - Specifies the optional settings for a multi-channel input. • ZONE Audio Setup - Specify your volume setting for a MULTI-ZONE setup (see ZONE Audio Setup on page 95). • SR+ Setup - Specify how you want to control your Pioneer flat panel TV (see SR+ Setup for Pioneer flat panel TVs on page 95). • HDMI Control Setup - Synchronizes this receiver with your Pioneer component supporting HDMI Control (see Setting the HDMI Control mode on page 90). • Flicker Reduction - Adjust the way the OSD screen looks (see Flicker Reduction Setup on page 95). 5 Make the adjustments necessary for each setting, pressing RETURN to confirm after each screen. Multi Channel Input Setup You can adjust the level of the subwoofer for a multichannel input. Also, when the multi-channel input is selected as an input source, you can display the video images of other input sources. In the Multi Channel Input Setup, you can assign a video input to the multi-channel input. 1 Select 'Multi Ch In Setup' from the Other Setup menu. 4d.Other Setup A/V RECEIVER 1. Multi Ch In Setup 2. ZONE Audio Setup 3. SR+ Setup 4. HDMI Control Setup 5. Flicker Reduction Setup Exit Return 2 Select the 'SW Input Gain' setting you want. • 0dB - Outputs sound of the subwoofer at the level originally recorded on the source. • +10dB - Outputs sound of the subwoofer at the level increased by 10 dB. 4d1.Multi Ch In Setup A/V RECEIVER SW Input Gain : Video Input : 0dB DVD Exit Finish 3 Select the 'Video Input' setting you want. When the multi-channel input is selected as an input source, you can display the video images of other input sources. The video input can be selected from the following: DVD, TV/SAT, DVR 1, DVR 2, VIDEO 1, VIDEO 2, VIDEO 3, OFF. 4d1.Multi Ch In Setup A/V RECEIVER SW Input Gain : Video Input : +10dB DVD Exit Finish 4 When you're finished, press RETURN. You will return to the Other Setup menu. 94 En
-
 1
1 -
2
-
3
-
4
-
5
-
6
-
7
-
8
-
9
-
10
-
11
-
12
-
13
-
14
-
15
-
16
-
17
-
18
-
19
-
20
-
21
-
22
-
23
-
24
-
25
-
26
-
27
-
28
-
29
-
30
-
31
-
32
-
33
-
34
-
35
-
36
-
37
-
38
-
39
-
40
-
41
-
42
-
43
-
44
-
45
-
46
-
47
-
48
-
49
-
50
-
51
-
52
-
53
-
54
-
55
-
56
-
57
-
58
-
59
-
60
-
61
-
62
-
63
-
64
-
65
-
66
-
67
-
68
-
69
-
70
-
71
-
72
-
73
-
74
-
75
-
76
-
77
-
78
-
79
-
80
-
81
-
82
-
83
-
84
-
85
-
86
-
87
-
88
-
 89
89 -
 90
90 -
 91
91 -
 92
92 -
 93
93 -
 94
94 -
 95
95 -
 96
96 -
 97
97 -
 98
98 -
 99
99 -
100
-
101
-
102
-
103
-
104
-
105
-
106
-
107
-
108
-
109
-
110
-
111
-
112
-
113
-
114
-
115
-
116
-
117
-
118
-
119
-
120
-
121
-
122
-
123
-
124
-
125
-
126
-
127
-
128
-
129
-
130
-
131
-
132
-
133
-
134
-
135
-
136
-
137
-
138
 |
 |
