Pioneer SC-05 Owner's Manual - Page 69
Multi-zone & Source Ir
 |
UPC - 012562891521
View all Pioneer SC-05 manuals
Add to My Manuals
Save this manual to your list of manuals |
Page 69 highlights
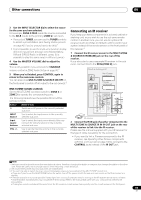
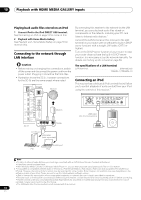
Other connections 09 3 Use the INPUT SELECTOR dial to select the source for the zone you have selected. For example, ZONE 2 CD-R sends the source connected to the CD-R inputs to the primary (ZONE 2) sub room. • If you select TUNER, you can use the TUNER controls to select a preset station (see Saving station presets on page 42 if you're unsure how to do this).1 • It is not possible to use the multi-zone function to play different inputs from among Home Media Gallery, XM and SIRIUS Radio in different zones. (It is possible to play the same input in different zones.) 4 Use the MASTER VOLUME dial to adjust the volume. This is only possible if you selected the VARIABLE volume control in ZONE Audio Setup on page 95.2 5 When you're finished, press CONTROL again to return to the main zone controls. You can also press MULTI-ZONE & SOURCE ON/OFF on the front panel to switch off all output to the sub zone(s).3 MULTI-ZONE remote controls Set the MULTI-ZONE operation switch to ZONE 2 or ZONE 3 to operate the corresponding zone. The following table shows the possible MULTI-ZONE remote controls: Button What it does Switches on/off power in the currently selected sub zone. INPUT SELECT Use to select the input source in the currently selected sub zone. Input source buttons Use to select the input source directly (this may not work for some functions) in the currently selected sub zone. VOL +/- Use to set the listening volume in the currently selected sub zone. Connecting an IR receiver If you keep your stereo components in a closed cabinet or shelving unit, or you wish to use the sub zone remote control in another zone, you can use an optional IR receiver (such as a Niles or Xantech unit) to control your system instead of the remote sensor on the front panel of this receiver.4 1 Connect the IR receiver sensor to the MULTI-ZONE & SOURCE IR IN (MAIN) jack on the rear of this receiver. If you also plan to use a separate IR receiver in the sub room, connect this to the IR IN (ZONE 2) jack. Closet or shelving unit Non-Pioneer IR component IN CONTROL Pioneer component IN OUT LAN(10/100) XM IN HDMI COAXIAL ASSIGNABLE IN 1 (DVD) BD IN IN 2 (CD) IN 3 (DVR2) IN 1 IN 1 (TV/SAT) IN 2 IN (DVR1) 2 IN 3 (VIDEO1) IN 3 IN 4 (CD-R) ASSIGNABLE 1 - 3 ASSIGNABLE OUT 1 (HDMI CTRL) ZONE3/ SOURCE OUT SOURCE OUT OUT 2 OPTICAL DIGITAL 12 V TRIGGER (OUTPUT 12V TOTAL 50mA MAX) SIRIUS IN 1 (DVD) 2 PR IN 1 IN (VIDEO1) PB Y PR ZONE 2 OUT R L ZONE 2 OUT IR IN 1 IN 2 OUT IN CONTROL OUT RS-232C ZONE 3 OUT PHONO CD IN IN SIGNAL GND L CD-R OUT R CAUTION: SPEAKER IMPEDANCE 6Ω ATTENTION: ENCEINTE D'IMPEDANCE D SELECTABLE SEE INSTRUCTION MANUAL SELECTABLE VOIR LE MODE D'EMPLOI IR IN 1 IN 2 OUT IN CONTROL OUT SIGNAL GND L R IR receiver 2 Connect the IR IN jack of another component to the MULTI-ZONE & SOURCE IR IN IR OUT jack on the rear of this receiver to link it to the IR receiver. Please see the manual supplied with your IR receiver for the type of cable necessary for the connection. • If you want to link a Pioneer component to the IR receiver, see Operating other Pioneer components with this unit's sensor on page 108 to connect to the CONTROL jacks instead of the IR OUT jack. Note 1 The tuner cannot be tuned to more than one station at a time. Therefore, changing the station in one zone also changes the station in the other zone. Please be careful not to change stations when recording a radio broadcast. 2 The volume levels of the main and sub zones are independent. 3 • You won't be able to switch the main zone off completely unless you've switched off the MULTI-ZONE control first. • If you don't plan to use the MULTI-ZONE feature for awhile, turn off the power in both the sub and main rooms so that this receiver is in standby. 4 • Remote operation may not be possible if direct light from a strong fluorescent lamp is shining on the IR receiver remote sensor window. • Note that other manufacturers may not use the IR terminology. Refer to the manual that came with your component to check for IR compatibility. • If using two remote controls (at the same time), the IR receiver's remote sensor takes priority over the remote sensor on the front panel. 69 En
-
 1
1 -
2
-
3
-
4
-
5
-
6
-
7
-
8
-
9
-
10
-
11
-
12
-
13
-
14
-
15
-
16
-
17
-
18
-
19
-
20
-
21
-
22
-
23
-
24
-
25
-
26
-
27
-
28
-
29
-
30
-
31
-
32
-
33
-
34
-
35
-
36
-
37
-
38
-
39
-
40
-
41
-
42
-
43
-
44
-
45
-
46
-
47
-
48
-
49
-
50
-
51
-
52
-
53
-
54
-
55
-
56
-
57
-
58
-
59
-
60
-
61
-
62
-
63
-
 64
64 -
 65
65 -
 66
66 -
 67
67 -
 68
68 -
 69
69 -
 70
70 -
 71
71 -
 72
72 -
 73
73 -
 74
74 -
75
-
76
-
77
-
78
-
79
-
80
-
81
-
82
-
83
-
84
-
85
-
86
-
87
-
88
-
89
-
90
-
91
-
92
-
93
-
94
-
95
-
96
-
97
-
98
-
99
-
100
-
101
-
102
-
103
-
104
-
105
-
106
-
107
-
108
-
109
-
110
-
111
-
112
-
113
-
114
-
115
-
116
-
117
-
118
-
119
-
120
-
121
-
122
-
123
-
124
-
125
-
126
-
127
-
128
-
129
-
130
-
131
-
132
-
133
-
134
-
135
-
136
-
137
-
138
 |
 |
