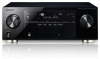
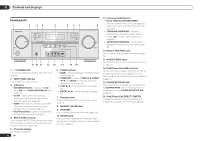
Pioneer VSX-1021-K Owner's Manual - Page 15
Connect a pair of speakers to - video
 |
UPC - 884938132978
View all Pioneer VSX-1021-K manuals
Add to My Manuals
Save this manual to your list of manuals |
Page 15 highlights
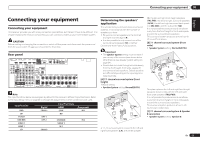
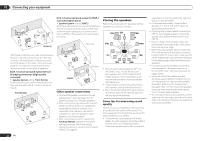
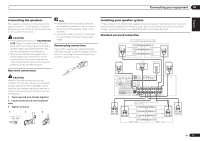
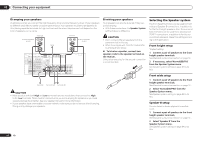
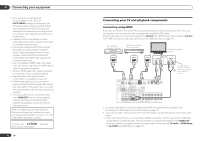
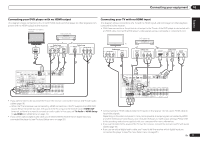
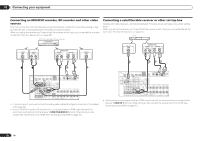
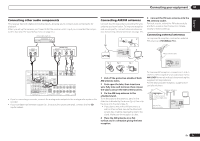
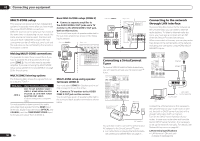
Connecting your equipment 03 Bi-Amping setup Bi-amping connection of the front speakers for high sound quality with 5.1-channel surround sound. 1 Connect bi-amp compatible speakers to the front and surround back speaker terminals. See Bi-amping your speakers on page 14 . 2 Select 'Front Bi-Amp' from the Speaker System menu. See Speaker system setting on page 64 to do this. About the audio connection Types of cables and terminals HDMI Transferable audio signals HD audio Digital (Coaxial) Conventional digital audio Digital (Optical) ZONE 2 setup With these connections you can simultaneously enjoy 5.1-channel surround sound in the main zone with stereo playback on another component in ZONE 2. 1 Connect a pair of speakers to the surround back speaker terminals. See Standard surround connection on page 13 . 2 Select 'ZONE 2' from the Speaker System menu. See Speaker system setting on page 64 to do this. RCA (Analog) (White/Red) Conventional analog audio ! With an HDMI cable, video and audio signals can be transferred in high quality over a single cable. About the video converter The video converter ensures that all video sources are output through all of the MONITOR VIDEO OUT jacks. The only exception is HDMI: since this resolution cannot be downsampled, you must connect your monitor/TV to the receiver's HDMI output when connecting this video source. If several video components are assigned to the same input function (see The Input Setup menu on page 25 ), the converter gives priority to HDMI, component, then composite (in that order). Sound signal priority High picture quality Terminal for connection with source device Terminal for connection with TV monitor HDMI IN HDMI OUT Y PB PR COMPONENT VIDEO IN Y PB PR COMPONENT VIDEO MONITOR OUT VIDEO IN VIDEO MONITOR OUT Video signals can be output Note ! If the video signal does not appear on your TV, try adjusting the resolution settings on your component or display. Note that some components (such as video game units) have resolutions that may not be converted. In this case, try switching Digital Video Conversion (in Setting the Video options on page 48 ) OFF. ! The signal input resolutions that can be converted from the component video input for the HDMI output are 480i/576i, 480p/576p, 720p and 1080i. 1080p signals cannot be converted. ! Only signals with an input resolution of 480i/576i can be converted from the component video input for the composite MONITOR OUT terminals. This item incorporates copy protection technology that is protected by U.S. patents and other intellectual property rights of Rovi Corporation. Reverse engineering and disassembly are prohibited. About HDMI The HDMI connection transfers uncompressed digital video, as well as almost every kind of digital audio. This receiver incorporates High-Definition Multimedia Interface (HDMI®) technology. This receiver supports the functions described below through HDMI connections. ! Digital transfer of uncompressed video (contents protected by HDCP (1080p/24, 1080p/60, etc.)) ! 3D signal transfer ! Deep Color signal transfer ! x.v.Color signal transfer ! ARC (Audio Return Channel) ! Input of multi-channel linear PCM digital audio signals (192 kHz or less) for up to 8 channels ! Input of the following digital audio formats: - Dolby Digital, Dolby Digital Plus, DTS, High bitrate audio (Dolby TrueHD, DTS-HD Master Audio, DTS-HD High Resolution Audio), DVD-Audio, CD, SACD (DSD signal), Video CD, Super VCD ! Synchronized operation with components using the Control with HDMI function (see Control with HDMI function on page 43 ) Note ! An HDMI connection can only be made with DVI-equipped components compatible with both DVI and High Bandwidth Digital Content Protection (HDCP). If you choose to connect to a DVI connector, you will need a separate adaptor (DVIdHDMI) to do so. A DVI connection, however, does not support audio signals. Consult your local audio dealer for more information. En 15
-
 1
1 -
2
-
3
-
4
-
5
-
6
-
7
-
8
-
9
-
 10
10 -
 11
11 -
 12
12 -
 13
13 -
 14
14 -
 15
15 -
 16
16 -
 17
17 -
 18
18 -
 19
19 -
 20
20 -
21
-
22
-
23
-
24
-
25
-
26
-
27
-
28
-
29
-
30
-
31
-
32
-
33
-
34
-
35
-
36
-
37
-
38
-
39
-
40
-
41
-
42
-
43
-
44
-
45
-
46
-
47
-
48
-
49
-
50
-
51
-
52
-
53
-
54
-
55
-
56
-
57
-
58
-
59
-
60
-
61
-
62
-
63
-
64
-
65
-
66
-
67
-
68
-
69
-
70
-
71
-
72
-
73
-
74
-
75
-
76
-
77
-
78
-
79
-
80
-
81
-
82
-
83
-
84
-
85
-
86
-
87
-
88
-
89
-
90
-
91
-
92
-
93
-
94
-
95
-
96
-
97
-
98
-
99
-
100
-
101
-
102
-
103
-
104
-
105
-
106
-
107
-
108
-
109
-
110
-
111
-
112
-
113
-
114
-
115
-
116
-
117
-
118
-
119
-
120
-
121
-
122
-
123
-
124
-
125
-
126
-
127
-
128
-
129
-
130
-
131
-
132
-
133
-
134
-
135
-
136
-
137
-
138
-
139
-
140
-
141
-
142
-
143
-
144
-
145
-
146
-
147
-
148
-
149
-
150
-
151
-
152
-
153
-
154
-
155
-
156
-
157
-
158
-
159
-
160
-
161
-
162
-
163
-
164
-
165
-
166
-
167
-
168
-
169
-
170
-
171
-
172
-
173
-
174
-
175
-
176
-
177
-
178
-
179
-
180
-
181
-
182
-
183
-
184
 |
 |
