Pioneer VSX-1021-K Owner's Manual - Page 21
Adapter Port. - k manual
 |
UPC - 884938132978
View all Pioneer VSX-1021-K manuals
Add to My Manuals
Save this manual to your list of manuals |
Page 21 highlights
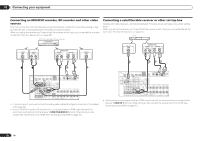
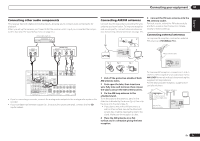
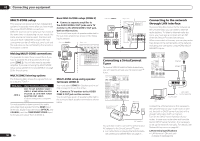
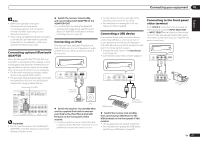
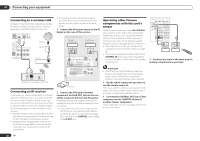
Connecting your equipment 03 Note ! Refer to the operation manual of the equipment you have as the connectedequipment and connection method may differ depending on your Internetenvironment. ! When using a broadband Internet connection, a contract with an Internetservice provider is required. For more details, contact your nearest Internetservice provider. Connecting optional Bluetooth ADAPTER When the Bluetooth® ADAPTER (AS-BT100 or AS-BT200) is connected to this receiver, a product equipped with Bluetooth wireless technology (portable cell phone, digital music player, etc.) can be used to listen to music wirelessly. ! The Bluetooth wireless technology enabled device must support A2DP profiles. ! Pioneer does not guarantee proper connection and operation of this unit with all Bluetooth wireless technology enabled devices. Bluetooth® ADAPTER DVD IN DVR/BDR IN OUT DC OUTPUT for WIRELESS LAN LAN (10/100) COAXIAL ASSIGNABLE IN 1 IN 2 IN 1 IN 2 OPTICAL ASSIGNABLE O R CD-R/TAPE ZONE 2 (OUTPUT 5 V 0.6 A MAX) (DVD) (CD) (TV/SAT) (DVR/BDR) L ADAPTER PORT (OUTPUT 5 V OUT 0.1 A MAX) R ANTENNA CD FM UNBAL L 75 AM LOOP IN SIRIUS A R FRONT R L CENTER SURROUND R L SURROUND BACK / ZONE 2 F R L(Single) IN L IN R T VIDEO 1 DVD SUBWOOFER CAUTION: ATTENTION: PRE OUT SPEAKER IMPEDANCE ENCEINTE D'IMPEDANCE DE 6 -16 . 6 -16 . SPEAKERS SELECT Class 2 Wiring SELECT Important ! Do not move the receiver with the Bluetooth ADAPTER connected. Doing so could cause damage or faulty contact. % Switch the receiver into standby and connect Bluetooth ADAPTER to the ADAPTER PORT. ! For instructions on playing the Bluetooth wireless technology device, see Pairing the Bluetooth ADAPTER and Bluetooth wireless technology device on page 33 . Connecting an iPod This receiver has a dedicated iPod terminal that will allow you to control playback of audio content from your iPod using the controls of this receiver. CONTROL ON / OFF MCACC SETUP MIC VIDEO 2 INPUT 5V 2.1 A L AUDIO R iPod iPhone USB VIDEO iPad iPod cable (supplied) MENU iPod % Switch the receiver into standby then use the supplied iPod cable to connect your iPod to the iPod iPhone iPad USB terminal on the front panel of this receiver. ! It is also possible to connect using the cable included with the iPod, but in this case it is not possible to view pictures via the receiver. ! For the cable connection, also refer to the operating instructions for your iPod. ! For instructions on playing the iPod, see Playing an iPod on page 28 . Connecting a USB device It is possible to play audio and photo files by connecting USB devices to this receiver. It is also possible to connect a USB keyboard (US-international layout) to the receiver to enter text in the following GUI screens. ! Change the input name in the Input Setup menu (page 25). ! Add names to radio station presets (page 31). CONTROL ON / OFF MCACC SETUP MIC VIDEO 2 INPUT 5V 2.1 A L AUDIO R iPod iPhone USB VIDEO iPad USB keyboard USB mass storage device % Switch the receiver into standby then connect your USB device to the USB terminal on the front panel of this receiver. ! This receiver does not support a USB hub. ! For instructions on playing the USB device, see Playing a USB device on page 29 . Connecting to the front panel video terminal Front VIDEO 2 connections are accessed via the front panel using the INPUT SELECTOR or INPUT SELECT c/d button on the remote control. There are standard audio/video jacks. Hook them up the same way you made the rear panel connections. CONTROL ON / OFF MCACC SETUP MIC VIDEO 2 INPUT 5V 2.1 A L AUDIO R iPod iPhone USB VIDEO iPad L R VIDEO AUDIO/VIDEO OUTPUT Video camera (etc.) En 21
-
 1
1 -
2
-
3
-
4
-
5
-
6
-
7
-
8
-
9
-
10
-
11
-
12
-
13
-
14
-
15
-
 16
16 -
 17
17 -
 18
18 -
 19
19 -
 20
20 -
 21
21 -
 22
22 -
 23
23 -
 24
24 -
 25
25 -
 26
26 -
27
-
28
-
29
-
30
-
31
-
32
-
33
-
34
-
35
-
36
-
37
-
38
-
39
-
40
-
41
-
42
-
43
-
44
-
45
-
46
-
47
-
48
-
49
-
50
-
51
-
52
-
53
-
54
-
55
-
56
-
57
-
58
-
59
-
60
-
61
-
62
-
63
-
64
-
65
-
66
-
67
-
68
-
69
-
70
-
71
-
72
-
73
-
74
-
75
-
76
-
77
-
78
-
79
-
80
-
81
-
82
-
83
-
84
-
85
-
86
-
87
-
88
-
89
-
90
-
91
-
92
-
93
-
94
-
95
-
96
-
97
-
98
-
99
-
100
-
101
-
102
-
103
-
104
-
105
-
106
-
107
-
108
-
109
-
110
-
111
-
112
-
113
-
114
-
115
-
116
-
117
-
118
-
119
-
120
-
121
-
122
-
123
-
124
-
125
-
126
-
127
-
128
-
129
-
130
-
131
-
132
-
133
-
134
-
135
-
136
-
137
-
138
-
139
-
140
-
141
-
142
-
143
-
144
-
145
-
146
-
147
-
148
-
149
-
150
-
151
-
152
-
153
-
154
-
155
-
156
-
157
-
158
-
159
-
160
-
161
-
162
-
163
-
164
-
165
-
166
-
167
-
168
-
169
-
170
-
171
-
172
-
173
-
174
-
175
-
176
-
177
-
178
-
179
-
180
-
181
-
182
-
183
-
184
 |
 |
