Pioneer VSX-1021-K Owner's Manual - Page 16
Control, HDMI OUT, TV Audio, HDMI Setup, via HDMI, HDCP ERROR - availability
 |
UPC - 884938132978
View all Pioneer VSX-1021-K manuals
Add to My Manuals
Save this manual to your list of manuals |
Page 16 highlights
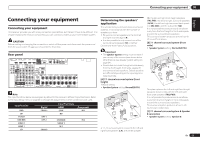
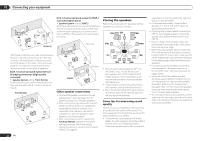
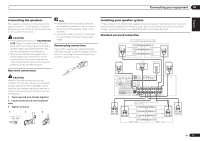
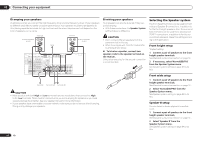
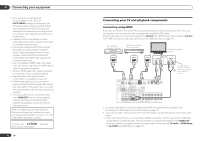
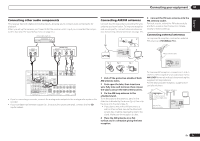
03 Connecting your equipment ! If you connect a component that is not compatible with HDCP, an HDCP ERROR message is displayed on the front panel display. Some components that are compatible with HDCP still cause this message to be displayed, but so long as there is no problem with displaying video this is not a malfunction. ! Depending on the component you have connected, using a DVI connection may result in unreliable signal transfers. ! This receiver supports SACD, Dolby Digital Plus, Dolby TrueHD and DTS-HD Master Audio. To take advantage of these formats, however, make sure that the component connected to this receiver also supports the corresponding format. ! Use a High Speed HDMI® cable. If an HDMI cable other than a High Speed HDMI® cable is used, it may not work properly. ! When an HDMI cable with a built-in equalizer is connected, it may not operate properly. ! Signal transfer is only possible when connected to a compatible component. ! HDMI format digital audio transmissions require a longer time to be recognized. Due to this, interruption in the audio may occur when switching between audio formats or beginning playback. ! Turning on/off the device connected to this unit's HDMI OUT terminal during playback, or disconnecting/connecting the HDMI cable during playback, may cause noise or interrupted audio. HDMI, the HDMI logo and High-Definition Multimedia Interface are trademarks or registered trademarks of HDMI Licensing, LLC in the United States and other countries. "x.v.Color" and marks of Sony Corporation. are trade- 16 En Connecting your TV and playback components Connecting using HDMI If you have an HDMI or DVI (with HDCP) equipped component (Blu-ray disc player (BD), etc.), you can connect it to this receiver using a commercially available HDMI cable. If the TV and playback components support the Control with HDMI feature, the convenient Control with HDMI functions can be used (see Control with HDMI function on page 43 ). Other HDMI/DVIequipped component HDMI OUT HDMI/DVI-compatible Blu-ray disc player HDMI OUT HDMI IN HDMI/DVI-compatible monitor Select one DIGITAL OUT AUDIO OUT COAXIAL OPTICAL R ANALOG L This connection is required in order to listen to the sound of the TV over the receiver. HDMI IN 1 ASSIGNABLE 1 VIDEO 1 IN BD IN DVD IN DVR/BDR IN OUT DC OUTPUT for WIRELESS LAN LAN (10/100) COAXIAL IN 1 ASSIGNABLE IN 2 IN 1 IN 2 OPTICAL ASSIGNABLE CONTROL IN OUT IR IN VIDEO ZONE 2 AUDIO DVR/BDR CD-R/TAPE ZONE 2 (OUTPUT 5 V 0.6 A MAX) OUT MONITOR OUT TV/SAT VIDEO 1 IN IN OUT L ADAPTER PORT (OUTPUT 5 V OUT 0.1 A MAX) R ANTENNA (DVD) (CD) (TV/SAT) (DVR/BDR) OUT DVR/ BDR OUT IN 1 (DVD) ASSIGN ABLE IN 2 (DVR/ BDR) IN DVD IN IN IN CD FM UNBAL L 75 AM LOOP IN SIRIUS A R FRONT R L IN L IN CENTER SURROUND R L SURROUND BACK / ZONE 2 R L(Single) MONITOR OUT Y PB PR COMPONENT VIDEO R TV/SAT VIDEO 1 DVD SUBWOOFER CAUTION: ATTENTION: PRE OUT SPEAKER IMPEDANCE ENCEINTE D'IMPEDANCE DE 6 -16 . 6 -16 . SPEAKERS SEL Class 2Wiring SEL ! For input components, connections other than HDMI connections are also possible (see Connecting your DVD player with no HDMI output on page 17 ). ! If you want to listen to the sound of the TV over the receiver, connect the receiver and TV with audio cables. - When the TV and receiver are connected by HDMI connections, if the TV supports the HDMI ARC (Audio Return Channel) function, the sound of the TV is input to the receiver via the HDMI OUT terminal, so there is no need to connect an audio cable. In this case, set TV Audio at HDMI Setup to via HDMI (see HDMI Setup on page 43 ).
-
 1
1 -
2
-
3
-
4
-
5
-
6
-
7
-
8
-
9
-
10
-
 11
11 -
 12
12 -
 13
13 -
 14
14 -
 15
15 -
 16
16 -
 17
17 -
 18
18 -
 19
19 -
 20
20 -
 21
21 -
22
-
23
-
24
-
25
-
26
-
27
-
28
-
29
-
30
-
31
-
32
-
33
-
34
-
35
-
36
-
37
-
38
-
39
-
40
-
41
-
42
-
43
-
44
-
45
-
46
-
47
-
48
-
49
-
50
-
51
-
52
-
53
-
54
-
55
-
56
-
57
-
58
-
59
-
60
-
61
-
62
-
63
-
64
-
65
-
66
-
67
-
68
-
69
-
70
-
71
-
72
-
73
-
74
-
75
-
76
-
77
-
78
-
79
-
80
-
81
-
82
-
83
-
84
-
85
-
86
-
87
-
88
-
89
-
90
-
91
-
92
-
93
-
94
-
95
-
96
-
97
-
98
-
99
-
100
-
101
-
102
-
103
-
104
-
105
-
106
-
107
-
108
-
109
-
110
-
111
-
112
-
113
-
114
-
115
-
116
-
117
-
118
-
119
-
120
-
121
-
122
-
123
-
124
-
125
-
126
-
127
-
128
-
129
-
130
-
131
-
132
-
133
-
134
-
135
-
136
-
137
-
138
-
139
-
140
-
141
-
142
-
143
-
144
-
145
-
146
-
147
-
148
-
149
-
150
-
151
-
152
-
153
-
154
-
155
-
156
-
157
-
158
-
159
-
160
-
161
-
162
-
163
-
164
-
165
-
166
-
167
-
168
-
169
-
170
-
171
-
172
-
173
-
174
-
175
-
176
-
177
-
178
-
179
-
180
-
181
-
182
-
183
-
184
 |
 |
