Ricoh 5100N Quick Installation Guide - Page 46
In the paper feed area, In the tray 1, In the optional tray
 |
UPC - 026649028502
View all Ricoh 5100N manuals
Add to My Manuals
Save this manual to your list of manuals |
Page 46 highlights
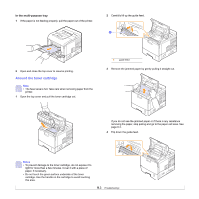
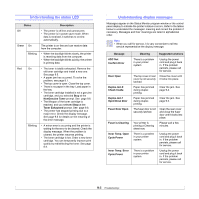
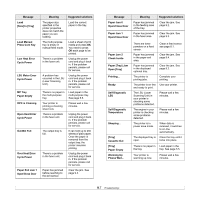
In the paper feed area In the tray 1 1 Pull the tray 1 open. In the optional tray 1 Pull the optional tray open. 2 Remove the jammed paper from the printer. 2 Remove the jammed paper by gently pulling it straight out. Make sure that all of the paper is properly aligned in the tray 1. If the paper does not move when you pull, or if you do not see the paper in this area, stop and go to step 3. 3 Pull the upper tray half way out. 4 Pull the jammed paper straight up and out. If the paper does not move when you pull, or if you do not see the paper in this area, check the fuser area around the toner cartridge. See page 9.3. 3 Insert the tray 1 into the printer until it snaps into place. Printing automatically resumes. 5 Fully insert the trays back into the printer. Printing automatically resumes. 9.2
-
 1
1 -
2
-
3
-
4
-
5
-
6
-
7
-
8
-
9
-
10
-
11
-
12
-
13
-
14
-
15
-
16
-
17
-
18
-
19
-
20
-
21
-
22
-
23
-
24
-
25
-
26
-
27
-
28
-
29
-
30
-
31
-
32
-
33
-
34
-
35
-
36
-
37
-
38
-
39
-
40
-
 41
41 -
 42
42 -
 43
43 -
 44
44 -
 45
45 -
 46
46 -
 47
47 -
 48
48 -
 49
49 -
 50
50 -
 51
51 -
52
-
53
-
54
-
55
-
56
-
57
-
58
-
59
-
60
-
61
-
62
-
63
-
64
-
65
-
66
-
67
-
68
-
69
-
70
-
71
-
72
-
73
-
74
-
75
-
76
-
77
-
78
-
79
-
80
-
81
-
82
-
83
-
84
-
85
-
86
-
87
-
88
-
89
-
90
-
91
-
92
-
93
-
94
-
95
-
96
-
97
-
98
-
99
-
100
-
101
-
102
-
103
-
104
-
105
-
106
-
107
-
108
-
109
-
110
-
111
-
112
-
113
-
114
-
115
-
116
-
117
-
118
-
119
-
120
-
121
-
122
-
123
-
124
-
125
-
126
-
127
-
128
-
129
-
130
-
131
-
132
-
133
-
134
-
135
-
136
-
137
-
138
-
139
-
140
-
141
-
142
-
143
-
144
-
145
-
146
-
147
-
148
-
149
-
150
-
151
-
152
-
153
-
154
-
155
-
156
-
157
-
158
-
159
-
160
-
161
-
162
-
163
-
164
-
165
-
166
-
167
-
168
-
169
-
170
-
171
-
172
-
173
-
174
-
175
-
176
-
177
-
178
 |
 |
