Ricoh 5100N Quick Installation Guide - Page 47
Around the toner cartridge, In the multi-purpose tray
 |
UPC - 026649028502
View all Ricoh 5100N manuals
Add to My Manuals
Save this manual to your list of manuals |
Page 47 highlights
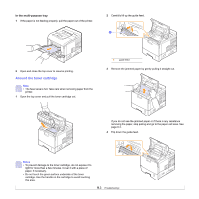
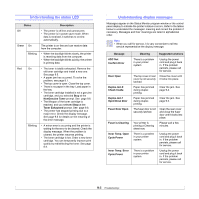
In the multi-purpose tray 1 If the paper is not feeding properly, pull the paper out of the printer. 2 Carefully lift up the guide feed. 1 2 Open and close the top cover to resume printing. Around the toner cartridge Note • The fuser area is hot. Take care when removing paper from the printer. 1 Open the top cover and pull the toner cartridge out. 1 guide feed 3 Remove the jammed paper by gently pulling it straight out. If you do not see the jammed paper or if there is any resistance removing the paper, stop pulling and go to the paper exit area. See page 9.4. 4 Flip down the guide feed. Notes • To prevent damage to the toner cartridge, do not expose it to light for more than a few minutes. Cover it with a piece of paper, if necessary. • Do not touch the green surface underside of the toner cartridge. Use the handle on the cartridge to avoid touching this area. 9.3
-
 1
1 -
2
-
3
-
4
-
5
-
6
-
7
-
8
-
9
-
10
-
11
-
12
-
13
-
14
-
15
-
16
-
17
-
18
-
19
-
20
-
21
-
22
-
23
-
24
-
25
-
26
-
27
-
28
-
29
-
30
-
31
-
32
-
33
-
34
-
35
-
36
-
37
-
38
-
39
-
40
-
41
-
 42
42 -
 43
43 -
 44
44 -
 45
45 -
 46
46 -
 47
47 -
 48
48 -
 49
49 -
 50
50 -
 51
51 -
 52
52 -
53
-
54
-
55
-
56
-
57
-
58
-
59
-
60
-
61
-
62
-
63
-
64
-
65
-
66
-
67
-
68
-
69
-
70
-
71
-
72
-
73
-
74
-
75
-
76
-
77
-
78
-
79
-
80
-
81
-
82
-
83
-
84
-
85
-
86
-
87
-
88
-
89
-
90
-
91
-
92
-
93
-
94
-
95
-
96
-
97
-
98
-
99
-
100
-
101
-
102
-
103
-
104
-
105
-
106
-
107
-
108
-
109
-
110
-
111
-
112
-
113
-
114
-
115
-
116
-
117
-
118
-
119
-
120
-
121
-
122
-
123
-
124
-
125
-
126
-
127
-
128
-
129
-
130
-
131
-
132
-
133
-
134
-
135
-
136
-
137
-
138
-
139
-
140
-
141
-
142
-
143
-
144
-
145
-
146
-
147
-
148
-
149
-
150
-
151
-
152
-
153
-
154
-
155
-
156
-
157
-
158
-
159
-
160
-
161
-
162
-
163
-
164
-
165
-
166
-
167
-
168
-
169
-
170
-
171
-
172
-
173
-
174
-
175
-
176
-
177
-
178
 |
 |
