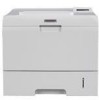
Ricoh 5100N Quick Installation Guide - Page 62
Setting the hard disk in the printer properties, Optional Hard Disk Drive HDD
 |
UPC - 026649028502
View all Ricoh 5100N manuals
Add to My Manuals
Save this manual to your list of manuals |
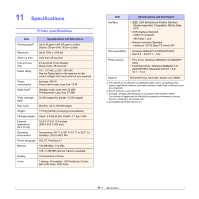
Page 62 highlights
5 Fasten the four screws supplied with your new hard disk. 5 In PCL 6 Properties, click the Printer tab and then check Optional Hard Disk Drive (HDD). In PS Properties, click the Device Option or Device Settings tab and set the Optional Hard Disk Drive (HDD) option to Installed. 6 Click OK. 6 Close the control board cover by aligning the groove on it with the notch on the printer and sliding it. 7 Reinstall the duplex-slot cover or the duplex unit. 8 Reconnect the power cord and printer cable, and turn the printer on. 9 Print a configuration page from the control panel to check if the hard disk is correctly installed. See page 8.1. Setting the hard disk in the printer properties After installing the hard disk, you need to select it in the printer properties to enable its use. Take the following steps: 1 Click the Windows Start menu. 2 For Windows 98/Me/NT 4.0/2000, select Settings and then Printers. For Windows XP/2003, select Printers and Faxes. 3 Select the SP 5100N PCL 6 printer icon or SP 5100N PS printer icon. 4 Click the right mouse button on the printer icon and select Properties. 10.4
-
 1
1 -
2
-
3
-
4
-
5
-
6
-
7
-
8
-
9
-
10
-
11
-
12
-
13
-
14
-
15
-
16
-
17
-
18
-
19
-
20
-
21
-
22
-
23
-
24
-
25
-
26
-
27
-
28
-
29
-
30
-
31
-
32
-
33
-
34
-
35
-
36
-
37
-
38
-
39
-
40
-
41
-
42
-
43
-
44
-
45
-
46
-
47
-
48
-
49
-
50
-
51
-
52
-
53
-
54
-
55
-
56
-
 57
57 -
 58
58 -
 59
59 -
 60
60 -
 61
61 -
 62
62 -
 63
63 -
 64
64 -
 65
65 -
 66
66 -
 67
67 -
68
-
69
-
70
-
71
-
72
-
73
-
74
-
75
-
76
-
77
-
78
-
79
-
80
-
81
-
82
-
83
-
84
-
85
-
86
-
87
-
88
-
89
-
90
-
91
-
92
-
93
-
94
-
95
-
96
-
97
-
98
-
99
-
100
-
101
-
102
-
103
-
104
-
105
-
106
-
107
-
108
-
109
-
110
-
111
-
112
-
113
-
114
-
115
-
116
-
117
-
118
-
119
-
120
-
121
-
122
-
123
-
124
-
125
-
126
-
127
-
128
-
129
-
130
-
131
-
132
-
133
-
134
-
135
-
136
-
137
-
138
-
139
-
140
-
141
-
142
-
143
-
144
-
145
-
146
-
147
-
148
-
149
-
150
-
151
-
152
-
153
-
154
-
155
-
156
-
157
-
158
-
159
-
160
-
161
-
162
-
163
-
164
-
165
-
166
-
167
-
168
-
169
-
170
-
171
-
172
-
173
-
174
-
175
-
176
-
177
-
178
 |
 |
