Ricoh CL3500N Maintenance Manual
Ricoh CL3500N - Aficio Color Laser Printer Manual
 |
UPC - 026649024344
View all Ricoh CL3500N manuals
Add to My Manuals
Save this manual to your list of manuals |
Ricoh CL3500N manual content summary:
- Ricoh CL3500N | Maintenance Manual - Page 1
paper feed unit 15 Loading Paper in the Bypass Tray 20 Switching between Paper Trays 26 Replacing Consumables and Maintenance Kit Replacing the Toner Cartridge 28 Replacing the Waste Toner Bottle 32 Replacing the Photo Conductor Unit 35 Replacing the Fusing Unit 44 When "Replace Fusing Unit - Ricoh CL3500N | Maintenance Manual - Page 2
Y: Paper Tray" Appears 102 When "Remove Misfeed Z: Duplex Unit" Appears 104 Appendix Moving and Transporting the Printer 106 Moving the Printer 106 Transporting the Printer 107 Consumables ...108 Toner Cartridge ...108 Waste Toner Bottle 109 Photo Conductor Unit 109 Intermediate Transfer Unit - Ricoh CL3500N | Maintenance Manual - Page 3
This First Trademarks Microsoft, Windows and Windows NT are registered trademarks of Microsoft Corporation in the United States and/or other countries. IPS-PRINT Printer Language Emulation Copyright© 1999-2000 Oak Technology, Inc., All rights reserved. Bluetooth® is a registered trademark of the - Ricoh CL3500N | Maintenance Manual - Page 4
Read This First How to Read This Manual The following set of symbols is used in this manual. This symbol indicates a potentially hazardous situation that might result in death or serious injury when you misuse the machine without following the instructions under this symbol. Be sure to read the - Ricoh CL3500N | Maintenance Manual - Page 5
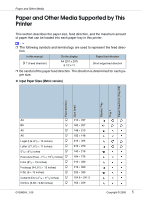
Media Paper and Other Media Supported by This Printer This section describes the paper size, feed direction, and the maximum amount of paper that can be loaded into each paper tray in this printer. ❒ The following symbols and terminology are used to represent the feed direction. In this manual - Ricoh CL3500N | Maintenance Manual - Page 6
(mm) Bypass Tray Tray 1 Paper Feed Unit (Tray 2/3) C6 Env (4.49 × 6.38 inches) K 114 × 162 DL Env (4.33 × 8.66 inches) K 110 × 220 Monarch Env (3 7/8 × 7 1/2 inches) K 98.4 × 190.5 Custom Size - - 16K (7.68 × 101/2 inches) K 195 × 267 • The size is supported and the printer selects it - Ricoh CL3500N | Maintenance Manual - Page 7
Media Feed direction Size (inch) Bypass Tray Tray 1 Paper Feed Unit (Tray 2/3) A5 K 5.83" × 8.26 using the control panel. The supported size may differ depending on the printer language you use. Set as a custom size setting using the control panel. The following sizes are supported: • Bypass Tray - Ricoh CL3500N | Maintenance Manual - Page 8
and Other Media The size is not supported. ❖ Paper weight and number of sheets to be set Tray 1 Paper Feed Unit (Tray 2, Tray 3) Bypass Tray Supported paper weight Maximum number of sheets (plain paper) 60.2 - 104.7 g/m2 (16 - 28 530 (80 g/m2, 20 lb.) lb.) 60.2 - 199 g/m2 (16 - 53 100 (80 - Ricoh CL3500N | Maintenance Manual - Page 9
following two settings using the control panel: • Press [Paper Input] menu, [Paper Type], and then [Plain Paper]. • Press [Maintenance] menu, and then [Thin] or [Normal]. Printer driver setup Click [Plain] or [Plain & Recycled] in the [Type:] list. Enabled paper feeding tray Any input tray can be - Ricoh CL3500N | Maintenance Manual - Page 10
guides inside the bypass tray. Not possible • Print speed is slightly slower than when using plain paper. Printer setup Press [Paper Input] menu, [Paper Type], and then [Labels] on the control panel. Printer driver setup Click [Labels] in the [Type:] list. Enabled paper feeding tray Bypass Tray - Ricoh CL3500N | Maintenance Manual - Page 11
[Paper Input] menu, [Paper Type], and then [Thick Paper 1] or [Thick Paper 2] on the control panel. Printer driver setup Click [Thick1] or [Thick2]in the [Type:] list. Enabled paper feeding tray Bypass Tray: 10 Both-sided printing ❒ Make sure paper is not stacked higher than the paper guides - Ricoh CL3500N | Maintenance Manual - Page 12
when using paper printed on by other than a laser printer (e.g. monochrome and color copiers, ink-jet printers, etc.) • Special paper, such as thermal paper, aluminum foil, carbon paper and conductive paper • Paper whose weight is heavier or lighter than the limitation • Paper with windows, holes - Ricoh CL3500N | Maintenance Manual - Page 13
sure to set the print margins correctly by the application. ❖ Paper A Print area B Feed direction C Approx. 5 mm (0.2 inches) D Approx. 5 mm (0.2 inches) ❒ The print area may vary depending on the paper size, printer language and printer driver settings. ❖ Envelope A Print area B Feed direction 13 - Ricoh CL3500N | Maintenance Manual - Page 14
Paper and Other Media C Approx. 5 mm (0.2 inches) D Approx. 5 mm (0.2 inches) ❒ The print area may vary depending on the paper size, printer language and printer driver settings. 14 - Ricoh CL3500N | Maintenance Manual - Page 15
the standard paper tray (Tray 1). The same procedure can be used for the optional paper feed unit. ❒ Make sure paper is not stacked above the limit mark inside the tray. Misfeeds might occur. ❒ Do not put different types of paper in a single paper tray. A Pull the paper tray out of the printer until - Ricoh CL3500N | Maintenance Manual - Page 16
"Push", and then adjust the rear guide to the paper size you want to load. C Adjust the side guides to the paper size you want to load. D Load paper print side up in the paper tray. ❒ Make sure the top of the stack is not higher than the limit mark inside the tray. ❒ To avoid misfeeds, set the side - Ricoh CL3500N | Maintenance Manual - Page 17
the paper tray fully into the printer. ❒ Misfeeds can occur if the paper tray is not fully inserted. Make sure it is fully inserted. Changing paper size of the paper tray A Pull the paper tray out of the printer until it stops. Lift it slightly, and then pull it fully out. Place the paper tray on - Ricoh CL3500N | Maintenance Manual - Page 18
Paper and Other Media B Remove the paper. C Press "Push", and then adjust the rear guide to the paper size you are using. D Adjust the side guides to the paper size you want to load. 18 - Ricoh CL3500N | Maintenance Manual - Page 19
Specifying a paper type for Tray 1 and the optional paper feed unit Improve printer performance by selecting the optimum paper type for the tray. You can select from the following paper types: • Plain Paper, Recycled Paper, Special Paper, Color Paper, Letterhead, Pre- printed A Press the {Menu} key - Ricoh CL3500N | Maintenance Manual - Page 20
{T} key to display the target paper tray, and then press the {# Enter} key. When the optional paper feed units are installed in the printer, [Tray 2] and [Tray 3] appears (depending on how many units are installed). Paper Type: Tray 2 The paper type selection menu appears. E Press the {U} or {T} key - Ricoh CL3500N | Maintenance Manual - Page 21
using the control panel or the printer driver. Make sure the settings do not conflict. Conflicting settings can cause paper jams or loss of print quality. ❒ Load paper print side down and in the short-edge feed direction. A Open the bypass tray. B Extend the bypass tray. C Slide the side guides - Ricoh CL3500N | Maintenance Manual - Page 22
D Adjust the side guides to the paper width. ❒ Check the top of the stack is not higher than the limit mark inside the tray. ❒ To avoid multi-sheet feeds, fan the paper before loading it onto the paper tray. E Set the paper size using the control panel. Press the {Menu} key. The [Menu]screen appears - Ricoh CL3500N | Maintenance Manual - Page 23
, make settings for thick paper or OHP transparencies using the control panel and printer driver. ❒ The number of pages that can be loaded in the bypass tray differs depending on paper type. Make sure paper is not stacked above the paper guides inside the bypass tray. For details about control - Ricoh CL3500N | Maintenance Manual - Page 24
Paper Input], and then press the {# Enter} key. Menu: Paper Input The paper selection menu appears. C Check [Bypass Size] appears, and then press the {# Enter} key. The paper size selection menu the {U} or {T} key to set the vertical value, and then press the {# Enter} key. Custom Size: Vert - Ricoh CL3500N | Maintenance Manual - Page 25
bypass tray. ❒ The paper type selected using the printer driver overrides that selected using the control panel. A Press the {Menu} key. The [Menu]screen appears. B Press the {U} or {T} key to display [Paper Input], and then press the {# Enter} key. Menu: Paper Input The paper selection menu appears - Ricoh CL3500N | Maintenance Manual - Page 26
] is set with the printer driver, paper will be fed from the standard tray when you start printing. To print on paper loaded in the paper feed unit, switch the tray to be used to the paper feed unit using [Tray Priority] in the [Paper Input] menu. A Press the {Menu} key. The [Menu]screen appears. 26 - Ricoh CL3500N | Maintenance Manual - Page 27
press the {# Enter} key. Menu: Paper Input The paper selection menu appears. C Press the {U} or {T} key to display [Tray Priority], and then press the {# Enter} key. The paper tray selection menu appears. D Press the {U} or {T} key to select the tray type you want to use, and then press the {# Enter - Ricoh CL3500N | Maintenance Manual - Page 28
density, number of pages printed at a time, paper type and size, and environmental conditions such as temperature and humidity. Toner quality degrades over time. You may have to replace the toner cartridge prematurely. We recommend you prepare a new toner cartridge beforehand. The color of the lit - Ricoh CL3500N | Maintenance Manual - Page 29
, magenta, or yellow toner runs out, you can print in black and white using black toner. Change the color mode setting to "Black and White" using the printer driver. ❒ If black toner runs out, you cannot print in black and white or color until the black toner cartridge is replaced. A Open the upper - Ricoh CL3500N | Maintenance Manual - Page 30
Replacing Consumables and Maintenance Kit D Shake the toner cartridge from side to side about 10 times. ❒ Do not open the shutter at the bottom of the toner cartridge. Toner may leak. ❒ The illustration uses the black cartridge as an example. E Check the toner color and location correspond, and - Ricoh CL3500N | Maintenance Manual - Page 31
Replacing Consumables and Maintenance Kit F Insert the toner cartridge in the direction of the arrow. ❒ Do not install and remove toner cartridges unless necessary. Excessive handling results in toner leakage. ❒ All four cartridges are installed using the same procedure. G Close the printer's upper - Ricoh CL3500N | Maintenance Manual - Page 32
and Maintenance Kit Replacing the Waste Toner Bottle • Do not incinerate spilled toner or used toner. Toner dust is flammable and might ignite when exposed to an open flame. Disposal should take place at an authorized dealer or an appropriate collection site. If you dispose of the used toner - Ricoh CL3500N | Maintenance Manual - Page 33
Replacing Consumables and Maintenance Kit D Unlock the waste toner bottle by sliding the green arrow to the position shown. ❒ Do not lock the removed waste toner bottle. Toner may leak. E Remove the used waste toner bottle carefully. 33 - Ricoh CL3500N | Maintenance Manual - Page 34
Replacing Consumables and Maintenance Kit F Place the new waste toner bottle in the position shown in the illustration. G Lock the waste toner bottle by sliding the green arrow to the position shown. ❒ Be sure to lock the waste toner bottle to prevent toner from leaking inside the printer. H Close - Ricoh CL3500N | Maintenance Manual - Page 35
and Maintenance Kit Replacing the Photo Conductor Unit Replace the black photo conductor unit when the following message appears on the display: Replace Black PCU Replace the three color photo conductor units when the following message appears on the display: Replace Color PCU Color photo conductor - Ricoh CL3500N | Maintenance Manual - Page 36
Replacing Consumables and Maintenance Kit ❖ Photo Conductor Unit Color A Turn off the power, and then unplug the power cable. B Open the right cover. C Pull out the green levers on the left and right that are securing the inner cover. 36 - Ricoh CL3500N | Maintenance Manual - Page 37
Replacing Consumables and Maintenance Kit D Lift the inner cover until it stays up. E Remove the photo conductor unit. F Pinch the green lever to unlock the unit. G Pull out the photo conductor unit carefully. 37 - Ricoh CL3500N | Maintenance Manual - Page 38
Replacing Consumables and Maintenance Kit H Pinch the green lever to unlock the unit. I Pull out the photo conductor unit carefully until it stops. J Pinch the green part to release the unit. K Pull out the photo conductor unit carefully. ❒ Be sure to hold the unit with both hands, and pull it out - Ricoh CL3500N | Maintenance Manual - Page 39
Replacing Consumables and Maintenance Kit M Remove the cap attached to the photo conductor unit. ❒ The cap is no longer needed and can be disposed of. N Remove the tape from around Photo Conductor Unit by peeling it down- ward, and then remove the unit's top cover. ❒ Do not remove the cover attached - Ricoh CL3500N | Maintenance Manual - Page 40
Replacing Consumables and Maintenance Kit ❒ After you take the new Photo Conductor Unit out of the bag, quickly install it. O Check the locations for each Photo Conductor Unit. A Photo Conductor Unit (Black) B Photo Conductor Unit (Color) P Align the green arrow at the tip of the photo conductor - Ricoh CL3500N | Maintenance Manual - Page 41
Replacing Consumables and Maintenance Kit ❖ Photo Conductor Unit Black ❖ Photo Conductor Unit Color Q Push the front of the photo conductor unit carefully in sliding the unit from its cover until it stops. ❖ Photo Conductor Unit Black 41 - Ricoh CL3500N | Maintenance Manual - Page 42
Replacing Consumables and Maintenance Kit ❖ Photo Conductor Unit Color ❒ If the photo conductor unit is not correctly installed, print quality will be lost. For example, certain colors may not print. R Lower the inner cover slowly. S Push the left and right edge of the inner cover to secure it. 42 - Ricoh CL3500N | Maintenance Manual - Page 43
Replacing Consumables and Maintenance Kit T Close the right cover carefully. U Plug in the power cable, and then turn on the power. The printer starts calibration. Wait until it stops. The following message appears on the display: Calibrating... Wait until [Ready] appears on the display panel. ❒ Do - Ricoh CL3500N | Maintenance Manual - Page 44
and Maintenance Kit Replacing the Fusing Unit • The inside of this machine gets very hot. Do not touch parts labelled "v"(hot surface). Touching "v" labelled parts (hot surface) could result in burns. • The fusing unit gets very hot. When installing a new fusing unit, turn off the printer and - Ricoh CL3500N | Maintenance Manual - Page 45
Consumables and Maintenance Kit ❖ Transfer Roller ❒ Be sure to make the maintenance setting using the control panel after replacing the fusing unit. The procedure is complete only when the maintenance setting is made. A Turn off the power, and then unplug the power cable. ❒ After power off, wait - Ricoh CL3500N | Maintenance Manual - Page 46
Replacing Consumables and Maintenance Kit D Push the green release buttons on the left and right outwards to unlock the fusing unit. E Remove the fusing unit carefully. F Take the new fusing unit from out from its box. G Place the unit as shown, and then carefully insert the new fusing unit. 46 - Ricoh CL3500N | Maintenance Manual - Page 47
Replacing Consumables and Maintenance Kit H Carefully push in the fusing unit until it clicks into position, and then check that the unit is locked. I Push in the connector. J Open the transfer roller cover. 47 - Ricoh CL3500N | Maintenance Manual - Page 48
Replacing Consumables and Maintenance Kit K Turn the green part in the direction of the arrow, and then remove the transfer roller. L Take out the new transfer roller. ❒ Do not touch the roller part. M Hold the green part as shown, and then insert the transfer roller into the printer. ❒ The end with - Ricoh CL3500N | Maintenance Manual - Page 49
Consumables and Maintenance Kit N Close the transfer roller cover. O Close the front cover carefully. P Turn on the power. Q Make the maintenance setting using the control panel. When "Replace Fusing Unit" Appears on the Display A If the following message appears on the control panel, hold down - Ricoh CL3500N | Maintenance Manual - Page 50
and Maintenance Kit B Press the {U} or {T} key to display [Maintenance], and then press the {# Enter} key. Menu: Maintenance C Press the {U} or {T} key to display [Maint. Reset], and then press the {# Enter} key. Maintenance: Maint. Reset D Press the {U} or {T} key to display [Fusing Unit], and - Ricoh CL3500N | Maintenance Manual - Page 51
Maintenance Kit Replacing the Intermediate Transfer Unit • The inside of this machine gets very hot. Do not touch parts labelled "v" (hot surface). Touching "v" labelled parts could result in burns. Replace the transfer belt when the following message appears on the display: Replace Transfer Belt - Ricoh CL3500N | Maintenance Manual - Page 52
Replacing Consumables and Maintenance Kit B Open printer's right cover. C Remove the waste toner bottle. See p.32 "Replacing the Waste Toner Bottle". D Pull out the green levers on the left and right that are securing the inner cover. E Lift the inner cover until it stays up. 52 - Ricoh CL3500N | Maintenance Manual - Page 53
Replacing Consumables and Maintenance Kit F Unlock the waste toner bottle by sliding the green arrow to the position shown. ❒ Do not lock the removed waste toner bottle. Toner may leak. G Remove the waste toner bottle carefully. 53 - Ricoh CL3500N | Maintenance Manual - Page 54
Replacing Consumables and Maintenance Kit H Loosen the green screws on the left and right by turning them the direc- tion of the arrows. Do not remove the screws. I Pinch the both screws, and then carefully pull out the transfer belt slow- ly until it stops. J Raise the green cover, hold the - Ricoh CL3500N | Maintenance Manual - Page 55
Replacing Consumables and Maintenance Kit L Holding the transfer belt as shown, carefully slide the transfer belt into the printer. M Close the green cover, and then push it in until it stops. N Tighten the green screws on the left and right by turning them the direc- tion of the arrows. 55 - Ricoh CL3500N | Maintenance Manual - Page 56
Replacing Consumables and Maintenance Kit O Place the waste toner bottle in the position shown in the illustration. P Lock the waste toner bottle by sliding the green arrow to the position shown. ❒ Be sure to lock the waste toner bottle to prevent toner from leaking inside the printer. Q Lower the - Ricoh CL3500N | Maintenance Manual - Page 57
Consumables and Maintenance Kit R Push the left and right edge of the inner cover to secure it. S Close the right cover. T Turn on the power. U Make the setting using the control panel. When "Replace Transfer Belt" Appears on the Display A If the following message appears on the control panel - Ricoh CL3500N | Maintenance Manual - Page 58
Consumables and Maintenance Kit When "Replace Transfer Belt soon" Appears on the Display A Press the {Menu} key. The [Menu] screen appears. B Press the {U} or {T} key to display [Maintenance], and then press the {# Enter} key. Menu: Maintenance C Press the {U} or {T} key to display [Maint. Reset - Ricoh CL3500N | Maintenance Manual - Page 59
, explosion or loss of sight. If the machine has laser systems, there is a risk of serious eye damage. • When removing misfed paper, do not touch the fusing unit because it could be very hot. Clean the printer periodically to maintain fine printing. Dry wipe the exterior with a soft cloth. If dry - Ricoh CL3500N | Maintenance Manual - Page 60
the printer is moved, perform automatic color adjustment. A Press the {Menu} key. The [Menu] screen appears. B Press the {U} or {T} key to display [Maintenance], and then press the {# Enter} key. Menu: Maintenance The maintenance menu appears. C Press the {U} or {T} key to display [Color Regist - Ricoh CL3500N | Maintenance Manual - Page 61
Cleaning and Adjusting the Printer Automatic color adjustment takes about 30 seconds. A confirmation message appears when complete. Completed E Press the {Escape} key. Return to the maintenance menu. F Press the {Online} key. The initial screen appears. 61 - Ricoh CL3500N | Maintenance Manual - Page 62
cannot be obtained after a single operation, repeat the cor- rection several times, as needed. ❒ Corrections to color gradation will be applied to all user jobs. ❒ Use the same paper when printing a run of gradation corrections. If a different type of paper is used, corrections may not be apparent - Ricoh CL3500N | Maintenance Manual - Page 63
Cleaning and Adjusting the Printer A Press the {Menu} key. The [Menu]screen appears. B Press the {U} or {T} key to display [Maintenance], and then press the {# Enter} key. Menu: Maintenance The maintenance menu appears. C Press the {U} or {T} key to display [Color Calibrate], and then press the {# - Ricoh CL3500N | Maintenance Manual - Page 64
(cyan), and Y (yel- low) using the same procedure as for the K (black). I If you finished all settings, ensure color is changed to 2. J Check [Yes] is displayed, and press the {# Enter} key to print the changes will not be applied to subsequent print jobs. Calibrate 1: Save and exit Calibrate 1: - Ricoh CL3500N | Maintenance Manual - Page 65
Adjusting the Printer M Check [Yes] is displayed, and then press the {# Enter} key to print grada- tion correction sheet 2. N Perform the same operations as used for setting the gradation correc- tion value using correction 1 to set the gradation correction value of the middle part using correction - Ricoh CL3500N | Maintenance Manual - Page 66
value setting sheet over the color sample of gradation correction 1 of the Color Calibration Sample Sheet and search for a corrected color closest to that of the color sample, and then set its correction value using the operation panel. The currently set correction value is printed in red. 66 - Ricoh CL3500N | Maintenance Manual - Page 67
❒ XXXX represents the printer model name. A K (black) correction values Adjust the printed color when only black toner is used. The currently set correction value is printed in red. B M (magenta) correction values Adjust the printed color when only magenta toner is used. The currently set correction - Ricoh CL3500N | Maintenance Manual - Page 68
Cleaning and Adjusting the Printer A Press the {Menu} key. The [Menu]screen appears. B Press the {U} or {T} key to display [Maintenance], and then press the {# Enter} key. Menu: Maintenance The maintenance menu appears. C Press the {U} or {T} key to display [Color Calibrate], and then press the {# - Ricoh CL3500N | Maintenance Manual - Page 69
of the page appears shaded or the print image is patchy. ❒ Extreme settings may create output that appears dirty. ❒ Image density settings should be made from the application or the printer driv- er whenever possible. ❒ Changing the image density setting can result in deterioration of color balance - Ricoh CL3500N | Maintenance Manual - Page 70
Printing... E Compare the colors on the printed image density test sheet with those on the Image Density Adjusting Card. ❒ If the image density of the Image Density Adjusting Card is equal to the framed part the color you want to adjust, and then press the {# Enter} key. Image Density: Black G - Ricoh CL3500N | Maintenance Manual - Page 71
and Adjusting the Printer Adjusting Tray Registration You can adjust the registration of each tray. The vertical adjustment is used for all trays. Normally, you need not update the registration. But when the optional paper feed unit or the duplex unit is installed, updating is useful in some cases - Ricoh CL3500N | Maintenance Manual - Page 72
Cleaning and Adjusting the Printer F Confirm the position of the image on the test sheet, and then adjust the registration value. In this setting, press the {# Enter} key. Adjustment: Horiz: Tray 2 I Press the {U} or {T} key to set the registration value (mm). Horiz: Tray 2: (-15 +15) 0 72 - Ricoh CL3500N | Maintenance Manual - Page 73
the Printer Increase the value to shift the print area in the positive direction, and decrease to shift in the negative direction. A : Print Area {# Enter} key. The display returns to the print area [Adjustment] menu. Registration: Adjustment K Print the test sheet to confirm the adjustment result. - Ricoh CL3500N | Maintenance Manual - Page 74
Off On / Call Service if error reoccurs Cannot check Signal in Ad hoc Description Recommended Action The printer is out of toner (Black). Replace the toner cartridge (Black). See p.28 "Replacing the Toner Cartridge". The printer is out of toner (Cy- Replace the toner cartridge an). (Cyan - Ricoh CL3500N | Maintenance Manual - Page 75
Troubleshooting Messages Change Setting Tray # / Paper Size: Paper Type: Close Front and/ or Right Cover Close Upper Left Cover DHCP assigned Cannot change Energy Save Mode Error: Enter 10 or 26 characters Error: Enter 5 or 13 characters Hardware Problem Ethernet Hardware Problem HDD Description - Ricoh CL3500N | Maintenance Manual - Page 76
-ROM labeled "Printer Drivers and Utilities": UTILITY 1394 The printer detected an error in the black photo conductor unit. ❒ For details about using the utility tool for IEEE 1394, see the README file in the same directory in the CD-ROM. If the message appears again, contact your sales or service - Ricoh CL3500N | Maintenance Manual - Page 77
Troubleshooting Messages Hardware Problem Color PCU Hardware Problem Option RAM Hardware Problem Parallel I/F Hardware Problem Printer font Hardware Problem USB Hardware Problem Wireless Board Description The printer detected an error in the color photo conductor unit. The printer identified an - Ricoh CL3500N | Maintenance Manual - Page 78
and size loaded in the tray which the printer searched using Tray Locking is invalid for Duplex Print. Change the setting of the indicated paper input tray, or press {Job Reset} key. Form Feed is not possible here. The printer is loading toner. Wait a while. The menu is protected and the Wait - Ricoh CL3500N | Maintenance Manual - Page 79
Tray Remove Misfeed Z: Duplex Unit Remove Paper Standard Tray Replace Black PCU Replace Black PCU soon Replace Color PCU Description Recommended Action There are no files available for Wait for two seconds until the Sample Print job or Locked previous display appears. Print job. The printer - Ricoh CL3500N | Maintenance Manual - Page 80
Troubleshooting Messages Replace Color PCU soon Replace Fusing Unit Replace Fusing Unit soon Replace Transfer Belt Replace Transfer Belt soon Replace Used Toner Bottle Reset Fusing Unit correctly Reset Paper Bypass Tray Reset PCU correctly XXX/XXX Reset Toner XXX/XXX Reset Tray # or Form Feed - Ricoh CL3500N | Maintenance Manual - Page 81
Set transfer belt or waste toner bottle is not set correctly, or er bottle correctly. not set. This message appears if the Enter the SSID. SSID has not been entered. Supply order has failed. The use is required to reset the job. The printer is almost out of ton- Prepare to replace the toner er - Ricoh CL3500N | Maintenance Manual - Page 82
Troubleshooting Messages Waiting... Warming up... Description Recommended Action The printer is waiting for the Wait a while. next data to print. The printer is warming up and Wait until the printer signals not ready. Ready. 82 - Ricoh CL3500N | Maintenance Manual - Page 83
? Load paper into the paper tray or onto the bypass tray. See p.15 "Loading Paper". Can you print a configura- If you cannot print a configuration page, it probably indicates a tion page? printer malfunction. Contact your sales or service representative. See "Test Printing", Setup Guide. Is - Ricoh CL3500N | Maintenance Manual - Page 84
Troubleshooting Possible Cause Solutions How is the signal strength when using Bluetooth ? Try the following: • Check the Bluetooth interface unit is installed properly. • Check there are no obstructions between computer, printer and other devices. • Change the location of the computer. • Change - Ricoh CL3500N | Maintenance Manual - Page 85
Troubleshooting • For a IEEE 1394 (SCSI print) port connection, port 1394_00 (n) *1 should be set. *1 (n) is the number of printers connected. Windows 95/98/Me A Click [Start], point to [Settings] and then click [Printers]. B Click to select the icon of the printer. Next, on the [File] menu, click [ - Ricoh CL3500N | Maintenance Manual - Page 86
Troubleshooting D Click to select the icon of the printer. Next, on the [File] menu, click [Prop- erties]. E Click the [Port] tab. F Check the [Print to the following port(s).] box to confirm that the correct port is selected. Windows NT 4.0 A Click [Start], point to [Settings] and then click [ - Ricoh CL3500N | Maintenance Manual - Page 87
and Other Media". • Check the printer driver's paper settings. See the printer driver Help. When [Replace Black PCU] or [Replace Color PCU] appears on the display, replace the photo conductor unit. See p.35 "Replacing the Photo Conductor Unit". Confirm that the paper is not curled or bent. Envelopes - Ricoh CL3500N | Maintenance Manual - Page 88
p.44 "Replacing the Fusing Unit". Paper is not fed from the select- When you are using a Windows operating system, the printer ed tray. driver settings override those set using the control panel. Set the desired input tray using the printer driver. See the printer driver Help. A printed image - Ricoh CL3500N | Maintenance Manual - Page 89
or glossy paper is being used, printing takes more time to start. It takes too much time to complete the print job. Photographs and other data intensive pages take a long time for the printer to process, so simply wait when printing such data. Changing the settings with printer driver may help - Ricoh CL3500N | Maintenance Manual - Page 90
p.28 "Replacing the Toner Cartridge". When [Replace Black PCU] or [Replace Color PCU] appears on the display, replace the photo conductor unit. See p.35 "Replacing the Photo Conductor Unit". Condensation may have collected. If rapid change in temperature or humidity occurs, use this printer only - Ricoh CL3500N | Maintenance Manual - Page 91
empty: XXX] message appears on the display panel, or the toner end LED on the control panel is lit, replace the toner cartridge of the displayed color. See p.28 "Replacing the Toner Cartridge". When [Replace Black PCU] or [Replace Color PCU] appears on the display, replace the photo conductor unit - Ricoh CL3500N | Maintenance Manual - Page 92
size. For example, When a PDF file set to A4 size paper is printed using PDF Direct Print and letter size paper is installed in the paper tray, the file will print out. This applies similarly to the opposite case. If the problem cannot be solved, contact your sales or service representative. 92 - Ricoh CL3500N | Maintenance Manual - Page 93
noise persists, contact your sales or service representative. No e-mail is received when an Alert occurs, and after resolving an Alert. Confirm [Notify by Email] is [On] using the System Menu on the Control Panel. See "System Menu", Software Guide. Access the printer through the Web browser, log - Ricoh CL3500N | Maintenance Manual - Page 94
or client computer if necessary. ❒ When you use a Bluetooth connection, print jobs are transmitted relatively slowly. If the machine is still not operating satisfactorily, contact your sales or service representative. Consult with the store where the printer was purchased for information about the - Ricoh CL3500N | Maintenance Manual - Page 95
Misfed Paper An error message appears if a paper misfeed occurs. The error message gives the location of the misfeed. ❒ Misfed paper may be covered in toner. Be careful not to get toner on your hands or clothes. ❒ Toner on prints made after removing misfed paper may be loose (inadequately fused - Ricoh CL3500N | Maintenance Manual - Page 96
. A Open the front cover by pushing the front cover release button. ❒ Close the bypass tray if it is extended. If the bypass tray is extended, the front cover does not open. B Carefully remove any misfed paper. ❒ If misfed paper is difficult to move or stuck, proceed to the next step. Do not pull - Ricoh CL3500N | Maintenance Manual - Page 97
Removing Misfed Paper C Pull part "A" in the direction of the arrow, and then open the cover. D Remove any misfed paper. E Close the cover. 97 - Ricoh CL3500N | Maintenance Manual - Page 98
Removing Misfed Paper F Close the front cover carefully. 98 - Ricoh CL3500N | Maintenance Manual - Page 99
Misfed Paper When "Remove Misfeed B: Fusing Unit" Appears • The inside of this machine gets very hot. Do not touch parts labelled "v" (hot surface). Touching "v" labelled parts could result in burns. A Open the front cover by pushing the front cover release button. ❒ Close the bypass tray if - Ricoh CL3500N | Maintenance Manual - Page 100
Removing Misfed Paper C Remove any misfed paper. ❒ If misfed paper is difficult to move or stuck, proceed to the next step. Do not pull forcefully on stuck or jammed paper. D Pull part "B2" toward the front, and then open the guide board. E Remove any misfed paper. 100 - Ricoh CL3500N | Maintenance Manual - Page 101
Removing Misfed Paper F Return the guide board. G Return levers "B1" on the left and right. H Close the front cover carefully. 101 - Ricoh CL3500N | Maintenance Manual - Page 102
Removing Misfed Paper When "Remove Misfeed Y: Paper Tray" Appears A Pull out the tray. ❒ Do not pull the tray out forcefully. If you do, the tray might fall and cause an injury. B Remove any misfed paper. ❖ Tray 1 ❖ Tray 2/3 102 - Ricoh CL3500N | Maintenance Manual - Page 103
Removing Misfed Paper C Slide the paper tray fully into the printer. ❒ Misfeeds can occur if the paper tray is not fully inserted. Make sure it is fully inserted. D Open the front cover by pushing the front cover release button, and then close it - Ricoh CL3500N | Maintenance Manual - Page 104
labelled parts could result in burns. A Open the front cover by pushing the front cover release button. ❒ Close the bypass tray if it is extended. If the bypass tray is extended, the front cover does not open. B Pull the lever marked "PULL" on the duplex unit ( ), and then pull up the duplex unit - Ricoh CL3500N | Maintenance Manual - Page 105
Removing Misfed Paper C Remove any misfed paper. D Close the front cover carefully. 105 - Ricoh CL3500N | Maintenance Manual - Page 106
damaging the cord and causing a fire or an electric shock. • When moving the printer after use, do not take out any of the Toners, Photo Conductor Units, nor the waste toner bottle to prevent toner spill inside the machine. Repack the printer in its original packing materials for transporting. ❒ The - Ricoh CL3500N | Maintenance Manual - Page 107
, move the printer slowly. ❒ If the optional paper feed unit is installed, remove it from the printer, and then move them separately. Transporting the Printer When transporting the printer, leave consumables such as the toner cartridge, photoconductor unit, and waste toner bottle in place inside - Ricoh CL3500N | Maintenance Manual - Page 108
first use this printer, use the four toner cartridges packaged with the printer. ❒ Numbers of pages that can be printed using the toner cartridge supplied with this printer are as follows: Toner Cartridge Black, Cyan, Magenta, Yellow Average printable number of pages per bottle 2,500 pages 108 - Ricoh CL3500N | Maintenance Manual - Page 109
waste toner bottles are not changed when necessary, printing will become impossible. We recommend keeping a stock of bottles or purchasing them soon. Photo Conductor Unit Name Photo Conductor Unit Type 165 Black Photo Conductor Unit Type 165 Color *1 A4/letter 5% test chart, 3 pages/ job. Average - Ricoh CL3500N | Maintenance Manual - Page 110
Appendix ❒ If the transfer unit is not changed when necessary, the quality of printing is not guaranteed. We recommend keeping a stock of transfer unit or purchasing one soon. 110 - Ricoh CL3500N | Maintenance Manual - Page 111
Print Process: Laser beam scanning & Electrophotographic printing 4 drums tandem method ❖ First Print Speed: Monochrome: 13.5 sec or less (A4K) Color: 14.5 sec or less (A4K) ❒ If the printer has not been used for a while, there may be a short delay before the first page starts printing. ❖ Printing - Ricoh CL3500N | Maintenance Manual - Page 112
no error. ❖ Dimensions: Width Printer only (tray not 419 mm (16.5 inch- extended) es) Depth 536 mm (21.1 inches) Height 398 mm (15.7 inches) ❖ Weight: Approximately 32 kg (70.5 lb.) (toner cartridges and power cord included) ❖ Noise Emission *1 : Sound Power Level Stand-by During Printing - Ricoh CL3500N | Maintenance Manual - Page 113
support USB 2.0. Optional: • IEEE 1394 (SCSI print, IP over 1394) • IEEE 802.11b (Wireless LAN) • Parallel (Bidirectional IEEE1284) • Bluetooth ❖ Printer 21.1 × 5.8 inches) ❖ Paper weight: 60.2 - 104.7 g/m2, (16 - 28 lb.) ❖ Weight: Less than 7.5 kg (16.4 lb) AD440 (Duplex Unit) ❖ Dimensions (W × D × - Ricoh CL3500N | Maintenance Manual - Page 114
Sample Print/Locked Print data • Store PostScript fonts • Store log data ❒ You can install PostScript fonts with this optional hard disk drive. With Mac OS, types of fonts supported are PostScript Type 1 and PostScript Type 2. To download them, use Printer Utility for Mac. User Account Enhance Unit - Ricoh CL3500N | Maintenance Manual - Page 115
Do not use a cable Unit Type H ❖ Transmission Spec.: Based on IEEE 802.11b (Wireless LAN) ❖ Protocol: TCP/IP, NetBEUI, IPX/SPX, AppleTalk ❒ SmartDeviceMonitor and Web Image Monitor are supported. ❖ Data Transfer These figures are a guideline for outdoor use. In general, the transmittable distance - Ricoh CL3500N | Maintenance Manual - Page 116
1284 ❖ Required cable: Standard IEEE 1284 compliant Micro Centronics 36 pin cable Bluetooth Interface Unit Type 3245 ❖ Supported Profiles: • SPP (Serial Port Profile) • HCRP (Hardcopy Cable Replacement Profile) • BIP (Basic Imaging Profile) ❖ Frequency Range: 2 GHz ISM band ❖ Data Transmission Speed
-
 1
1 -
 2
2 -
 3
3 -
 4
4 -
 5
5 -
 6
6 -
 7
7 -
8
-
9
-
10
-
11
-
12
-
13
-
14
-
15
-
16
-
17
-
18
-
19
-
20
-
21
-
22
-
23
-
24
-
25
-
26
-
27
-
28
-
29
-
30
-
31
-
32
-
33
-
34
-
35
-
36
-
37
-
38
-
39
-
40
-
41
-
42
-
43
-
44
-
45
-
46
-
47
-
48
-
49
-
50
-
51
-
52
-
53
-
54
-
55
-
56
-
57
-
58
-
59
-
60
-
61
-
62
-
63
-
64
-
65
-
66
-
67
-
68
-
69
-
70
-
71
-
72
-
73
-
74
-
75
-
76
-
77
-
78
-
79
-
80
-
81
-
82
-
83
-
84
-
85
-
86
-
87
-
88
-
89
-
90
-
91
-
92
-
93
-
94
-
95
-
96
-
97
-
98
-
99
-
100
-
101
-
102
-
103
-
104
-
105
-
106
-
107
-
108
-
109
-
110
-
111
-
112
-
113
-
114
-
115
-
116
 |
 |

G1398504_1.00
EN USA G139-8504
Copyright ©
2005
1
Maintenance Guide
Read This First
Trademarks
.............................................................................................................
3
How to Read This Manual
.....................................................................................
4
Paper and Other Media
Paper and Other Media Supported by This Printer
.............................................
5
Paper Recommendations
......................................................................................
9
Loading Paper
............................................................................................................
9
Storing Paper
.............................................................................................................
9
Types of Paper and Other Media
...............................................................................
9
Paper not supported by this printer
..........................................................................
12
Print Area
.................................................................................................................
13
Loading Paper
......................................................................................................
15
Loading Paper in Tray 1 and the optional paper feed unit
.......................................
15
Loading Paper in the Bypass Tray
...........................................................................
20
Switching between Paper Trays
...............................................................................
26
Replacing Consumables and Maintenance Kit
Replacing the Toner Cartridge
...........................................................................
28
Replacing the Waste Toner Bottle
......................................................................
32
Replacing the Photo Conductor Unit
.................................................................
35
Replacing the Fusing Unit
...................................................................................
44
When “Replace Fusing Unit” Appears on the Display
..............................................
49
When “Replace Fusing Unit soon” Appears on the Display
.....................................
49
Replacing the Intermediate Transfer Unit
..........................................................
51