Ricoh Priport HQ7000 Printer Reference - Page 47
Mac OS - Installing the PostScript 3 Printer Driver and Utilities, Setting up the PPD file, Mac OS
 |
View all Ricoh Priport HQ7000 manuals
Add to My Manuals
Save this manual to your list of manuals |
Page 47 highlights
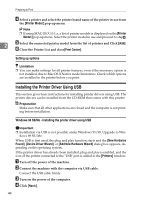
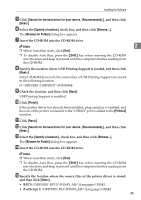
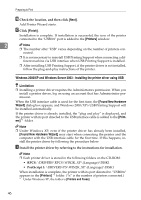
Installing the Software Mac OS - Installing the PostScript 3 Printer Driver and Utilities It is necessary to install a printer driver and a PPD file to print from a Macintosh. Follow this procedure to install a printer driver and a PPD file on Macintosh running OS 8.6 or later versions up to 9.2, and Mac OS X Classic mode. Note ❒ For installation under Mac OS X (v10.1.x), see p.43 "Mac OS X - Installing the 2 PostScript 3 Printer Driver". A Insert the CD-ROM into the CD-ROM drive. B Double-click the CD-ROM icon. C Double-click the [Mac OS] folder. D Double-click the [PS Driver] folder. E Double-click the folder of the language you use. F Open [Disk 1], and then double-click the installer icon. The PostScript 3 printer driver installer window appears. G Follow the instructions on the screen. H Double-click [Extensions] in [System Folder]. I Double-click [Printer Descriptions]. J Double-click the CD-ROM icon on the desktop. K Double-click the [Printer Descriptions] folder in the [Mac OS] folder. L Double-click [Disk 1] in the folder of the language you use. M Drag the PPD file into [Printer Descriptions] in [Extensions] in [System Folder]. N Restart the Macintosh. Setting up the PPD file Preparation Make sure that the printer is connected to an AppleTalk network before performing the following procedure: A On the Apple menu, click [Chooser]. B Click the [Adobe PS] icon. C In the [Select a PostScript Printer:] list, click the name of the printer you want to use. 41
-
 1
1 -
2
-
3
-
4
-
5
-
6
-
7
-
8
-
9
-
10
-
11
-
12
-
13
-
14
-
15
-
16
-
17
-
18
-
19
-
20
-
21
-
22
-
23
-
24
-
25
-
26
-
27
-
28
-
29
-
30
-
31
-
32
-
33
-
34
-
35
-
36
-
37
-
38
-
39
-
40
-
41
-
 42
42 -
 43
43 -
 44
44 -
 45
45 -
 46
46 -
 47
47 -
 48
48 -
 49
49 -
 50
50 -
 51
51 -
 52
52 -
53
-
54
-
55
-
56
-
57
-
58
-
59
-
60
-
61
-
62
-
63
-
64
-
65
-
66
-
67
-
68
-
69
-
70
-
71
-
72
-
73
-
74
-
75
-
76
-
77
-
78
-
79
-
80
-
81
-
82
-
83
-
84
-
85
-
86
-
87
-
88
-
89
-
90
-
91
-
92
-
93
-
94
-
95
-
96
-
97
-
98
-
99
-
100
-
101
-
102
-
103
-
104
-
105
-
106
 |
 |
