Ricoh Priport HQ7000 Printer Reference - Page 50
Setting up options, Installing the Printer Driver Using USB
 |
View all Ricoh Priport HQ7000 manuals
Add to My Manuals
Save this manual to your list of manuals |
Page 50 highlights
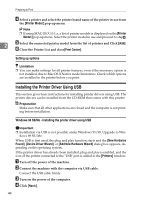
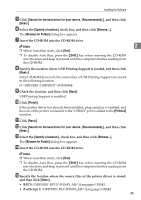
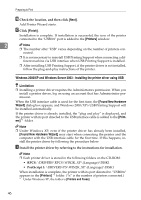
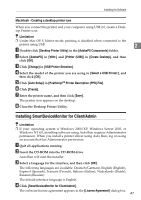
Preparing to Print D Select a printer and select the printer brand name of the printer in use from the [Printer Model:] pop-up menu. Note ❒ If using MAC OS X 10.1.x, a list of printer models is displayed on the[Printer Model:] pop-up menu. Select the printer model in use and proceed to stepF. 2 E Select the connected printer model from the list of printers and Click [Add]. F Close the Printer List and close[Print Center]. Setting up options Limitation ❒ You can make settings for all printer features, even if the necessary option is not installed, due to Mac OS X Native mode limitations. Check which options are installed in the printer before you print. Installing the Printer Driver Using USB This section gives basic instructions for installing printer drivers using USB. The printer drivers can be installed from the CD-ROM that comes with this printer. Preparation Make sure that all other applications are closed and the computer is not printing before installation. Windows 98 SE/Me - Installing the printer driver using USB Important ❒ Installation via USB is not possible under Windows 95/98. Upgrade to Win- dows 98 SE/Me. When USB is first used, the plug and play function starts and the [New Hardware Found], [Device Driver Wizard], or [Add New Hardware Wizard] dialog box appears, depending on the operating system. If the printer driver has already been installed, plug and play is enabled, and the icon of the printer connected to the "USB" port is added to the [Printers] window. A Turn off the power of the machine. B Connect the machine with the computer via USB cable. Connect the USB cable firmly. C Turn on the power of the computer. D Click [Next>]. 44
-
 1
1 -
2
-
3
-
4
-
5
-
6
-
7
-
8
-
9
-
10
-
11
-
12
-
13
-
14
-
15
-
16
-
17
-
18
-
19
-
20
-
21
-
22
-
23
-
24
-
25
-
26
-
27
-
28
-
29
-
30
-
31
-
32
-
33
-
34
-
35
-
36
-
37
-
38
-
39
-
40
-
41
-
42
-
43
-
44
-
 45
45 -
 46
46 -
 47
47 -
 48
48 -
 49
49 -
 50
50 -
 51
51 -
 52
52 -
 53
53 -
 54
54 -
 55
55 -
56
-
57
-
58
-
59
-
60
-
61
-
62
-
63
-
64
-
65
-
66
-
67
-
68
-
69
-
70
-
71
-
72
-
73
-
74
-
75
-
76
-
77
-
78
-
79
-
80
-
81
-
82
-
83
-
84
-
85
-
86
-
87
-
88
-
89
-
90
-
91
-
92
-
93
-
94
-
95
-
96
-
97
-
98
-
99
-
100
-
101
-
102
-
103
-
104
-
105
-
106
 |
 |
