Samsung WMN5090 Installation Instructions - Page 11
location.They
 |
View all Samsung WMN5090 manuals
Add to My Manuals
Save this manual to your list of manuals |
Page 11 highlights
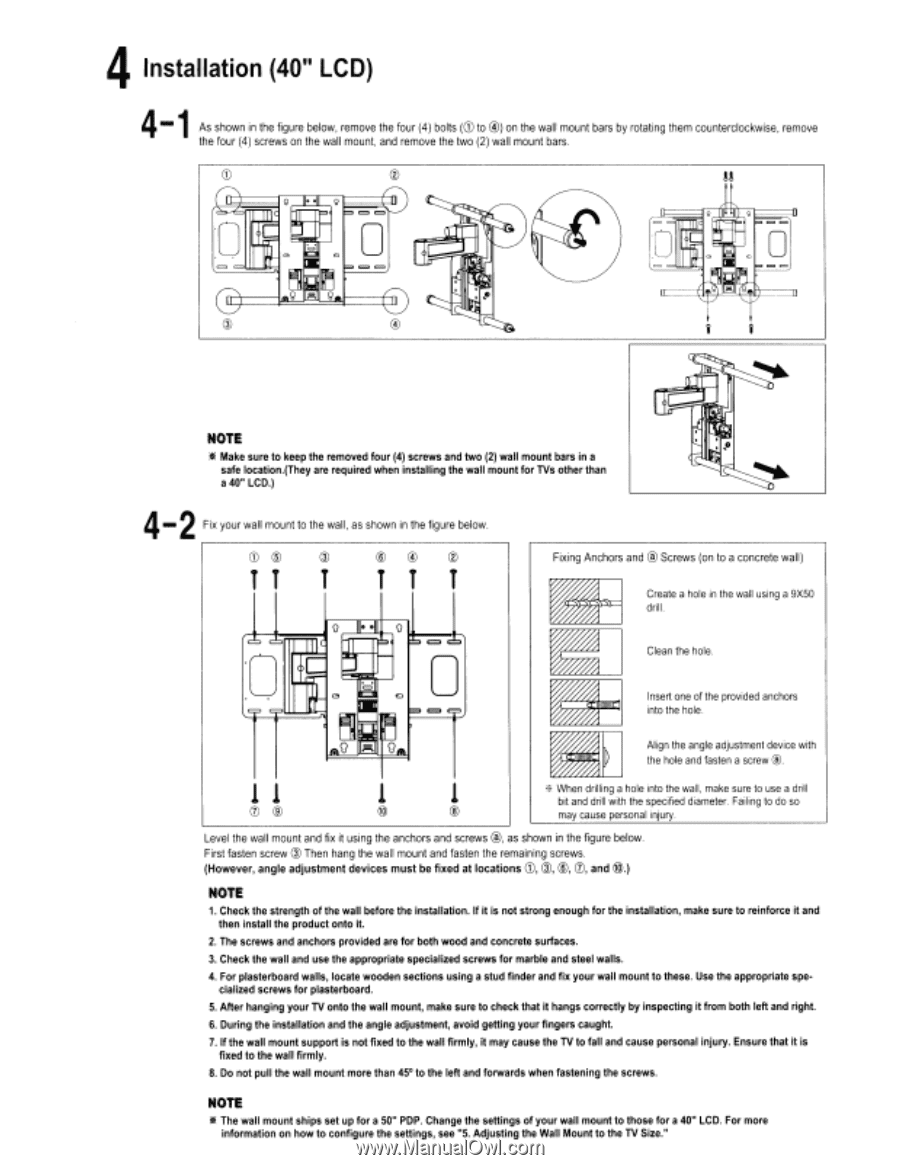
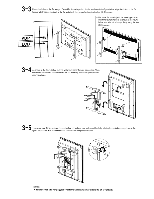
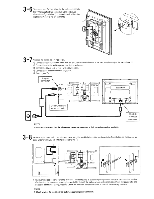
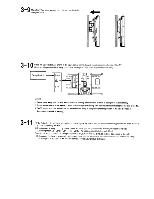
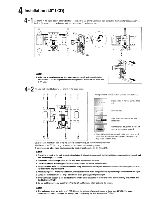
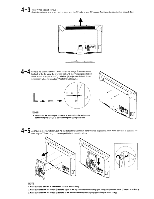
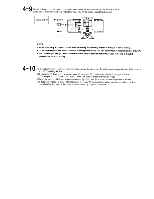
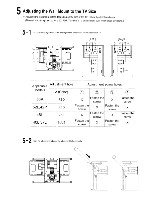
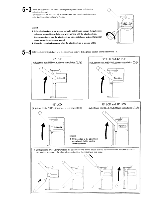
4 Installation (40" LCD) 4 1 As shown in the figure below, remove the four (4) bolts (C) to 0) on the wall mount bars by rotating them counterclockwise, remove the four (4) screws on the wall mount, and remove the two (2) wall mount bars. 0 !!, • • 0 0 0 0 .0 A 9 NOTE Make sure to keep the removed four (4) screws and two (2) wall mount bars in a safe location.(They are required when installing the wall mount for TVs other than a 40" LCD.) 4..2 Fix your wall mount to the wall, as shown in the figure below 0 T T Fixing Anchors and ® Screws (on to a concrete wall) Create a hole in the wall using a 9X50 drill . • • Clean the hole. 0 Insert one of the provided anchors until into the hole. Align the angle adjustment device with the hole and fasten a screw ®. When drilling a hole into the wall, make sure to use a drill bit and drill with the specified diameter. Failing to do so 10 may cause personal injury. Level the wall mount and fix it using the anchors and screws ®, as shown in the figure below. First fasten screw C) Then hang the wall mount and fasten the remaining screws. (However, angle adjustment devices must be fixed at locations Ot , 0, ©, (I), and (0.) NOTE 1. Check the strength of the wall before the installation. If it is not strong enough for the installation, make sure to reinforce it and then install the product onto it. 2. The screws and anchors provided are for both wood and concrete surfaces. 3. Check the wall and use the appropriate specialized screws for marble and steel walls. 4. For plasterboard walls, locate wooden sections using a stud finder and fix your wall mount to these. Use the appropriate spe- cialized screws for plasterboard. 5. After hanging your TV onto the wall mount, make sure to check that it hangs correctly by inspecting it from both left and right. 6. During the installation and the angle adjustment, avoid getting your fingers caught. 7. If the wall mount support is not fixed to the wall firmly, it may cause the TV to fall and cause personal injury. Ensure that it is fixed to the wall firmly. 8. Do not pull the wall mount more than 45° to the left and forwards when fastening the screws. NOTE 4( The wall mount ships set up for a 50" PDP. Change the settings of your wall mount to those for a 40" LCD. For more information on how to configure the settings, see "5. Adjusting the Wall Mount to the TV Size."
-
 1
1 -
2
-
3
-
4
-
5
-
 6
6 -
 7
7 -
 8
8 -
 9
9 -
 10
10 -
 11
11 -
 12
12 -
 13
13 -
 14
14 -
 15
15 -
 16
16 -
17
-
18
-
19
-
20
-
21
-
22
-
23
-
24
-
25
-
26
-
27
-
28
-
29
-
30
-
31
-
32
-
33
-
34
-
35
-
36
-
37
-
38
-
39
 |
 |