Samsung WMN5090 Installation Instructions - Page 35
Size], Quick, Installation, Guide, 40inch, Backside
 |
View all Samsung WMN5090 manuals
Add to My Manuals
Save this manual to your list of manuals |
Page 35 highlights
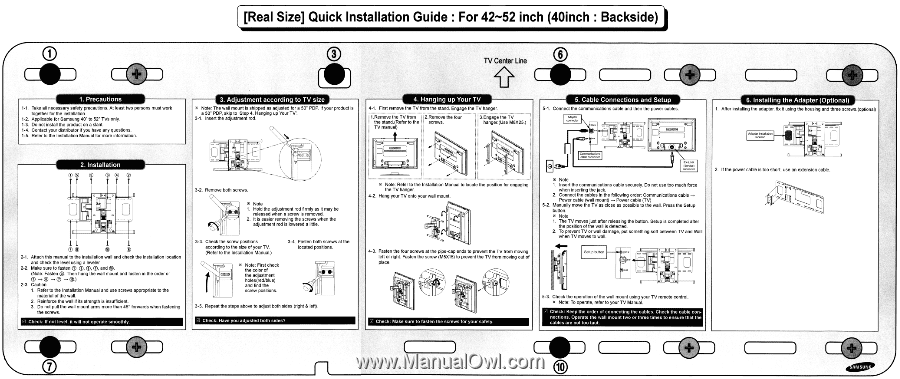
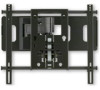
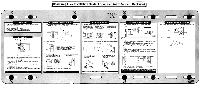
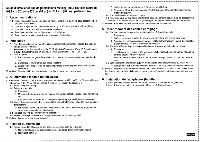
[Real Size] Quick Installation Guide : For 4252 inch (40inch : Backside) 0 TV Center Line 6 coo 1. Precautions 1-1. Take all necessary safety precautions. At least two persons must work together for the installation. 1-2. Applicable for Samsung 40" to 52" TVs only. 1-3. Do not install the product on a slant. 1-4. Contact your distributor if you have any questions. 1-5. Refer to the Installation Manual for more information. A • Note: The wall mount is shipped as adjusted for a 50" PDP. If your product is a 50" PDP, skip to 'Step 4. Hanging up Your TV'. 3-1. Insert the adjustment rod. 0 0 2. Installation CD O TT TT T g 11 1 1 CD CD 0 ® 2-1. Attach this manual to the installation wall and check the installation location and check the level using a leveler. 2-2. Make sure to fasten C), C), ®, C), and ®. (Note: Fasten ®. Then hang the wall mount and fasten in the order of 0 0.) 2-3. Caution 1. Refer to the Installation Manual and use screws appropriate to the material of the wall. 2. Reinforce the wall if its strength is insufficient. 3. Do not pull the wall mount arms more than 45° forwards when fastening the screws. WI Check: If not level, it will not operate smoothly. 0 0 3-2. Remove both screws. ............ X Note 1. Hold the adjustment rod firmly as it may be released when a screw is removed. 2. It is easier removing the screws when the adjustment rod is lowered a little. 3-3. Check the screw positions according to the size of your TV. (Refer to the Installation Manual.) 3-4. Fasten both screws at the located positions. X Note: First check the color of the adjustment holes(red/blue) and find the screw positions. 3-5. Repeat the steps above to adjust both sides (right & left). El Check: Have you adjusted both sides? 4. Hanging up Your TV 4-1. First remove the TV from the stand. Engage the TV hanger. 1.Remove the TV from 2.Remove the four the stand.(Refer to the screws. TV manual) 3.Engage the TV hanger.(Use M8X25.) U 0 0 0 0 Note: Refer to the Installation Manual to locate the position for engaging the TV hanger. 4-2. Hang your TV onto your wall mount. 4-3. Fasten the four screws at the pipe-cap ends to prevent the TV from moving left or right. Fasten the screw (M5X15) to prevent the TV from moving out of place. • El Check: Make sure to fasten the screws for your safety. 5. Cable Connections and Setup 5-1. Connect the communications cable and then the power cables. Adapter connector ID Communications cable connector -I ' 0 0 EX-LINK (Service) connector X Note 1. Insert the communications cable securely. Do not use too much force when inserting the jack. 2. Connect the cables in the following order: Communications cable -> Power cable (wall mount) -> Power cable (TV) 5-2. Manually move the TV as close as possible to the wall. Press the Setup button. X Note 1. The TV moves just after releasing the button. Setup is completed after the position of the wall is detected. 2. To prevent TV or wall damage, put something soft between TV and Wall when TV moves to wall. Setup button @51UP 0 all EX U E = 0 0 = 0 4= 5-3. Check the operation of the wall mount using your TV remote control. X Note: To operate, refer to your TV Manual. WI Check: Keep the order of connecting the cables. Check the cable connections. Operate the wall mount two or three times to ensure that the cables are not too taut. 6. Installing the Adapter (Optional) 1. After installing the adapter, fix it using the housing and three screws.(optional) Adapter installation location 0 0 • • = 0 0 ( I It gm 2. If the power cable is too short, use an extension cable. 10
-
 1
1 -
2
-
3
-
4
-
5
-
6
-
7
-
8
-
9
-
10
-
11
-
12
-
13
-
14
-
15
-
16
-
17
-
18
-
19
-
20
-
21
-
22
-
23
-
24
-
25
-
26
-
27
-
28
-
29
-
 30
30 -
 31
31 -
 32
32 -
 33
33 -
 34
34 -
 35
35 -
 36
36 -
 37
37 -
 38
38 -
 39
39
 |
 |