Sharp AR-337 AR-287 , AR-337 , AR-407 Operation Manual - Page 107
PART NAMES AND FUNCTIONS, Touch Panel Basic screen
 |
View all Sharp AR-337 manuals
Add to My Manuals
Save this manual to your list of manuals |
Page 107 highlights
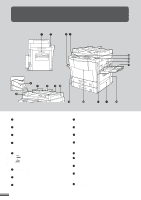
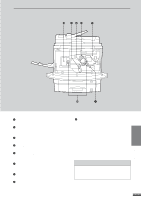
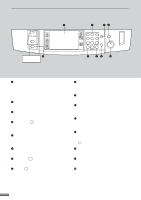
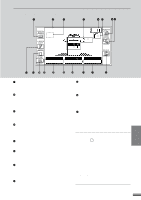
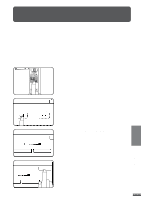
Touch Panel (Basic screen) PART NAMES AND FUNCTIONS READY TO COPY. 1.81/2 11 2.11 17 ORIGINAL 81/2 11 81/2 11R AUTO EXPOSURE AUTO 81/2 11 PAPER SELECT 100% COPY RATIO 6 CHAPTER CUSTOM SETTINGS key Press to set key operator programs or adjust the contrast of the touch panel. 2-SIDED COPY key Press to select the 1-sided to 1-sided, 1-sided to 2-sided, 2-sided to 1-sided or 2-sided to 2-sided copy mode. OUTPUT key Press to select the finisher mode: SORT or GROUP. SCAN key Press to select the network scanner function. (Optional Printer Expansion Kit and Network Scanner Expansion Kit must be installed.) EXPOSURE display Indicates the selected exposure mode. EXPOSURE key (p. 2-16) Press to select the exposure mode: AUTO, TEXT, TEXT/PHOTO, or PHOTO. PAPER SELECT display Displays the selected paper size. When "AUTO" is displayed, paper size matching the original and copy ratio will be automatically selected. PAPER SELECT key Press to select the desired paper tray. COPY RATIO display Displays the copy ratios for reductions or enlargements. COPY RATIO key Press to select a reduction or enlargement copy ratio or select the automatic copy ratio selection mode. REVIEW key Press to check the settings of selected functions. Initial settings The copier assumes the initial settings when the CLEAR ALL ( CA ) key is pressed and approximately 1 minute after the last copy is made in any mode. Except for the paper tray selection, the copier also assumes the initial setting when it is turned on. q Copy ratio: 100% q Automatic exposure q Copy quantity: 0 q All special copier modes are set to off. q Tray select: Paper tray 1 (At power on, the previously selected tray will again be selected.) Optional large capacity tray will be selected when installed. 5 KEY OPERATOR Initial settings can be programmed as desired. The auto clear time can also be changed. See pages 17 and 21 of the KEY OPERATOR'S GUIDE. 6-5 GENERAL INFORMATION Part names and functions
-
 1
1 -
2
-
3
-
4
-
5
-
6
-
7
-
8
-
9
-
10
-
11
-
12
-
13
-
14
-
15
-
16
-
17
-
18
-
19
-
20
-
21
-
22
-
23
-
24
-
25
-
26
-
27
-
28
-
29
-
30
-
31
-
32
-
33
-
34
-
35
-
36
-
37
-
38
-
39
-
40
-
41
-
42
-
43
-
44
-
45
-
46
-
47
-
48
-
49
-
50
-
51
-
52
-
53
-
54
-
55
-
56
-
57
-
58
-
59
-
60
-
61
-
62
-
63
-
64
-
65
-
66
-
67
-
68
-
69
-
70
-
71
-
72
-
73
-
74
-
75
-
76
-
77
-
78
-
79
-
80
-
81
-
82
-
83
-
84
-
85
-
86
-
87
-
88
-
89
-
90
-
91
-
92
-
93
-
94
-
95
-
96
-
97
-
98
-
99
-
100
-
101
-
 102
102 -
 103
103 -
 104
104 -
 105
105 -
 106
106 -
 107
107 -
 108
108 -
 109
109 -
 110
110 -
 111
111 -
 112
112 -
113
-
114
-
115
-
116
-
117
-
118
-
119
-
120
-
121
-
122
-
123
-
124
-
125
-
126
-
127
-
128
-
129
-
130
-
131
-
132
-
133
-
134
-
135
-
136
-
137
-
138
-
139
-
140
-
141
-
142
-
143
-
144
-
145
-
146
-
147
-
148
-
149
-
150
-
151
-
152
 |
 |
