Sharp AR-337 AR-287 , AR-337 , AR-407 Operation Manual - Page 52
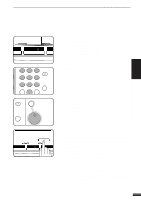
Press the PAMPHLET COPY key on the touch panel., Select the type of originals., Select the binding
 |
View all Sharp AR-337 manuals
Add to My Manuals
Save this manual to your list of manuals |
Page 52 highlights
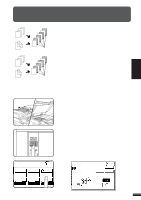
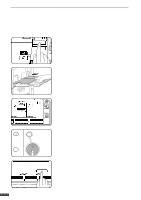
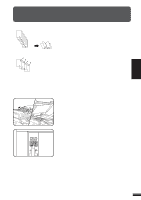
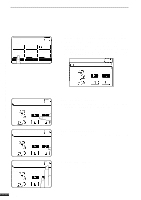
PAMPHLET COPY 3 CHAPTER SPECIAL FUNCTIONS Pamphlet copy READY TO COPY. SPECIAL MODES MARGIN SHIFT ERASE MULTI SHOT COVERS PAMPHLET COPY AUTO EXPOSURE IMAGE EDIT AUTO 81/2 11 PAPER SELECT OK DUAL PAGE COPY TRANSPARENCY INSERTS TEXT STAMP 100% COPY RATIO 3 Press the "PAMPHLET COPY" key on the touch panel. q The setting screen for PAMPHLET COPY will appear. q Depending on installation of an optional component, the "PAMPHLET COPY" function may be included in the "IMAGE EDIT" menu. In this case, press the "IMAGE EDIT" key and then press the "PAMPHLET COPY" key. READY TO COPY. PAMPHLET COPY OK CANCEL OK ORIGINAL 1-SIDED LEFT BINDING 2-SIDED RIGHT BINDING READY TO COPY. PAMPHLET COPY OK CANCEL OK ORIGINAL 1-SIDED LEFT BINDING 4 Select the type of originals. q Indicate whether the originals are 1-sided or 2-sided using the "1-SIDED" or "2-SIDED" key on the touch panel. 2-SIDED RIGHT BINDING READY TO COPY. PAMPHLET COPY OK CANCEL OK ORIGINAL 1-SIDED LEFT BINDING 5 Select the binding position. q Select "LEFT BINDING" or "RIGHT BINDING" on the touch panel. 2-SIDED RIGHT BINDING READY TO COPY. PAMPHLET COPY OK CANCEL OK ORIGINAL 1-SIDED LEFT BINDING 6 Press the upper "OK" key. 2-SIDED RIGHT BINDING 3-18
-
 1
1 -
2
-
3
-
4
-
5
-
6
-
7
-
8
-
9
-
10
-
11
-
12
-
13
-
14
-
15
-
16
-
17
-
18
-
19
-
20
-
21
-
22
-
23
-
24
-
25
-
26
-
27
-
28
-
29
-
30
-
31
-
32
-
33
-
34
-
35
-
36
-
37
-
38
-
39
-
40
-
41
-
42
-
43
-
44
-
45
-
46
-
 47
47 -
 48
48 -
 49
49 -
 50
50 -
 51
51 -
 52
52 -
 53
53 -
 54
54 -
 55
55 -
 56
56 -
 57
57 -
58
-
59
-
60
-
61
-
62
-
63
-
64
-
65
-
66
-
67
-
68
-
69
-
70
-
71
-
72
-
73
-
74
-
75
-
76
-
77
-
78
-
79
-
80
-
81
-
82
-
83
-
84
-
85
-
86
-
87
-
88
-
89
-
90
-
91
-
92
-
93
-
94
-
95
-
96
-
97
-
98
-
99
-
100
-
101
-
102
-
103
-
104
-
105
-
106
-
107
-
108
-
109
-
110
-
111
-
112
-
113
-
114
-
115
-
116
-
117
-
118
-
119
-
120
-
121
-
122
-
123
-
124
-
125
-
126
-
127
-
128
-
129
-
130
-
131
-
132
-
133
-
134
-
135
-
136
-
137
-
138
-
139
-
140
-
141
-
142
-
143
-
144
-
145
-
146
-
147
-
148
-
149
-
150
-
151
-
152
 |
 |
