Sharp AR-337 AR-287 , AR-337 , AR-407 Operation Manual - Page 12
Using The Touch Panel - imager
 |
View all Sharp AR-337 manuals
Add to My Manuals
Save this manual to your list of manuals |
Page 12 highlights
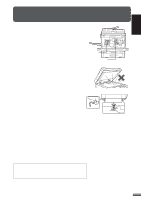
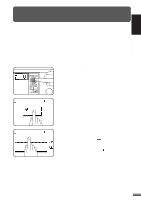
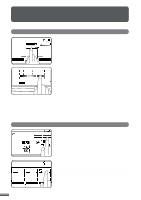
1 CHAPTER GETTING STARTED Using the touch panel USING THE TOUCH PANEL How to use the touch panel READY TO COPY. 1.81/2 11 2.11 17 AUTO EXPOSURE AUTO 81/2 11 PAPER SELECT 100% COPY RATIO You can set or cancel a function displayed on the touch panel by pressing (touching) a key with a finger. The touch key operation can be confirmed with a beep tone (and highlighted display). 5 KEY OPERATOR For the beep tone to be heard, the beep tone must be enabled by a key operator program. See page 27 of the KEY OPERATOR'S GUIDE. If any keys are displayed gray, the keys have been disabled. If you press these keys, two short beeps will be sounded. RECALL STORE/DELETE Selection of function ERASE EDGE ERASE CENTER ERASE EDGE+CENTER ERASE CANCEL OK OK 1/2 (0~1) inch To register the selected settings for a function, press the "OK" key on the setting screen. The settings indicated by a highlighted display will be registered as a selected function. READY TO COPY. SPECIAL MODES MARGIN SHIFT ERASE MULTI SHOT COVERS PAMPHLET COPY AUTO EXPOSURE IMAGE EDIT AUTO 81/2 11 PAPER SELECT OK DUAL PAGE COPY TRANSPARENCY INSERTS TEXT STAMP 100% COPY RATIO 1-8 Some special functions can be selected by pressing the relevant keys on the SPECIAL MODES screen (page 3-4) or on the IMAGE EDIT menu (page 3-21) to highlight the keys. To cancel these functions, press the relevant keys again to return the keys to the normal display. These functions are: Dual page copying, Centering, B/W reverse, and Binding change.
-
 1
1 -
2
-
3
-
4
-
5
-
6
-
 7
7 -
 8
8 -
 9
9 -
 10
10 -
 11
11 -
 12
12 -
 13
13 -
 14
14 -
 15
15 -
 16
16 -
 17
17 -
18
-
19
-
20
-
21
-
22
-
23
-
24
-
25
-
26
-
27
-
28
-
29
-
30
-
31
-
32
-
33
-
34
-
35
-
36
-
37
-
38
-
39
-
40
-
41
-
42
-
43
-
44
-
45
-
46
-
47
-
48
-
49
-
50
-
51
-
52
-
53
-
54
-
55
-
56
-
57
-
58
-
59
-
60
-
61
-
62
-
63
-
64
-
65
-
66
-
67
-
68
-
69
-
70
-
71
-
72
-
73
-
74
-
75
-
76
-
77
-
78
-
79
-
80
-
81
-
82
-
83
-
84
-
85
-
86
-
87
-
88
-
89
-
90
-
91
-
92
-
93
-
94
-
95
-
96
-
97
-
98
-
99
-
100
-
101
-
102
-
103
-
104
-
105
-
106
-
107
-
108
-
109
-
110
-
111
-
112
-
113
-
114
-
115
-
116
-
117
-
118
-
119
-
120
-
121
-
122
-
123
-
124
-
125
-
126
-
127
-
128
-
129
-
130
-
131
-
132
-
133
-
134
-
135
-
136
-
137
-
138
-
139
-
140
-
141
-
142
-
143
-
144
-
145
-
146
-
147
-
148
-
149
-
150
-
151
-
152
 |
 |
