Sharp AR-337 AR-287 , AR-337 , AR-407 Operation Manual - Page 58
Repeat Copy
 |
View all Sharp AR-337 manuals
Add to My Manuals
Save this manual to your list of manuals |
Page 58 highlights
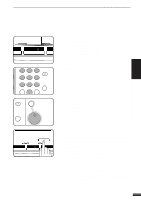
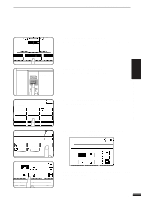
IMAGE EDITING FUNCTIONS 3 CHAPTER SPECIAL FUNCTIONS Image editing functions INTERRUPT CLEAR C CLEAR ALL CA START 8 Press the START key. q If the document feeder is used, scanning of originals and copying will start. q If the document glass is used in the SORT mode, proceed to the next step. PLACE NEXT ORIGINAL. PRESS [START]. WHEN FINISHED, PRESS [READ-END]. READ-END AUTO IMAGE AUTO EXPOSURE 11 17 PAPER SELECT 100% COPY RATIO 9 Replace the finished original with the next original after the START key indicator lights up, and then press the START key. Repeat this step until all originals have been scanned. Then, press the "READ-END" key on the touch panel. q Copying will start at this time. q Up to 120 sheets of 8-1/2" x 11" originals or up to 60 sheets of originals larger than 8-1/2" x 11" can be scanned. q To cancel the CENTERING function, press the "CENTERING" key again on the IMAGE EDIT menu screen. REPEAT COPY C B C C B B C C B B REPEAT COPY is used to produce repeated images of an original on a single sheet of paper. Border lines can be drawn to separate repeated images. q Up to 16 (4 x 4) copies can be made on a single sheet. q When a standard size original is copied onto a standard size paper, copy ratio will be automatically calculated based on the original size and the number of the images required in single sheet of paper. When the copier cannot detect the size of original, however, copy ratio will be automatically set to 100%. q If the proper reduction ratio is calculated as less than 25%, part of the original will not be copied. In that case the reduction ratio will be set to 25% showing the following message on the display. "IMAGE DOES NOT FIT INTO THE IMAGE AREA. COPY RATIO WILL BE SET TO 25%." 1 Place the originals in the document feeder tray or on the document glass. 3-24
-
 1
1 -
2
-
3
-
4
-
5
-
6
-
7
-
8
-
9
-
10
-
11
-
12
-
13
-
14
-
15
-
16
-
17
-
18
-
19
-
20
-
21
-
22
-
23
-
24
-
25
-
26
-
27
-
28
-
29
-
30
-
31
-
32
-
33
-
34
-
35
-
36
-
37
-
38
-
39
-
40
-
41
-
42
-
43
-
44
-
45
-
46
-
47
-
48
-
49
-
50
-
51
-
52
-
 53
53 -
 54
54 -
 55
55 -
 56
56 -
 57
57 -
 58
58 -
 59
59 -
 60
60 -
 61
61 -
 62
62 -
 63
63 -
64
-
65
-
66
-
67
-
68
-
69
-
70
-
71
-
72
-
73
-
74
-
75
-
76
-
77
-
78
-
79
-
80
-
81
-
82
-
83
-
84
-
85
-
86
-
87
-
88
-
89
-
90
-
91
-
92
-
93
-
94
-
95
-
96
-
97
-
98
-
99
-
100
-
101
-
102
-
103
-
104
-
105
-
106
-
107
-
108
-
109
-
110
-
111
-
112
-
113
-
114
-
115
-
116
-
117
-
118
-
119
-
120
-
121
-
122
-
123
-
124
-
125
-
126
-
127
-
128
-
129
-
130
-
131
-
132
-
133
-
134
-
135
-
136
-
137
-
138
-
139
-
140
-
141
-
142
-
143
-
144
-
145
-
146
-
147
-
148
-
149
-
150
-
151
-
152
 |
 |
