Sharp AR-337 AR-287 , AR-337 , AR-407 Operation Manual - Page 13
Sharp AR-337 Manual
 |
View all Sharp AR-337 manuals
Add to My Manuals
Save this manual to your list of manuals |
Page 13 highlights
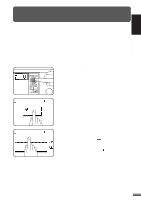
1 CHAPTER GETTING STARTED Using the touch panel Function setting icons READY TO COPY. READY TO COPY. ERASE EDGE ERASE CENTER ERASE EDGE+CENTER ERASE 1.81/2 11 2.11 17 CANCEL OK OK 1/2 (0~1) inch USING THE TOUCH PANEL Selected special functions are indicated with their icons on the basic screen. The setting screen for a selected function can be easily called by pressing its icon. If multiple special functions are selected, up to six icons will be displayed. The function setting icons are listed below. The content of the icons indicated by *1 will change depending upon the particular settings for these functions. *1 Margin shift (p.3-4) *1 Erase (p.3-6) Dual page copying (p.3-8) *1 Multi shot (p.3-10) *1 Covers (p.3-13) *1 Transparency film with insert sheets (p.3-15) Pamphlet copy (p.3-17) Job build (p.3-20) Centering (p.3-22) *1 Repeat copy (p.3-24) B/W reverse (p.3-27) Binding change (p.3-29) Date (p.3-32) Select stamp (p.3-35) Watermark (p.3-38) Page number (p.3-41) Tandem copy (p.3-44) 1-9
-
 1
1 -
2
-
3
-
4
-
5
-
6
-
7
-
 8
8 -
 9
9 -
 10
10 -
 11
11 -
 12
12 -
 13
13 -
 14
14 -
 15
15 -
 16
16 -
 17
17 -
 18
18 -
19
-
20
-
21
-
22
-
23
-
24
-
25
-
26
-
27
-
28
-
29
-
30
-
31
-
32
-
33
-
34
-
35
-
36
-
37
-
38
-
39
-
40
-
41
-
42
-
43
-
44
-
45
-
46
-
47
-
48
-
49
-
50
-
51
-
52
-
53
-
54
-
55
-
56
-
57
-
58
-
59
-
60
-
61
-
62
-
63
-
64
-
65
-
66
-
67
-
68
-
69
-
70
-
71
-
72
-
73
-
74
-
75
-
76
-
77
-
78
-
79
-
80
-
81
-
82
-
83
-
84
-
85
-
86
-
87
-
88
-
89
-
90
-
91
-
92
-
93
-
94
-
95
-
96
-
97
-
98
-
99
-
100
-
101
-
102
-
103
-
104
-
105
-
106
-
107
-
108
-
109
-
110
-
111
-
112
-
113
-
114
-
115
-
116
-
117
-
118
-
119
-
120
-
121
-
122
-
123
-
124
-
125
-
126
-
127
-
128
-
129
-
130
-
131
-
132
-
133
-
134
-
135
-
136
-
137
-
138
-
139
-
140
-
141
-
142
-
143
-
144
-
145
-
146
-
147
-
148
-
149
-
150
-
151
-
152
 |
 |
