Sharp AR-337 AR-287 , AR-337 , AR-407 Operation Manual - Page 22
Copying From The Document Glass
 |
View all Sharp AR-337 manuals
Add to My Manuals
Save this manual to your list of manuals |
Page 22 highlights
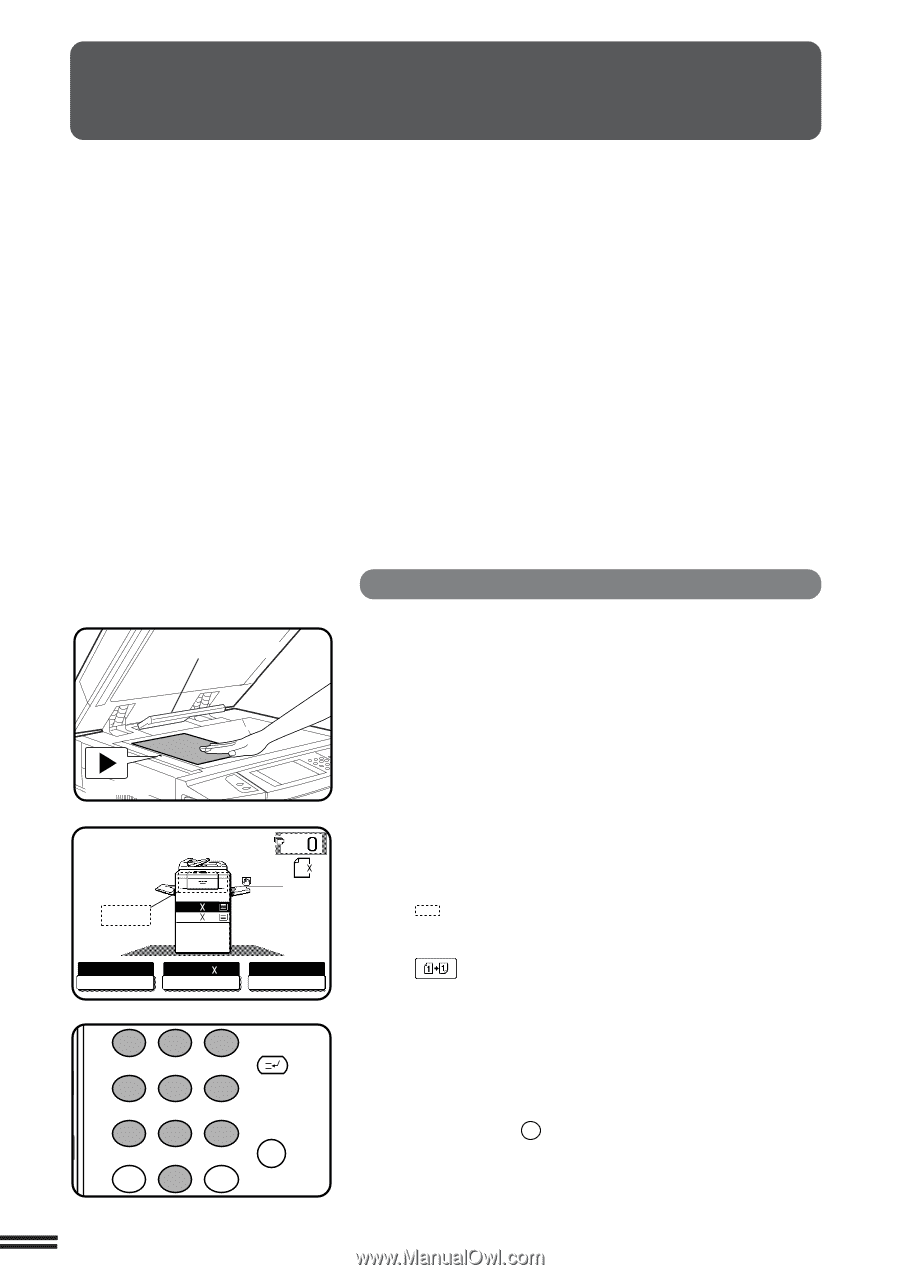
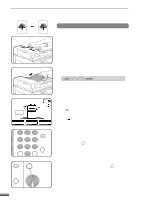
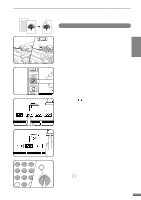
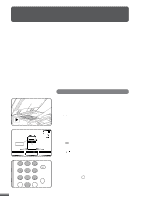
COPYING FROM THE DOCUMENT GLASS Use the document glass for copying single originals, bound documents, and other originals that cannot be set in the RADF. q Only 1-sided to 1-sided and 1-sided to 2-sided copying can be selected when copying from the document glass. q Duplex copying will not work when a non-standard sized paper or 5-1/2" x 8-1/2" paper is used. q 2-sided to 2-sided or 2-sided to 1-sided copying cannot be selected when copying from the document glass. These operations can, however, be performed simply by turning over the original manually. q If the orientation of the original does not match that of the copy paper when both the original and copy paper are of standard sizes and the auto paper select mode or automatic copy ratio select mode is on, the image of the original will be automatically rotated to match the copy paper. However, if enlargement copying onto a paper size larger than 8-1/2" x 11" is performed, the image will not be rotated. q Image void (max. 13/64" (5 mm)) can occur along the leading and trailing edges of the copies. Also image void (max. 13/64" (5 mm) in total) can occur along the other edges of the copies. 2 CHAPTER MAKING COPIES Copying from the document glass 1-sided copies of 1-sided originals Original size detector Centring scale READY TO COPY. 1.81/2 11 2.11 17 ORIGINAL 81/2 11 AUTO EXPOSURE AUTO 81/2 11 PAPER SELECT 100% COPY RATIO 1 2 3 INTERRUPT 456 78 AUDIT CLEAR 0 9 PROGRAM P CLEAR C 2-8 1 Open the document feeder cover and place an original face down on the document glass, using the centering scale to position it. q When copying multi-page documents, copy from the last page to the first page. NOTE: Do not place objects under the original size detector, because they may damage it. 2 Close the document feeder cover. q The original size will be indicated on the touch panel, and the paper tray with the corresponding paper size will be automatically selected. 3 Ensure that the 1-sided to 1-sided copying mode is selected on the touch panel. q When no icon is displayed in the area indicated in the illustration ( ), the 1-sided to 1-sided copying mode is selected. q If the 1-sided to 1-sided mode is not selected, press the 2-SIDED COPY key and then press the 1-sided to 1-sided key ( ) on the touch panel. Press the "OK" key to return to the basic screen. 4 Use the 10-key pad to enter the desired number of copies. q The number will be shown in the copy quantity display of the touch panel. q A single copy can be made with the initial setting, i.e., when "0" is displayed. q Use the CLEAR ( C ) key to cancel an entry if a mistake is made. q If you set a multiple number of copies, the copies will not be delivered collated in the default setting. To deliver in the SORT mode, press the OUTPUT key and then select the SORT mode on the touch panel. See page 2-17.
-
 1
1 -
2
-
3
-
4
-
5
-
6
-
7
-
8
-
9
-
10
-
11
-
12
-
13
-
14
-
15
-
16
-
 17
17 -
 18
18 -
 19
19 -
 20
20 -
 21
21 -
 22
22 -
 23
23 -
 24
24 -
 25
25 -
 26
26 -
 27
27 -
28
-
29
-
30
-
31
-
32
-
33
-
34
-
35
-
36
-
37
-
38
-
39
-
40
-
41
-
42
-
43
-
44
-
45
-
46
-
47
-
48
-
49
-
50
-
51
-
52
-
53
-
54
-
55
-
56
-
57
-
58
-
59
-
60
-
61
-
62
-
63
-
64
-
65
-
66
-
67
-
68
-
69
-
70
-
71
-
72
-
73
-
74
-
75
-
76
-
77
-
78
-
79
-
80
-
81
-
82
-
83
-
84
-
85
-
86
-
87
-
88
-
89
-
90
-
91
-
92
-
93
-
94
-
95
-
96
-
97
-
98
-
99
-
100
-
101
-
102
-
103
-
104
-
105
-
106
-
107
-
108
-
109
-
110
-
111
-
112
-
113
-
114
-
115
-
116
-
117
-
118
-
119
-
120
-
121
-
122
-
123
-
124
-
125
-
126
-
127
-
128
-
129
-
130
-
131
-
132
-
133
-
134
-
135
-
136
-
137
-
138
-
139
-
140
-
141
-
142
-
143
-
144
-
145
-
146
-
147
-
148
-
149
-
150
-
151
-
152
 |
 |