Sharp AR M550N AR-M550 AR-M620 AR-M700 Operation Manual - Page 140
Saving A Document Image File, Quick File
 |
View all Sharp AR M550N manuals
Add to My Manuals
Save this manual to your list of manuals |
Page 140 highlights
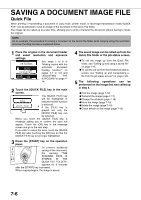
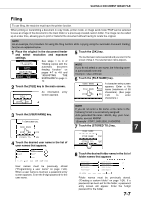
SAVING A DOCUMENT IMAGE FILE Quick File When printing or transmitting a document in copy mode, printer mode, or fax/image transmission mode,"QUICK FILE" can be selected to save an image of the document to the Quick File folder. The image can be called up at a later time, allowing you to print or transmit the document without having to locate the original. NOTE As an example, the procedure for saving a document to the Quick File folder while copying using the automatic document feeding function is explained below. 1 Place the original in the document feeder and select resolution and exposure settings. UTO See steps 1 to 8 of ORIGINAL "Making copies with the AUTO EXPOSURE automatic document feeding function" on pages 4-7 to 4-8 and AUTO A4 "ADJUSTING THE EXPOSURE"on page 4- 14. 2 Touch the [QUICK FILE] key in the main screen. The [QUICK FILE] key FILE will be highlighted to indicate that the function QUICK FILE is selected. If the [FILE] key is grayed out, only the [QUICK FILE] key can be selected. When you touch the [QUICK FILE] key, a message asking you to confirm the save will appear. Touch the [OK] key in the message screen and go to the next step. If you wish to cancel the save, touch the [QUICK FILE] key after touching the [OK] key so that the [QUICK FILE] key is no longer highlighted. 3 Press the [START] key on the operation panel. To prevent accidental saving of the document, the warning "THE SCANNED DATA IS STORED IN THE QUICK FILE FOLDER." appears for 6 seconds after the [START] key is pressed. When copying begins, the image is saved. 4 The saved image can be called up from the Quick File folder or the job status screen. GTo call the image up from the Quick File folder, see "Calling up and using a saved file" on page 7-15. GTo call the job up from the finished job status screen, see "Calling up and manipulating a file from the job status screen" on page 7-20. 5 The following operations can be performed on the image that was called up in step 4. GPrint the image (page 7-16) GTransmit the image (page 7-17) GChange the attribute (page 7-18) GMove the image (page 7-19) GDelete the image (page 7-19) GCheck details on the image (page 7-19) 7-6
-
 1
1 -
2
-
3
-
4
-
5
-
6
-
7
-
8
-
9
-
10
-
11
-
12
-
13
-
14
-
15
-
16
-
17
-
18
-
19
-
20
-
21
-
22
-
23
-
24
-
25
-
26
-
27
-
28
-
29
-
30
-
31
-
32
-
33
-
34
-
35
-
36
-
37
-
38
-
39
-
40
-
41
-
42
-
43
-
44
-
45
-
46
-
47
-
48
-
49
-
50
-
51
-
52
-
53
-
54
-
55
-
56
-
57
-
58
-
59
-
60
-
61
-
62
-
63
-
64
-
65
-
66
-
67
-
68
-
69
-
70
-
71
-
72
-
73
-
74
-
75
-
76
-
77
-
78
-
79
-
80
-
81
-
82
-
83
-
84
-
85
-
86
-
87
-
88
-
89
-
90
-
91
-
92
-
93
-
94
-
95
-
96
-
97
-
98
-
99
-
100
-
101
-
102
-
103
-
104
-
105
-
106
-
107
-
108
-
109
-
110
-
111
-
112
-
113
-
114
-
115
-
116
-
117
-
118
-
119
-
120
-
121
-
122
-
123
-
124
-
125
-
126
-
127
-
128
-
129
-
130
-
131
-
132
-
133
-
134
-
 135
135 -
 136
136 -
 137
137 -
 138
138 -
 139
139 -
 140
140 -
 141
141 -
 142
142 -
 143
143 -
 144
144 -
 145
145 -
146
-
147
-
148
-
149
-
150
-
151
-
152
-
153
-
154
-
155
-
156
-
157
-
158
-
159
-
160
-
161
-
162
-
163
-
164
-
165
-
166
-
167
-
168
-
169
-
170
-
171
-
172
 |
 |
