Sharp AR M550N AR-M550 AR-M620 AR-M700 Operation Manual - Page 84
Sided Copy, Output, Quick File, Quick File] Key.
 |
View all Sharp AR M550N manuals
Add to My Manuals
Save this manual to your list of manuals |
Page 84 highlights
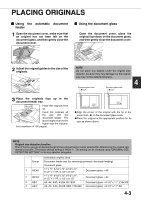
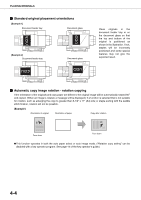
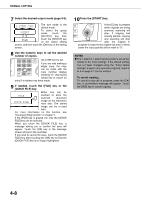
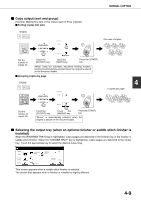
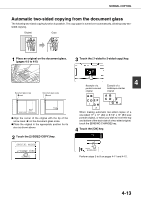
NORMAL COPYING 7 Select the desired output mode (page 4-9). 2-SIDED COPY The sort mode is the default mode. OUTPUT To select the group mode, touch the [OUTPUT] key, then FILE touch the [GROUP] key on the output setting screen, and then touch the [OK] key on the setting screen. 8 Use the numeric keys to set the desired number of copies. Up to 999 can be set. If you are only making a single copy, the copy can be made with the copy number display showing "0". Use the [C] (clear) key to cancel an entry if a mistake has been made. 9 If needed, touch the [FILE] key or the [QUICK FILE] key. Either key can be FILE touched to store the scanned document QUICK FILE image on the machine's hard disk. The stored image can be re-used later. For more information on this function, see "Document filing function" in chapter 7. If the [FILE] key is grayed out, only the [QUICK FILE] key can be selected. When you touch the [QUICK FILE] key, a message asking you to confirm the save will appear. Touch the [OK] key in the message screen and go to the next step. If you wish to cancel the save, touch the [QUICK FILE] key after touching the [OK] key so that the [QUICK FILE] key is no longer highlighted. 10Press the [START] key. If the [C] key is pressed while originals are being scanned, scanning will stop. If copying had already started, copying and scanning will stop after the original in progress is output to the original exit area. In these cases the copy quantity will be reset to "0". NOTES G The 1-sided to 1-sided copying mode is set as the default in the initial settings. If the default setting has not been changed using the "Initial status settings" program (key operator program), steps 3 to 5 on page 4-7 can be omitted. To cancel copying... To cancel a copy job in progress, press the [CA] key. A confirmation message will appear. Touch the [YES] key to cancel copying. 4-8
-
 1
1 -
2
-
3
-
4
-
5
-
6
-
7
-
8
-
9
-
10
-
11
-
12
-
13
-
14
-
15
-
16
-
17
-
18
-
19
-
20
-
21
-
22
-
23
-
24
-
25
-
26
-
27
-
28
-
29
-
30
-
31
-
32
-
33
-
34
-
35
-
36
-
37
-
38
-
39
-
40
-
41
-
42
-
43
-
44
-
45
-
46
-
47
-
48
-
49
-
50
-
51
-
52
-
53
-
54
-
55
-
56
-
57
-
58
-
59
-
60
-
61
-
62
-
63
-
64
-
65
-
66
-
67
-
68
-
69
-
70
-
71
-
72
-
73
-
74
-
75
-
76
-
77
-
78
-
 79
79 -
 80
80 -
 81
81 -
 82
82 -
 83
83 -
 84
84 -
 85
85 -
 86
86 -
 87
87 -
 88
88 -
 89
89 -
90
-
91
-
92
-
93
-
94
-
95
-
96
-
97
-
98
-
99
-
100
-
101
-
102
-
103
-
104
-
105
-
106
-
107
-
108
-
109
-
110
-
111
-
112
-
113
-
114
-
115
-
116
-
117
-
118
-
119
-
120
-
121
-
122
-
123
-
124
-
125
-
126
-
127
-
128
-
129
-
130
-
131
-
132
-
133
-
134
-
135
-
136
-
137
-
138
-
139
-
140
-
141
-
142
-
143
-
144
-
145
-
146
-
147
-
148
-
149
-
150
-
151
-
152
-
153
-
154
-
155
-
156
-
157
-
158
-
159
-
160
-
161
-
162
-
163
-
164
-
165
-
166
-
167
-
168
-
169
-
170
-
171
-
172
 |
 |