Sharp AR M550N AR-M550 AR-M620 AR-M700 Operation Manual - Page 143
Print jobs, Using a print job file (printing, deleting, transmitting, etc.)
 |
View all Sharp AR M550N manuals
Add to My Manuals
Save this manual to your list of manuals |
Page 143 highlights
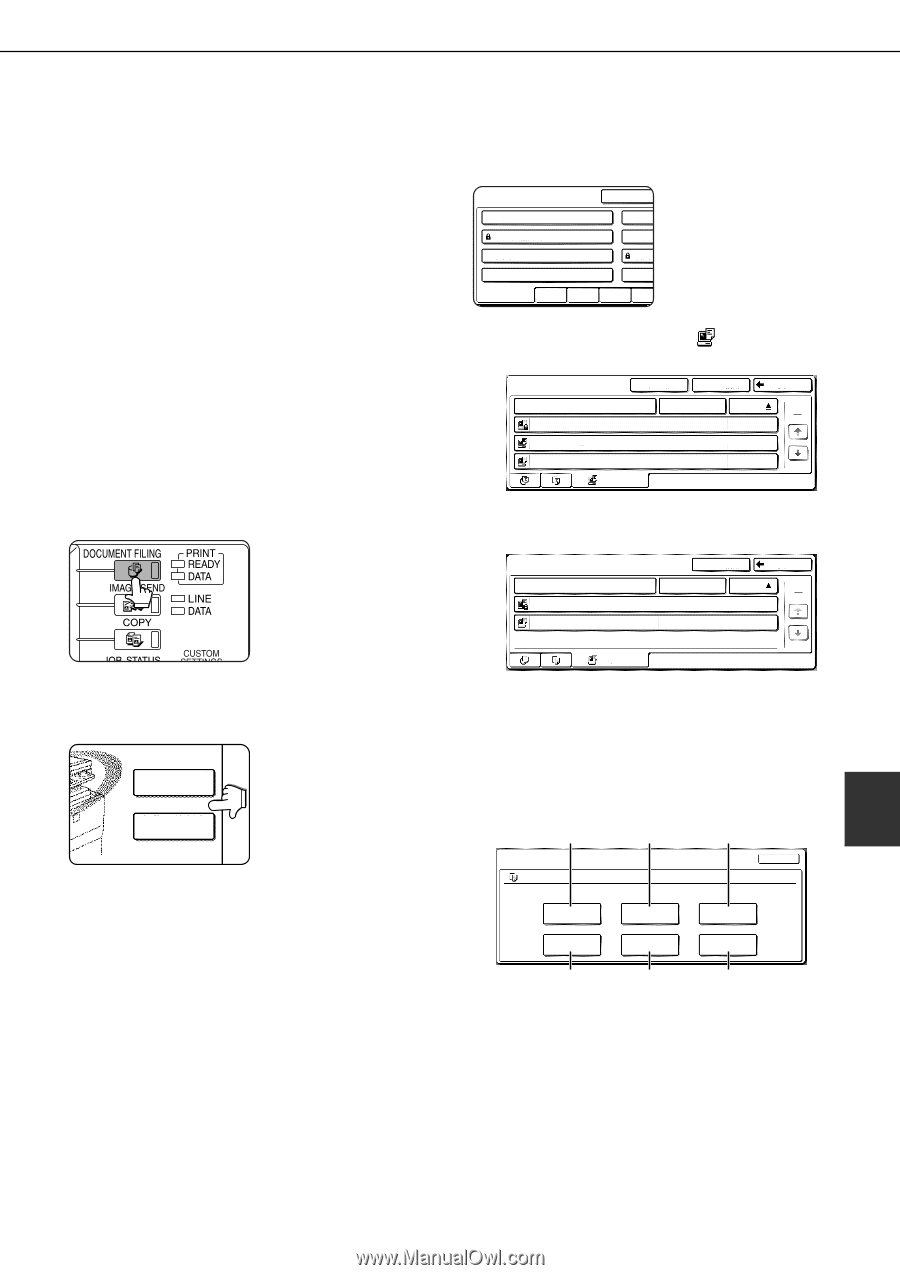
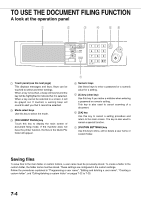
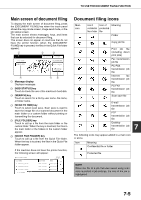
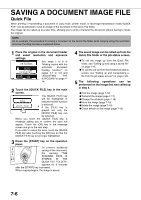
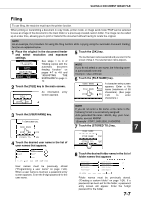
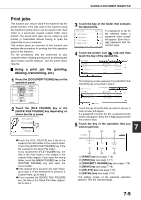
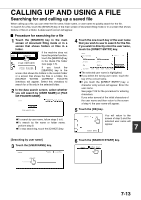
SAVING A DOCUMENT IMAGE FILE Print jobs This function can only be used if the machine has the printer function. Print jobs sent to the machine using the machine's printer driver can be saved in the main folder or a previously created custom folder when printed. The saved print data can be called up and printed or transmitted without having to open the original file on your computer. This section gives an overview of this function and explains the procedure for printing from the operation panel of the machine. For the procedures that are performed at your computer when initiating printing such as selecting the save location and file attribute, see the printer driver Help file. I Using a print job file (printing, deleting, transmitting, etc.) 1 Press the [DOCUMENT FILING] key on the operation panel. 2 Touch the [FILE FOLDER] key or the [QUICK FILE FOLDER] key depending on where the file is saved. FILE RETRIEVE FILE FOLDER QUICK FILE FOLDER GTouch the [FILE FOLDER] key if the file is saved in the main folder or the custom folder. Touch the [QUICK FILE FOLDER] key if the file is saved in the Quick File folder. If you touched the [FILE FOLDER] key, the files in the main folder or the folders in the custom folder appear. If you open the wrong folder, touch the [MAIN FOLDER] key or the [CUSTOM FOLDER] key and open the correct folder. GIf the desired file is saved in the main folder, go to step 4. If the desired file is saved in a custom folder, go to step 3. GIf you touched the [QUICK FILE FOLDER] key, the files in the Quick File folder appear. Go to step 4. 3 Touch the key of the folder that contains the desired file. CUSTOM FOLDER MAIN FOLDER If a password is set for CUSTOM FOLDER 1 CUSTO the selected folder, a CUSTOM FOLDER 3 CUSTO password entry screen CUSTOM FOLDER 5 CUSTO will appear. Enter the 5- CUSTOM FOLDER 7 CUSTO digit password with the numeric keys. ALL FOLDERS ABCD EFGHI JKLMN OPQRS 4 Touch the printer icon ( ) tab and then touch the key of the desired file. MAIN FOLDER FILE NAME Basic presentation Product CUSTOM FOLDER SEARCH BACK PRINTS USER NAME Yamada Sato Akata DATE 111/1 2003/10/01 2003/10/01 2003/10/01 The following screen appears if the [QUICK FILE FOLDER] key is touched in step 2. QUICK FILE FOLDER FILE NAME Tanaka7890123456 Suzuki7890123456 SEARCH BACK USER NAME DATE 1 1 User unknown 2003/10/01 User unknown 2003/10/01 PRINTS Touch the key of the file that you wish to call up. A menu screen will appear. If a password is set for the file, a password entry screen will appear. Enter the 5-digit password with the numeric keys. 5 7 Touch the key of the operation that you wish to perform. (1) (2) (3) JOB SETTINGS Basic specifications SELECT THE JOB. PRINT Yamada Taro 81/2"x11" CANCEL SEND PROPERTY CHANGE MOVE DELETE DETAIL (4) (5) (6) (1) [PRINT] key (see page 7-16) (2) [SEND] key (see page 7-17) (3) [PROPERTY CHANGE] key (see page 7-18) (4) [MOVE] key (see page 7-19) (5) [DELETE] key (see page 7-19) (6) [DETAIL] key (see page 7-19) The setting screen of the selected operation appears. See the indicated page. 7-9
-
 1
1 -
2
-
3
-
4
-
5
-
6
-
7
-
8
-
9
-
10
-
11
-
12
-
13
-
14
-
15
-
16
-
17
-
18
-
19
-
20
-
21
-
22
-
23
-
24
-
25
-
26
-
27
-
28
-
29
-
30
-
31
-
32
-
33
-
34
-
35
-
36
-
37
-
38
-
39
-
40
-
41
-
42
-
43
-
44
-
45
-
46
-
47
-
48
-
49
-
50
-
51
-
52
-
53
-
54
-
55
-
56
-
57
-
58
-
59
-
60
-
61
-
62
-
63
-
64
-
65
-
66
-
67
-
68
-
69
-
70
-
71
-
72
-
73
-
74
-
75
-
76
-
77
-
78
-
79
-
80
-
81
-
82
-
83
-
84
-
85
-
86
-
87
-
88
-
89
-
90
-
91
-
92
-
93
-
94
-
95
-
96
-
97
-
98
-
99
-
100
-
101
-
102
-
103
-
104
-
105
-
106
-
107
-
108
-
109
-
110
-
111
-
112
-
113
-
114
-
115
-
116
-
117
-
118
-
119
-
120
-
121
-
122
-
123
-
124
-
125
-
126
-
127
-
128
-
129
-
130
-
131
-
132
-
133
-
134
-
135
-
136
-
137
-
 138
138 -
 139
139 -
 140
140 -
 141
141 -
 142
142 -
 143
143 -
 144
144 -
 145
145 -
 146
146 -
 147
147 -
 148
148 -
149
-
150
-
151
-
152
-
153
-
154
-
155
-
156
-
157
-
158
-
159
-
160
-
161
-
162
-
163
-
164
-
165
-
166
-
167
-
168
-
169
-
170
-
171
-
172
 |
 |