Sharp MX-B201D MX-B201D Operation Guide - Page 17
Changing A Tray's Paper Size Setting, Until Paper Size
 |
View all Sharp MX-B201D manuals
Add to My Manuals
Save this manual to your list of manuals |
Page 17 highlights
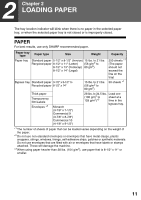
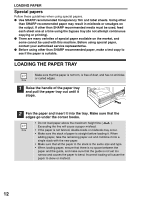
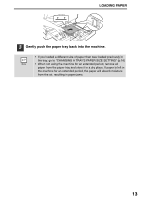
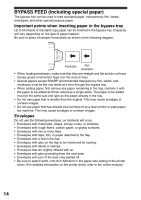
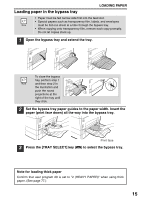
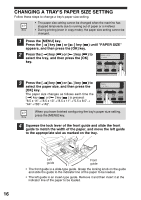
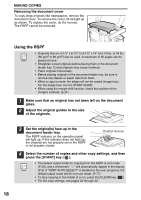
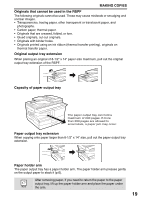
CHANGING A TRAY'S PAPER SIZE SETTING Follow these steps to change a tray's paper size setting. • The paper size setting cannot be changed when the machine has stopped temporarily due to running out of paper or a misfeed. • During printing (even in copy mode), the paper size setting cannot be changed. 1 Press the [MENU] key. Press the [ ] key ( ) or [ ] key ( ) until "PAPER SIZE" appears, and then press the [OK] key. 2 Press the [ ] key ( ) or [ ] key ( ) to select the tray, and then press the [OK] key. PAPER SIZE 1:TRAY1 3 Press the [ ] key ( ) or [ ] key ( ) to select the paper size, and then press the [OK] key. The paper size changes as follows each time the [ ] key ( ) or [ ] key ( ) is pressed: "8.5 x 14"→"8.5 x 13"→"8.5 x 11"→"5.5 x 8.5"→ "A4"→"B5"→"A5". TRAY1 1:8.5x11 When you have finished configuring the tray's paper size setting, press the [MENU] key. 4 Squeeze the lock lever of the front guide and slide the front guide to match the width of the paper, and move the left guide to the appropriate slot as marked on the tray. Left guide Front guide • The front guide is a slide-type guide. Grasp the locking knob on the guide and slide the guide to the indicator line of the paper to be loaded. • The left guide is an insert-type guide. Remove it and then insert it at the indicator line of the paper to be loaded. 5 16
-
 1
1 -
2
-
3
-
4
-
5
-
6
-
7
-
8
-
9
-
10
-
11
-
 12
12 -
 13
13 -
 14
14 -
 15
15 -
 16
16 -
 17
17 -
 18
18 -
 19
19 -
 20
20 -
 21
21 -
 22
22 -
23
-
24
-
25
-
26
-
27
-
28
-
29
-
30
-
31
-
32
-
33
-
34
-
35
-
36
-
37
-
38
-
39
-
40
-
41
-
42
-
43
-
44
-
45
-
46
-
47
-
48
-
49
-
50
-
51
-
52
-
53
-
54
-
55
-
56
-
57
-
58
-
59
-
60
-
61
-
62
-
63
-
64
-
65
-
66
-
67
-
68
-
69
-
70
-
71
-
72
-
73
-
74
-
75
-
76
-
77
-
78
-
79
-
80
-
81
-
82
-
83
-
84
-
85
-
86
-
87
-
88
-
89
-
90
-
91
-
92
-
93
-
94
-
95
-
96
-
97
-
98
-
99
-
100
-
101
-
102
-
103
-
104
-
105
-
106
-
107
-
108
-
109
-
110
-
111
-
112
-
113
-
114
-
115
 |
 |
