Sharp MX-B201D MX-B201D Operation Guide - Page 40
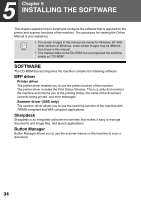
Connecting a USB cable, connector on the machine. - printer driver
 |
View all Sharp MX-B201D manuals
Add to My Manuals
Save this manual to your list of manuals |
Page 40 highlights
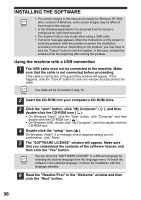
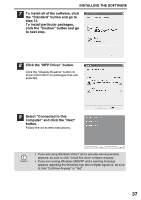
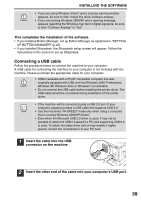
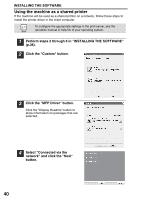
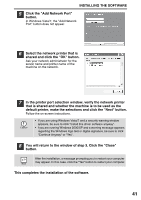
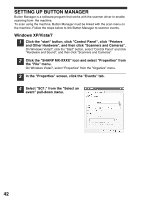
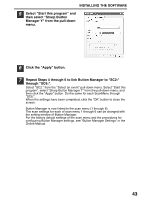
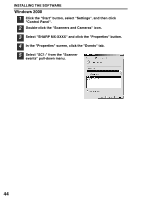
INSTALLING THE SOFTWARE • If you are using Windows Vista/7 and a security warning window appears, be sure to click "Install this driver software anyway". • If you are running Windows 2000/XP and a warning message appears regarding the Windows logo test or digital signature, be sure to click "Continue Anyway" or "Yes". This completes the installation of the software. • If you installed Button Manager, set up Button Manager as explained in "SETTING UP BUTTON MANAGER" (p.42). • If you installed Sharpdesk, the Sharpdesk setup screen will appear. Follow the instructions in the screen to set up Sharpdesk. Connecting a USB cable Follow the procedure below to connect the machine to your computer. A USB cable for connecting the machine to your computer is not included with the machine. Please purchase the appropriate cable for your computer. • USB is available with a PC/AT compatible computer that was originally equipped with USB and had Windows 2000 Professional, Windows XP, Windows Vista or Windows 7 preinstalled. • Do not connect the USB cable before installing the printer driver. The USB cable should be connected during installation of the printer driver. • If the machine will be connected using a USB 2.0 port of your computer, please purchase a USB cable that supports USB 2.0. • Use the machine's "HI-SPEED" mode only when using a computer that is running Windows 2000/XP/Vista/7. • Even when the Microsoft USB 2.0 driver is used, it may not be possible to obtain full USB 2.0 speed if a PC card supporting USB 2.0 is used. To obtain the latest driver (which may enable a higher speed), contact the manufacturer of your PC card. 1 Insert the cable into the USB connector on the machine. 2 Insert the other end of the cable into your computer's USB port. 39
-
 1
1 -
2
-
3
-
4
-
5
-
6
-
7
-
8
-
9
-
10
-
11
-
12
-
13
-
14
-
15
-
16
-
17
-
18
-
19
-
20
-
21
-
22
-
23
-
24
-
25
-
26
-
27
-
28
-
29
-
30
-
31
-
32
-
33
-
34
-
 35
35 -
 36
36 -
 37
37 -
 38
38 -
 39
39 -
 40
40 -
 41
41 -
 42
42 -
 43
43 -
 44
44 -
 45
45 -
46
-
47
-
48
-
49
-
50
-
51
-
52
-
53
-
54
-
55
-
56
-
57
-
58
-
59
-
60
-
61
-
62
-
63
-
64
-
65
-
66
-
67
-
68
-
69
-
70
-
71
-
72
-
73
-
74
-
75
-
76
-
77
-
78
-
79
-
80
-
81
-
82
-
83
-
84
-
85
-
86
-
87
-
88
-
89
-
90
-
91
-
92
-
93
-
94
-
95
-
96
-
97
-
98
-
99
-
100
-
101
-
102
-
103
-
104
-
105
-
106
-
107
-
108
-
109
-
110
-
111
-
112
-
113
-
114
-
115
 |
 |