Sharp MX-B201D MX-B201D Operation Guide - Page 48
BASIC PRINTING, Select Print from the application's File - tray setup
 |
View all Sharp MX-B201D manuals
Add to My Manuals
Save this manual to your list of manuals |
Page 48 highlights
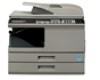
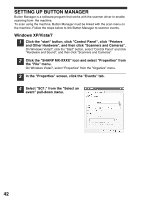
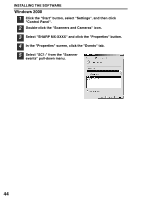
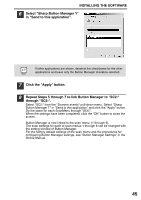
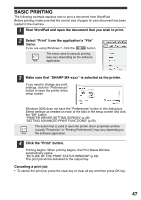
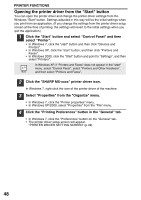
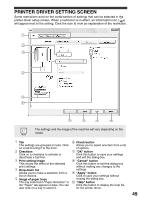
BASIC PRINTING The following example explains how to print a document from WordPad. Before printing, make sure that the correct size of paper for your document has been loaded in the machine. 1 Start WordPad and open the document that you wish to print. 2 Select "Print" from the application's "File" menu. If you are using Windows 7, click the button. The menu used to execute printing may vary depending on the software application. 3 Make sure that "SHARP MX-xxxx" is selected as the printer. If you need to change any print settings, click the "Preferences" button to open the printer driver setup screen. MX Windows 2000 does not have the "Preferences" button in this dialog box. Select settings as needed on each of the tabs in the setup screen and click the "OK" button. "PRINTER DRIVER SETTING SCREEN" (p.49) "SETTING ADVANCED PRINT FUNCTIONS" (p.50) The button that is used to open the printer driver properties window (usually "Properties" or "Printing Preferences") may vary depending on the software application. 4 Click the "Print" button. Printing begins. When printing begins, the Print Status Window automatically opens. "OUTLINE OF THE PRINT STATUS WINDOW" (p.59) The print job will be delivered to the output tray. Canceling a print job • To cancel the print job, press the clear key or clear all key and then press OK key. 47
-
 1
1 -
2
-
3
-
4
-
5
-
6
-
7
-
8
-
9
-
10
-
11
-
12
-
13
-
14
-
15
-
16
-
17
-
18
-
19
-
20
-
21
-
22
-
23
-
24
-
25
-
26
-
27
-
28
-
29
-
30
-
31
-
32
-
33
-
34
-
35
-
36
-
37
-
38
-
39
-
40
-
41
-
42
-
 43
43 -
 44
44 -
 45
45 -
 46
46 -
 47
47 -
 48
48 -
 49
49 -
 50
50 -
 51
51 -
 52
52 -
 53
53 -
54
-
55
-
56
-
57
-
58
-
59
-
60
-
61
-
62
-
63
-
64
-
65
-
66
-
67
-
68
-
69
-
70
-
71
-
72
-
73
-
74
-
75
-
76
-
77
-
78
-
79
-
80
-
81
-
82
-
83
-
84
-
85
-
86
-
87
-
88
-
89
-
90
-
91
-
92
-
93
-
94
-
95
-
96
-
97
-
98
-
99
-
100
-
101
-
102
-
103
-
104
-
105
-
106
-
107
-
108
-
109
-
110
-
111
-
112
-
113
-
114
-
115
 |
 |