Sharp MX-B201D MX-B201D Operation Guide - Page 73
Scanning from the Scanner and Camera Wizard, Windows XP, Panel, click Printers and Other
 |
View all Sharp MX-B201D manuals
Add to My Manuals
Save this manual to your list of manuals |
Page 73 highlights
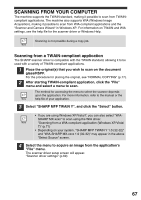
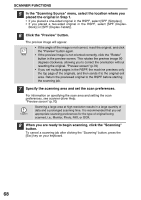
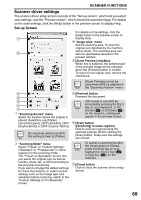
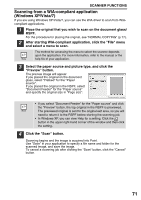
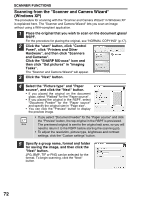
SCANNER FUNCTIONS Scanning from the "Scanner and Camera Wizard" (Windows XP) The procedure for scanning with the "Scanner and Camera Wizard" in Windows XP is explained here. The "Scanner and Camera Wizard" lets you scan an image without using a WIA-compliant application. 1 Place the original that you wish to scan on the document glass/ RSPF. For the procedure for placing the original, see "NORMAL COPYING" (p.17). 2 Click the "start" button, click "Control Panel", click "Printers and Other Hardware", and then click "Scanners and Cameras". Click the "SHARP MX-xxxx" icon and then click "Get pictures" in "Imaging Tasks". The "Scanner and Camera Wizard" will appear. 3 Click the "Next" button. 4 Select the "Picture type" and "Paper source", and click the "Next" button. • If you placed the original on the document glass, select "Flatbed" for the "Paper source". • If you placed the original in the RSPF, select "Document Feeder" for the "Paper source" and specify the original size in "Page size". • You can click the "Preview" button to display the preview image. • If you select "Document Feeder" for the "Paper source" and click the "Preview" button, the top original in the RSPF is previewed. The previewed original is sent to the original exit area, so you will need to return it to the RSPF before starting the scanning job. • To adjust the resolution, picture type, brightness and contrast settings, click the "Custom settings" button. 5 Specify a group name, format and folder for saving the image, and then click the "Next" button. JPG, BMP, TIF or PNG can be selected for the format. To begin scanning, click the "Next" button. 72
-
 1
1 -
2
-
3
-
4
-
5
-
6
-
7
-
8
-
9
-
10
-
11
-
12
-
13
-
14
-
15
-
16
-
17
-
18
-
19
-
20
-
21
-
22
-
23
-
24
-
25
-
26
-
27
-
28
-
29
-
30
-
31
-
32
-
33
-
34
-
35
-
36
-
37
-
38
-
39
-
40
-
41
-
42
-
43
-
44
-
45
-
46
-
47
-
48
-
49
-
50
-
51
-
52
-
53
-
54
-
55
-
56
-
57
-
58
-
59
-
60
-
61
-
62
-
63
-
64
-
65
-
66
-
67
-
 68
68 -
 69
69 -
 70
70 -
 71
71 -
 72
72 -
 73
73 -
 74
74 -
 75
75 -
 76
76 -
 77
77 -
 78
78 -
79
-
80
-
81
-
82
-
83
-
84
-
85
-
86
-
87
-
88
-
89
-
90
-
91
-
92
-
93
-
94
-
95
-
96
-
97
-
98
-
99
-
100
-
101
-
102
-
103
-
104
-
105
-
106
-
107
-
108
-
109
-
110
-
111
-
112
-
113
-
114
-
115
 |
 |
