Singer Quantum Stylist 9985 Instruction Manual - Page 68
Buttonhole Sewing
 |
View all Singer Quantum Stylist 9985 manuals
Add to My Manuals
Save this manual to your list of manuals |
Page 68 highlights
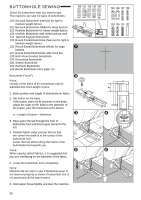
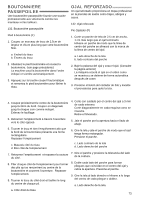
BUTTONHOLE SEWING Select the buttonhole style you want to sew. This machine can sew 13 types of buttonholes. 120. Bar-tack Buttonhole (Narrow) for light to medium weight fabrics 121. Bar-tack Buttonhole (Wide) for large buttons 122. Keyhole Buttonhole for heavy weight fabrics 123. Keyhole Buttonhole with reinforced bar tack 124. Tapered Keyhole Buttonhole 125. Round Ended Buttonhole (Narrow) for light to medium weight fabrics 126. Round Ended Buttonhole (Wide) for large buttons 127. Round Ended Buttonhole with cross bar 128. Both Round Ended Buttonhole 129. Decorative Buttonhole 130. Stretch Buttonhole 131. Heirloom Buttonhole 132. Bound Buttonhole (See page 72) Buttonhole Foot (F) Note: Density of the sides of the buttonhole may be adjusted with stitch length control. 1. Mark position and length of buttonhole on fabric. 2. Set button on the base. If the button does not fit securely on the base, adjust the slide on the base to the diameter of the button, plus the thickness of the button. a = Length of button + thickness 3. Pass upper thread through the hole of buttonhole foot and bring upper thread to the left. 4. Position fabric under presser foot so that the center line mark is in the center of the buttonhole foot. Lower the foot while pulling the frame of the buttonhole foot towards you. Note: When sewing stretch fabrics, it is suggested that you use interfacing on the backside of the fabric. 5. Lower the buttonhole lever completely. Note: Machine will not start to sew if buttonhole lever is not lowered properly or frame of buttonhole foot is not positioned all the way forward. 6. Hold upper thread lightly and start the machine. 68
-
 1
1 -
2
-
3
-
4
-
5
-
6
-
7
-
8
-
9
-
10
-
11
-
12
-
13
-
14
-
15
-
16
-
17
-
18
-
19
-
20
-
21
-
22
-
23
-
24
-
25
-
26
-
27
-
28
-
29
-
30
-
31
-
32
-
33
-
34
-
35
-
36
-
37
-
38
-
39
-
40
-
41
-
42
-
43
-
44
-
45
-
46
-
47
-
48
-
49
-
50
-
51
-
52
-
53
-
54
-
55
-
56
-
57
-
58
-
59
-
60
-
61
-
62
-
 63
63 -
 64
64 -
 65
65 -
 66
66 -
 67
67 -
 68
68 -
 69
69 -
 70
70 -
 71
71 -
 72
72 -
 73
73 -
74
-
75
-
76
-
77
-
78
-
79
-
80
-
81
-
82
-
83
-
84
-
85
-
86
-
87
-
88
-
89
-
90
-
91
-
92
-
93
-
94
-
95
-
96
-
97
-
98
-
99
-
100
-
101
-
102
-
103
-
104
-
105
-
106
-
107
-
108
 |
 |
