Singer Quantum Stylist 9985 Instruction Manual - Page 94
G. SETTING THE THREAD TENSION, H. SAVING SELECTED PATTERNS, a. To memorize, b. To call memorized
 |
View all Singer Quantum Stylist 9985 manuals
Add to My Manuals
Save this manual to your list of manuals |
Page 94 highlights
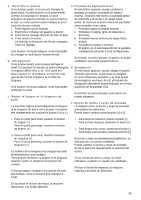
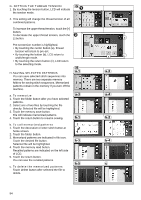
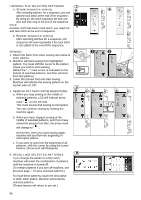
G. SETTING THE THREAD TENSION 1. By touching the tension button, LCD will indicate the tension mode. 2. This setting will change the thread tension of all combined patterns. To increase the upper thread tension, touch the [+] button. To decrease the upper thread tension, touch the [-] button. Pre-set tension number is highlighted. • By touching the center button (a), thread tension will return to pre-set. • By touching the button (b), LCD return to width/length mode. • By touching the return button (c), LCD return to the selecting mode. H a-1 H. SAVING SELECTED PATTERNS You can save selected stitch sequences into memory. There are two separate memory folders for saving stitch sequences. Memorized patterns remain in the memory if you turn off the machine. a. To memorize a-3 1. Touch the folder button after you have selected patterns. 2. Select one of two files by touching the file directly. Selected file will be highlighted. 3. Touch the memory save button. File will indicate memorized patterns. 4. Touch the return button to resume sewing. b-1 b. To call memorized patterns 1. Touch the decorative or letter stitch button at home screen. 2. Touch the folder button. 3. Memorized patterns are indicated in file icon. Touch the desired file button. b-3 Selected file will be highlighted. 4. Touch the memory read button. Recalled patterns are indicated on the left side of LCD. 5. Touch the return button. You can sew the recalled patterns b-5 c. To delete the memorized patterns Touch delete button after selected the file to delete. 94 b a c a-2 a-4 b-2 b-4 c
-
 1
1 -
2
-
3
-
4
-
5
-
6
-
7
-
8
-
9
-
10
-
11
-
12
-
13
-
14
-
15
-
16
-
17
-
18
-
19
-
20
-
21
-
22
-
23
-
24
-
25
-
26
-
27
-
28
-
29
-
30
-
31
-
32
-
33
-
34
-
35
-
36
-
37
-
38
-
39
-
40
-
41
-
42
-
43
-
44
-
45
-
46
-
47
-
48
-
49
-
50
-
51
-
52
-
53
-
54
-
55
-
56
-
57
-
58
-
59
-
60
-
61
-
62
-
63
-
64
-
65
-
66
-
67
-
68
-
69
-
70
-
71
-
72
-
73
-
74
-
75
-
76
-
77
-
78
-
79
-
80
-
81
-
82
-
83
-
84
-
85
-
86
-
87
-
88
-
 89
89 -
 90
90 -
 91
91 -
 92
92 -
 93
93 -
 94
94 -
 95
95 -
 96
96 -
 97
97 -
 98
98 -
 99
99 -
100
-
101
-
102
-
103
-
104
-
105
-
106
-
107
-
108
 |
 |
