Sony DSC-P92 Operating Instructions (primary manual) - Page 10
Getting started, Preparing batteries, Charging the batteries, Insert Nickel-Metal Hydride - trouble shooting
 |
View all Sony DSC-P92 manuals
Add to My Manuals
Save this manual to your list of manuals |
Page 10 highlights
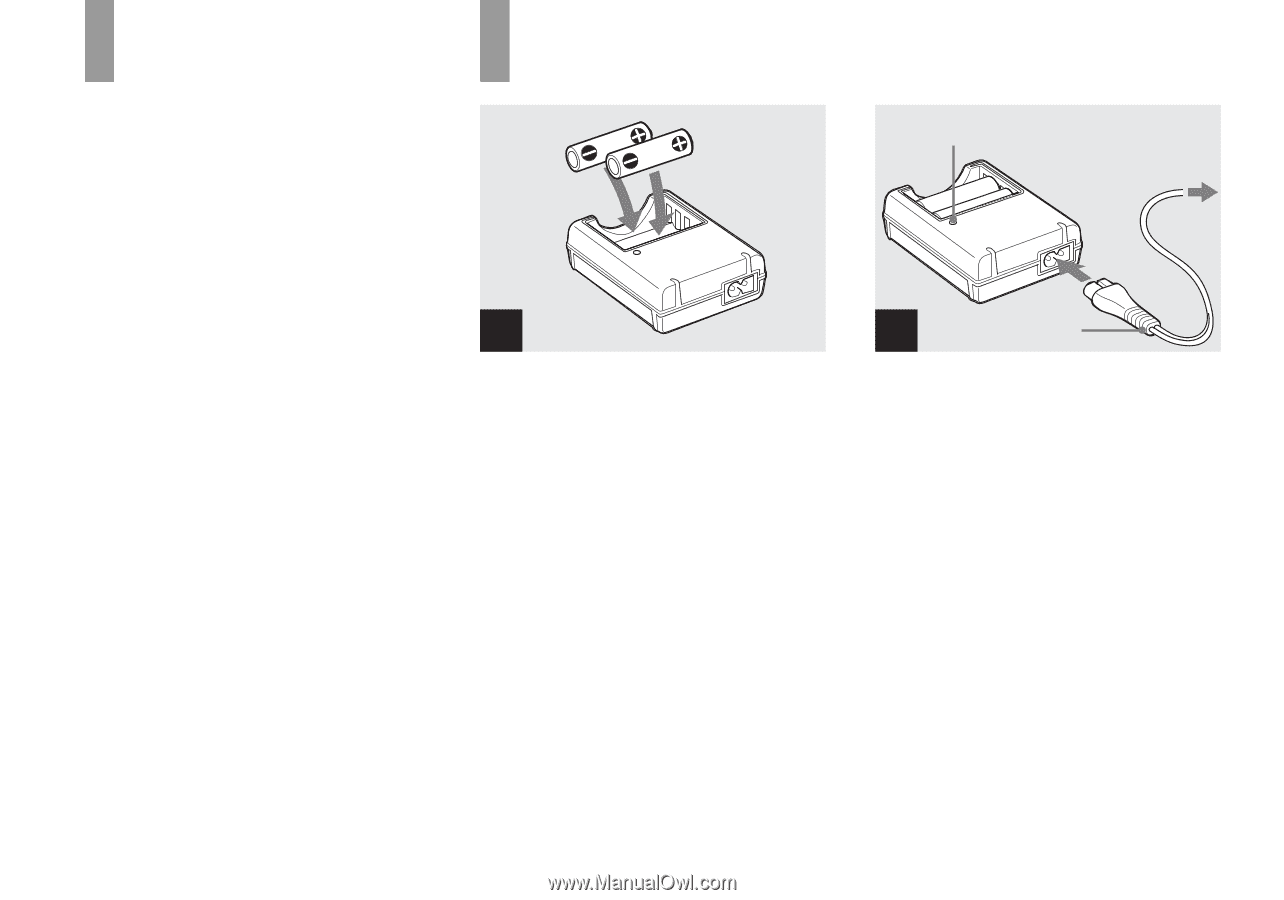
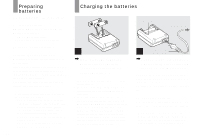
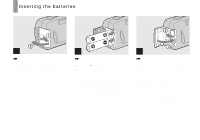
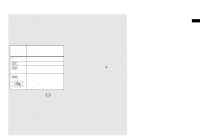
Preparing batteries Use the following batteries in this camera. Acceptable batteries HR 15/51:HR6 (size AA) Nickel-Metal Hydride batteries (2) - NH-AA-DA (2) (supplied) - NH-AA-2DA twin-pack (not supplied) R6 (size AA) alkaline batteries (2) Batteries that cannot be used Manganese batteries, lithium batteries, nicad batteries If you use the batteries described above, we cannot guarantee full performance of the camera by property of the batteries, such as brownout of the batteries. The battery remaining indicator does not display the correct information. • When alkaline batteries are used, take note of the following information. - There is a big difference in the performance of batteries of different types and of batteries made by different manufacturers. This is especially true in low temperatures, where some batteries are noticeably weaker. You may not be able to shoot in temperatures below 5°C (41°F). - The battery remaining indicator may not display the correct information. 10 Charging the batteries Getting started CHARGE lamp to a wall outlet (wall socket) 1 , Insert Nickel-Metal Hydride batteries into the battery charger (supplied) with the correct polarity +/-. • You cannot charge alkaline batteries using the battery charger. • Be sure to charge the Nickel-Metal Hydride batteries supplied with your camera before using them. • Connect the battery charger to an easily accessible wall outlet (wall socket) close by. • Even if the CHARGE lamp is not lit, the set is not disconnected from the AC power source (mains) as long as it is connected to the wall outlet (wall socket). If some trouble occurs while using the battery charger, immediately shut off the power by disconnecting the plug from the wall outlet (wall socket). 2 Power cord (mains lead) , Connect the battery charger to a wall outlet (wall socket) using the power cord (mains lead). Charging starts, and the CHARGE lamp lights. When the CHARGE lamp goes out, charging is finished. For details on the battery charger, see page 107. To remove the batteries Press the - end of the battery down in order to raise the + end, then remove the battery. • When charging is finished, disconnect the power cord (mains lead) from the wall outlet (wall socket), and remove the Nickel-Metal Hydride batteries from the battery charger.
-
 1
1 -
2
-
3
-
4
-
 5
5 -
 6
6 -
 7
7 -
 8
8 -
 9
9 -
 10
10 -
 11
11 -
 12
12 -
 13
13 -
 14
14 -
 15
15 -
16
-
17
-
18
-
19
-
20
-
21
-
22
-
23
-
24
-
25
-
26
-
27
-
28
-
29
-
30
-
31
-
32
-
33
-
34
-
35
-
36
-
37
-
38
-
39
-
40
-
41
-
42
-
43
-
44
-
45
-
46
-
47
-
48
-
49
-
50
-
51
-
52
-
53
-
54
-
55
-
56
-
57
-
58
-
59
-
60
-
61
-
62
-
63
-
64
-
65
-
66
-
67
-
68
-
69
-
70
-
71
-
72
-
73
-
74
-
75
-
76
-
77
-
78
-
79
-
80
-
81
-
82
-
83
-
84
-
85
-
86
-
87
-
88
-
89
-
90
-
91
-
92
-
93
-
94
-
95
-
96
-
97
-
98
-
99
-
100
-
101
-
102
-
103
-
104
-
105
-
106
-
107
-
108
-
109
-
110
-
111
-
112
-
113
-
114
-
115
-
116
 |
 |