Sony DSC-P92 Operating Instructions (primary manual) - Page 22
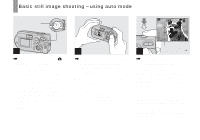
Basic still image shooting – using auto mode, focus frame. - turn on flash
 |
View all Sony DSC-P92 manuals
Add to My Manuals
Save this manual to your list of manuals |
Page 22 highlights
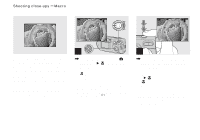
Basic still image shooting - using auto mode Mode selector VGA FINE 101 98 F2.8 30 1 , Set the mode selector to , and turn on the camera. The recording folder name is indicated on the LCD screen for about five seconds. • The lens cover opens when the power is turned on. • Do not touch the lens portion while it is operating, such as when you press POWER to turn on the power or when the zoom function is working (page 25). • You can create a new folder in the "Memory Stick" and select the folder for storing images (page 42). 2 , Hold the camera steadily with both hands and position a subject in the center of the focus frame. Do not cover the lens, flash, or microphone with your fingers. • The minimum focal distance to a subject is 50 cm (19 3/4 inches) (W)/60 cm (23 5/8 inches) (T). To shoot subjects at distances closer than this, use the macro mode (page 26). AE/AF lock indicator 3 Flashes in green t Remains on , Press and hold the shutter button halfway down. The camera beeps. When the AE/AF lock indicator stops flashing and remains on, the camera is ready for shooting. (The screen may be frozen for a split second depending on the subject.) • If you release your finger from the shutter button, shooting will be canceled. • When the camera does not beep, the AF adjustment is not complete. You can continue to shoot, but the focus is not set properly. • The frame indicated on the LCD screen shows the focus adjustment range. (AF range finder, see page 44.) 22
-
 1
1 -
2
-
3
-
4
-
5
-
6
-
7
-
8
-
9
-
10
-
11
-
12
-
13
-
14
-
15
-
16
-
 17
17 -
 18
18 -
 19
19 -
 20
20 -
 21
21 -
 22
22 -
 23
23 -
 24
24 -
 25
25 -
 26
26 -
 27
27 -
28
-
29
-
30
-
31
-
32
-
33
-
34
-
35
-
36
-
37
-
38
-
39
-
40
-
41
-
42
-
43
-
44
-
45
-
46
-
47
-
48
-
49
-
50
-
51
-
52
-
53
-
54
-
55
-
56
-
57
-
58
-
59
-
60
-
61
-
62
-
63
-
64
-
65
-
66
-
67
-
68
-
69
-
70
-
71
-
72
-
73
-
74
-
75
-
76
-
77
-
78
-
79
-
80
-
81
-
82
-
83
-
84
-
85
-
86
-
87
-
88
-
89
-
90
-
91
-
92
-
93
-
94
-
95
-
96
-
97
-
98
-
99
-
100
-
101
-
102
-
103
-
104
-
105
-
106
-
107
-
108
-
109
-
110
-
111
-
112
-
113
-
114
-
115
-
116
 |
 |
