Sony DSC-P92 Operating Instructions (primary manual) - Page 17
Setting the date and time, Set the mode selector to, Press POWER to turn on the, camera.
 |
View all Sony DSC-P92 manuals
Add to My Manuals
Save this manual to your list of manuals |
Page 17 highlights
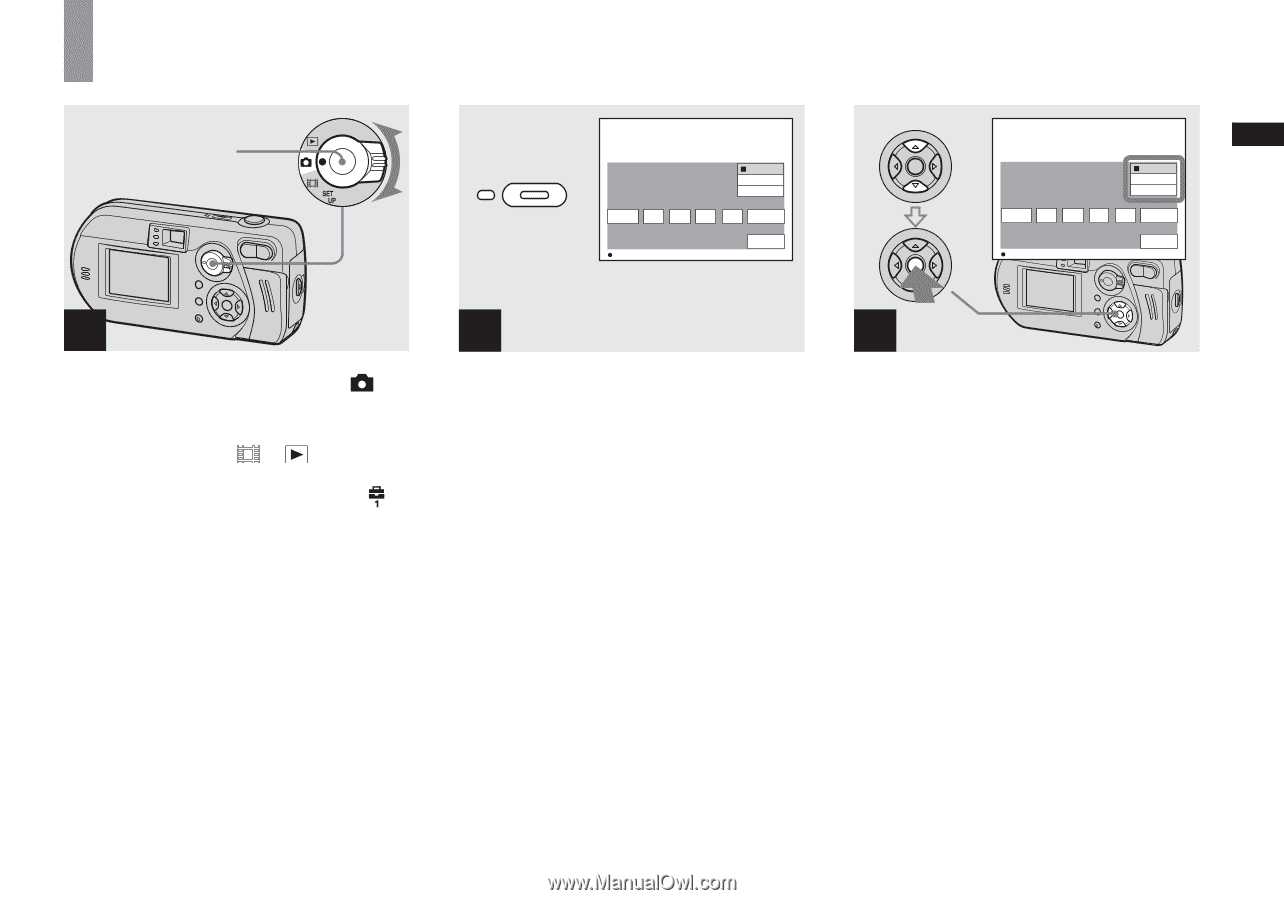
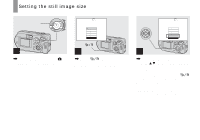
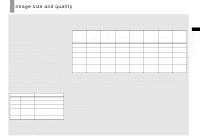
Getting started Setting the date and time Mode selector POWER Clock Set Y/M/D M/D/Y D/M/Y 2003 / OK 1/ 1 12 : 00 OK AM Cancel 1 , Set the mode selector to . • You can carry out this operation even when the mode selector is set to or . • To set the time and the date again, set the mode selector to SET UP, select [Clock Set] in (Setup 1) (pages 41, 103), then proceed from Step 3. 2 , Press POWER to turn on the camera. The POWER lamp lights in green and the Clock Set screen appears on the LCD screen. Clock Set Y/M/D M/D/Y D/M/Y 2003 / OK 1/ 1 12 : 00 OK AM Cancel 3 , Select the desired date format with v/V on the control button, then press z. You can select from [Y/M/D] (year/month/ day), [M/D/Y], and [D/M/Y]. • If the rechargeable button battery, which provides the power for saving the time data, ever loses its charge (page 105), the Clock Set screen automatically reappears. If this happens, start from Step 3 to set up the date and time again. 17
-
 1
1 -
2
-
3
-
4
-
5
-
6
-
7
-
8
-
9
-
10
-
11
-
 12
12 -
 13
13 -
 14
14 -
 15
15 -
 16
16 -
 17
17 -
 18
18 -
 19
19 -
 20
20 -
 21
21 -
 22
22 -
23
-
24
-
25
-
26
-
27
-
28
-
29
-
30
-
31
-
32
-
33
-
34
-
35
-
36
-
37
-
38
-
39
-
40
-
41
-
42
-
43
-
44
-
45
-
46
-
47
-
48
-
49
-
50
-
51
-
52
-
53
-
54
-
55
-
56
-
57
-
58
-
59
-
60
-
61
-
62
-
63
-
64
-
65
-
66
-
67
-
68
-
69
-
70
-
71
-
72
-
73
-
74
-
75
-
76
-
77
-
78
-
79
-
80
-
81
-
82
-
83
-
84
-
85
-
86
-
87
-
88
-
89
-
90
-
91
-
92
-
93
-
94
-
95
-
96
-
97
-
98
-
99
-
100
-
101
-
102
-
103
-
104
-
105
-
106
-
107
-
108
-
109
-
110
-
111
-
112
-
113
-
114
-
115
-
116
 |
 |